I recently heard a story that captures one of the biggest misunderstandings about AI today.
A colleague was speaking with a mentor about artificial intelligence. The mentor said something like:
“You’re not really an AI maker. You’re just a user, because you build agents instead of training foundation models.”
That statement misses what has always driven innovation.
It’s a bit like saying Picasso wasn’t a painter because he didn’t manufacture his own paint. No one would seriously make that argument.
Painters don’t mine minerals, mix pigments, stretch their own canvas, or build their own brushes. They use the best tools available to create something new. We judge the artist by what they create, not by whether they manufactured every tool in the process.
The same is true for architects.
No one looks at a skyscraper and says, “The architect didn’t really build this. They didn’t smelt the steel, fire the bricks, manufacture the glass, or pour the concrete.”
Of course they didn’t.
An architect’s value isn’t in creating raw materials. It’s in understanding the client’s needs, balancing thousands of tradeoffs, coordinating experts, and bringing together countless components into something that has never existed before.
Without the architect, the steel is just steel. The concrete is just concrete. The glass is just glass.
The design is what turns materials into a building.
AI works the same way
Foundation model companies are creating incredible materials. They are building the engines that power modern AI, and that work deserves enormous respect.
But an engine isn’t a business solution.
Someone still has to understand the problem, design the process, connect enterprise systems, define the rules, manage security, handle exceptions, and create an experience that people can actually use.
That’s where AI builders come in.
Creating AI agents isn’t simply writing prompts. It’s designing systems.
An effective AI solution may include multiple agents with different responsibilities, access to business applications, memory, planning, approval workflows, governance, monitoring, and human oversight. Each piece must work together toward a common goal.
That is architecture.
Software has always worked this way
Developers don’t build their own processors. They don’t write operating systems from scratch. They don’t create every programming language or every library they use.
They assemble proven components into solutions that create value.
No one calls them “just users.”
Why should AI be any different?
In fact, many AI builders face a challenge similar to architects. The technology is often the easy part. The hard part is understanding people, business processes, regulations, risk, and change management. Success depends on making hundreds of good design decisions that never appear in a benchmark.
Training a better model is an incredible achievement.
Building an AI system that changes how a hospital treats patients, how a manufacturer runs its supply chain, or how a business serves its customers is also an incredible achievement.
These aren’t competing roles. They are different layers of the same profession.
Foundation model researchers create the materials. Infrastructure companies build the tools. AI architects design the systems. AI engineers assemble the solution. Organizations create value from the finished product.
Every layer matters.
History has shown this over and over
The printing press didn’t diminish authors. Cameras didn’t eliminate photographers. CAD software didn’t make engineers less legitimate. Excel didn’t make accountants “spreadsheet users.”
Technology changes the tools. It doesn’t change what it means to create.
The AI builders who will shape the next decade may never train a trillion-parameter model. Instead, they will design intelligent systems that help businesses make better decisions, automate work, improve healthcare, transform education, and solve problems that once seemed impossible.
The foundation model is the raw material. The agent is the structure. The finished business solution is the building.
And just like no one questions whether an architect created a skyscraper because they didn’t manufacture the steel, we shouldn’t question whether someone is an AI maker simply because they didn’t train the model.
The measure of a maker has never been whether they created every component. It’s whether they created something that mattered.
In Waterdeep, a good scoop can sell as quickly as a healing draught before a dungeon run. The Waterdeep Trading Company already has the store traffic, warehouse discipline, and trade network to support a new frozen goods venture. The next step is to treat ice cream not as a novelty, but as a managed product line with ingredients, batch control, storage rules, shop service, and delivery routes.
Frostmantle Creamery will operate as a shop within the Waterdeep Trading Company, using the Waterdeep site and warehouse structure already defined for inventory operations. The existing supply chain guide establishes product setup, units of measure, storage dimensions, tracking dimensions, warehouses, purchasing, sales orders, sales pricing, sales charges, and returns as core operating areas for the company. The Waterdeep site and store warehouse pattern also provides the foundation for assigning stock to a physical location.
The business goal is simple. Produce high quality ice cream in controlled batches, store it safely, sell it by scoop and tub, and deliver sealed product to taverns, inns, guild halls, and festival stands without losing quality.
This expanded edition carries the original operating model further. It adds flavor portfolio governance, staffing structure, equipment upkeep, yield variance analysis, a shop level profit and loss statement, multi site expansion planning, festival marketing, and risk management. Together these sections turn Frostmantle Creamery from a single shop concept into a repeatable business unit that the Waterdeep Trading Company can carry into other cities.
What It Is
Frostmantle Creamery is a cold goods operation that produces small batch ice cream using dairy, fruit, sugar, flavorings, and stabilizing frost runes. The shop sells finished product in three main forms.
Scoops served at the counter.
Pints sold for take away.
Three gallon tubs sold to taverns, inns, guild halls, and event sellers.
From an AD&D365 point of view, this is a mixed production and retail model. The finished ice cream is manufactured using a BOM and route. The tubs and pints are stocked in inventory. Scoops are sold as a retail service item that consumes inventory from an open tub.
Why It Matters
Ice cream has very different controls than cloaks, boots, rope, or scroll cases. It melts, expires, absorbs odors, and depends on batch quality. That means the Waterdeep Trading Company must manage more than price and quantity. It must manage freshness, storage condition, batch trace, serving yield, and delivery timing.
If the company does this well, Frostmantle Creamery becomes more than a sweet shop. It becomes a repeatable business model for frozen goods across Waterdeep, Baldur’s Gate, Neverwinter, and Silverymoon.
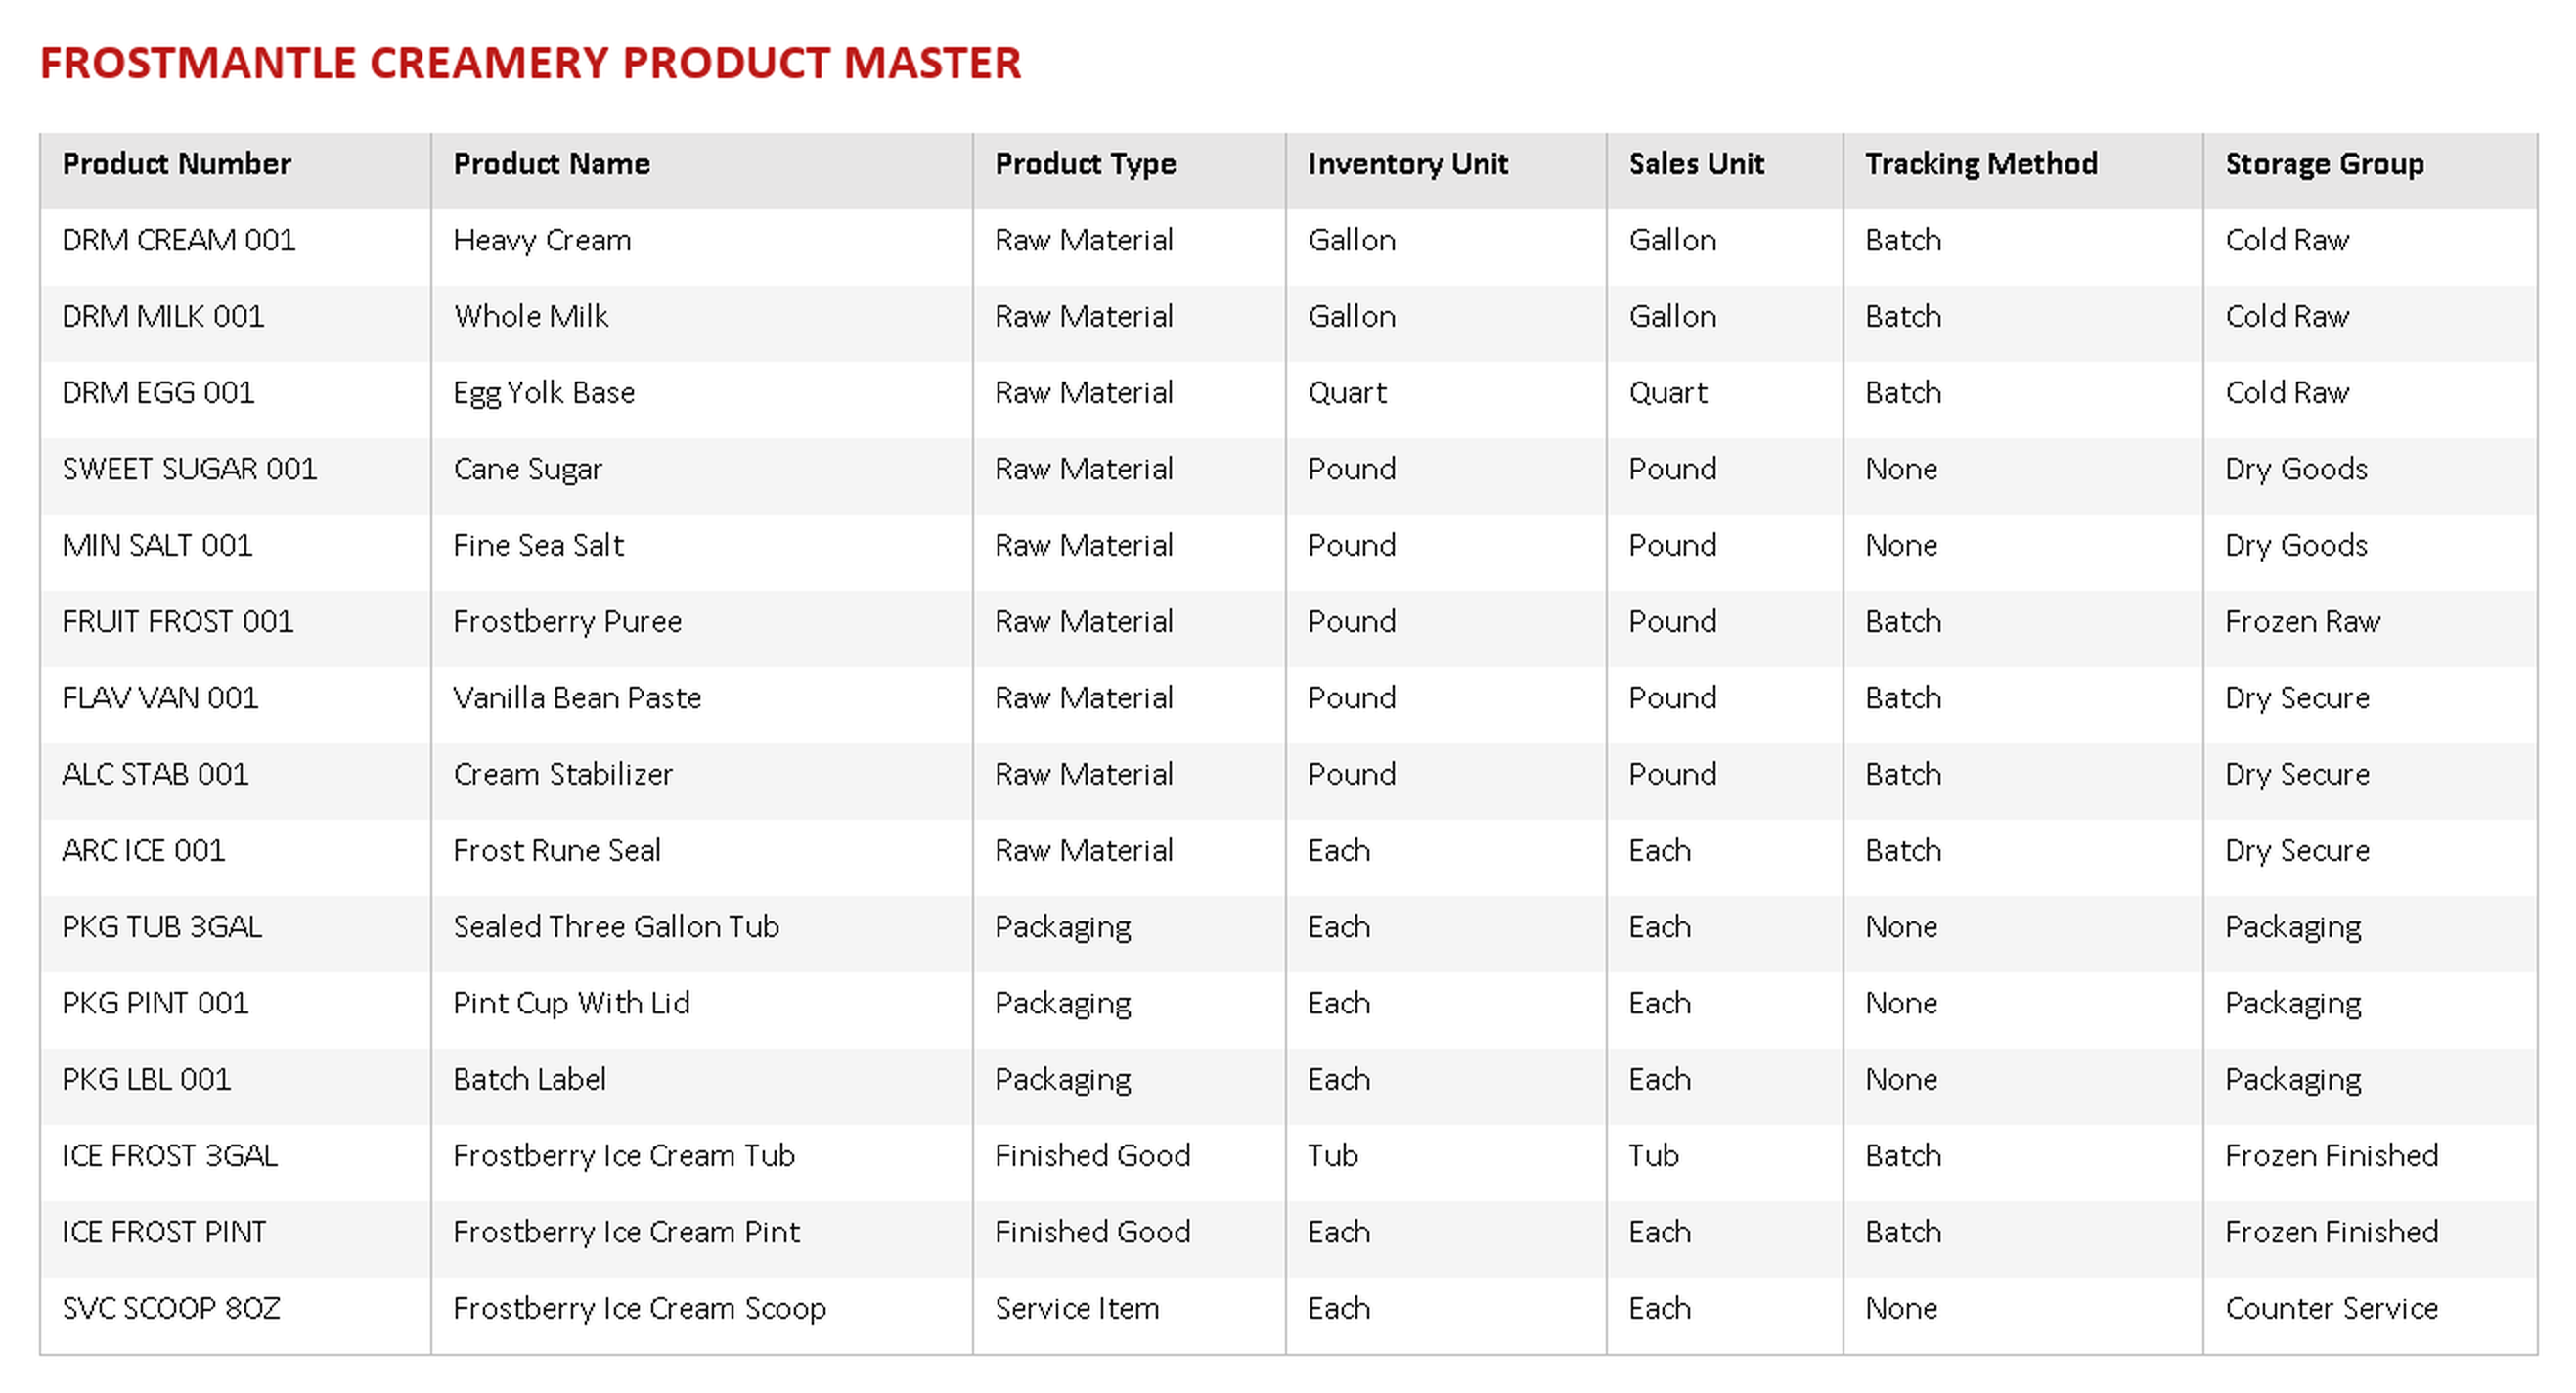
Product Setup
The product setup defines what the company buys, makes, stores, and sells. This table shows the core items needed before the shop opens.
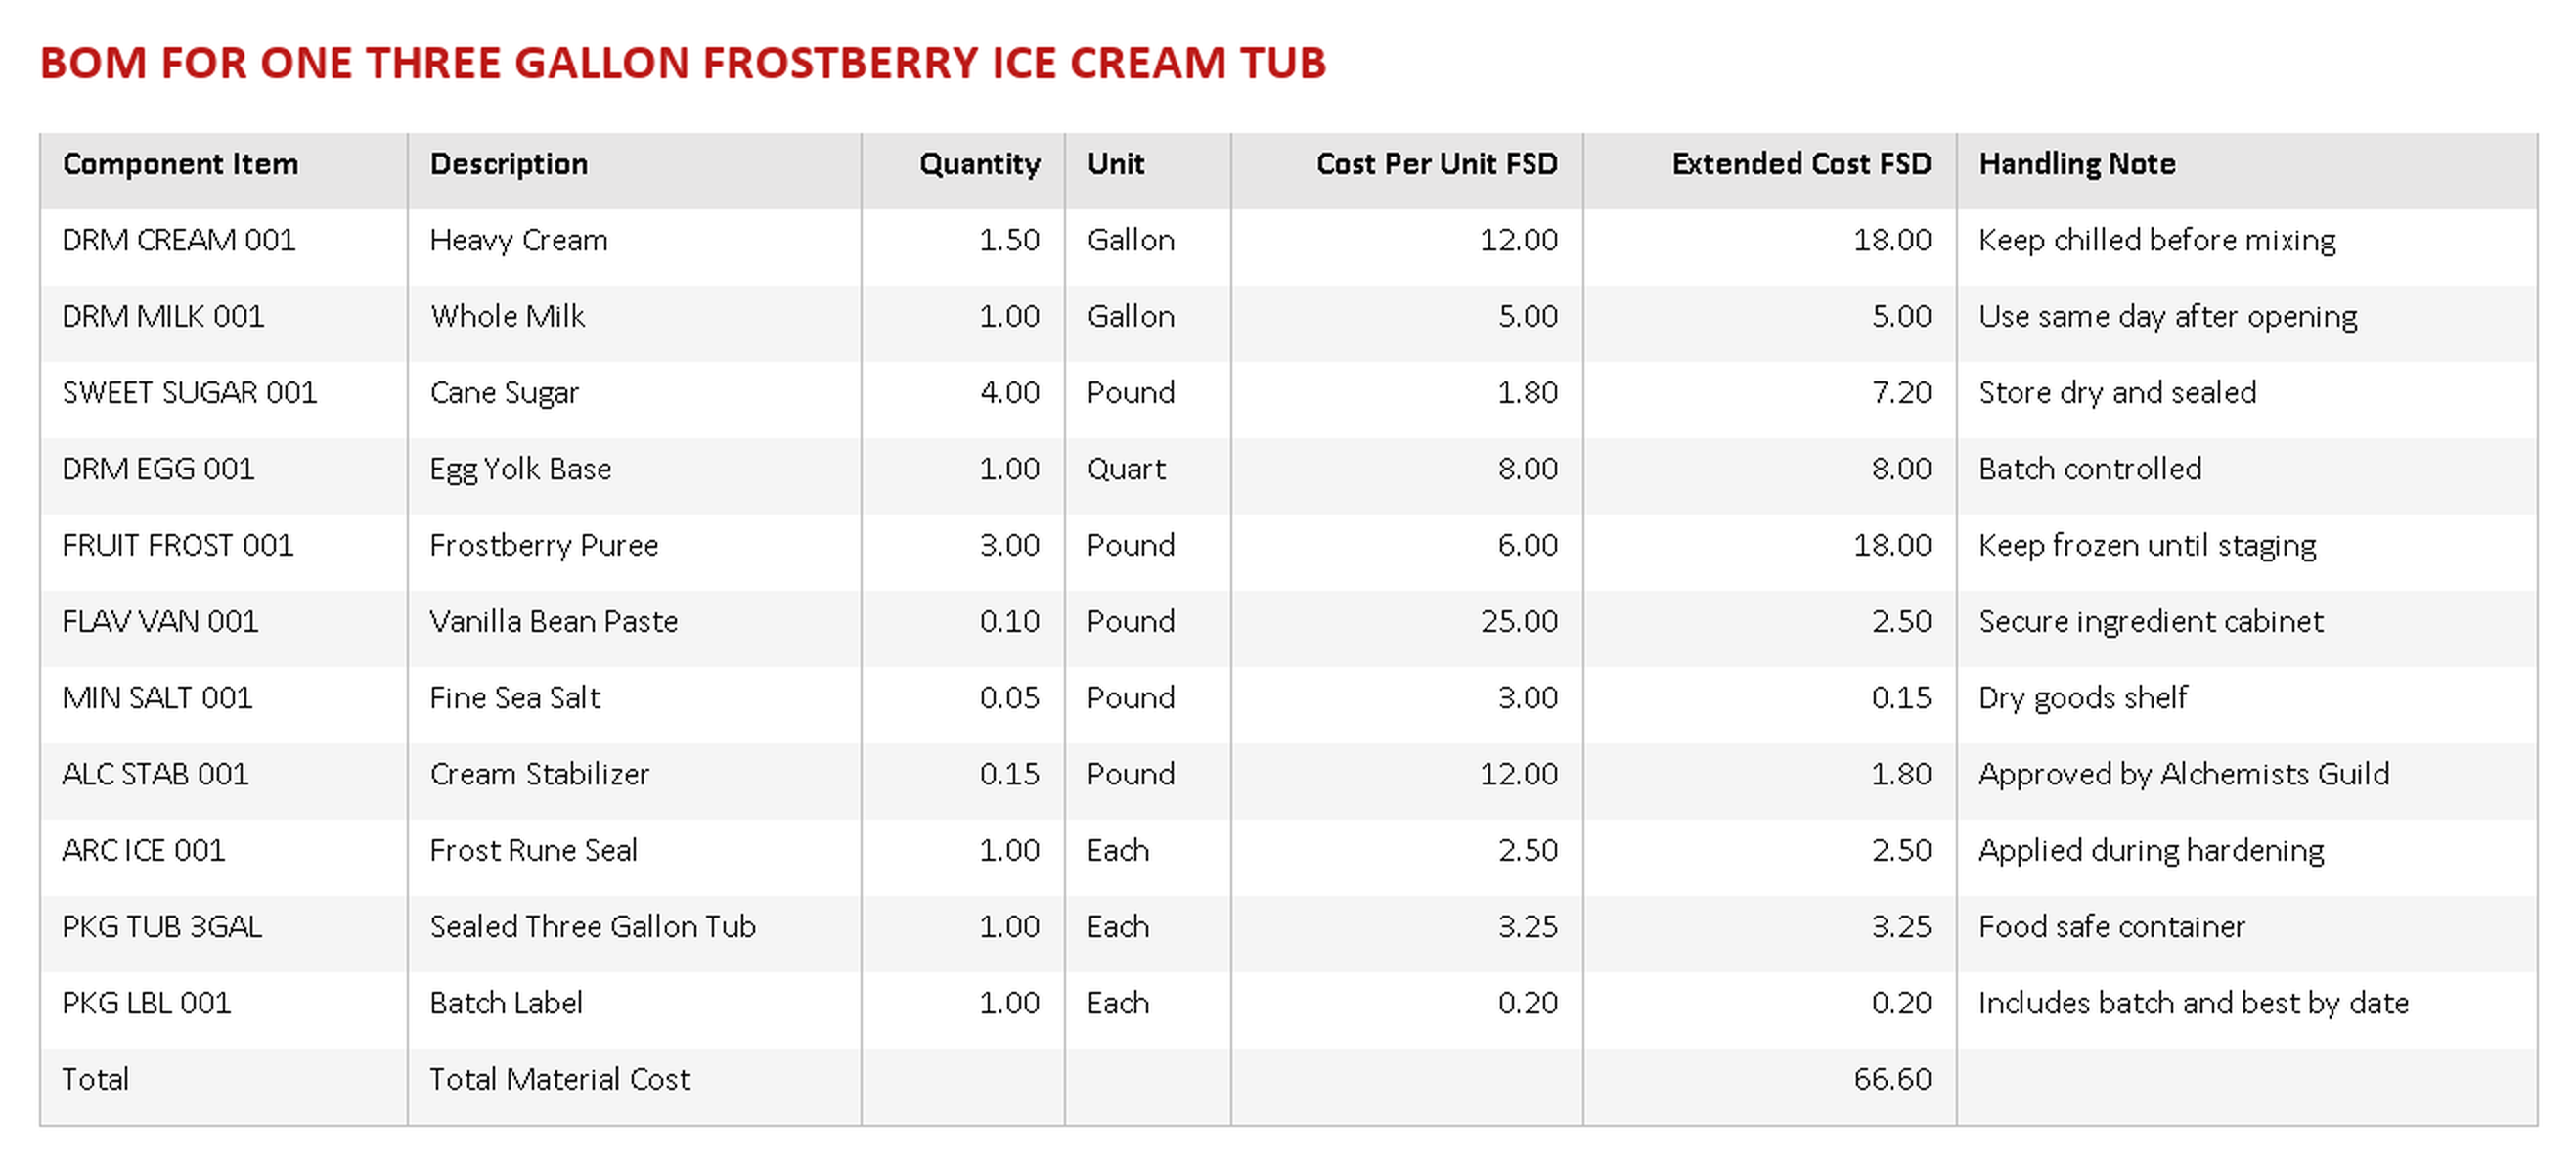
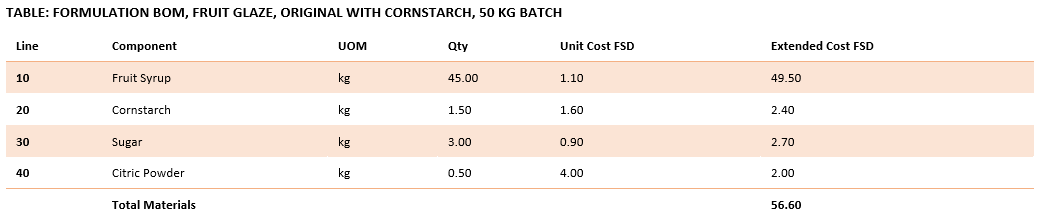
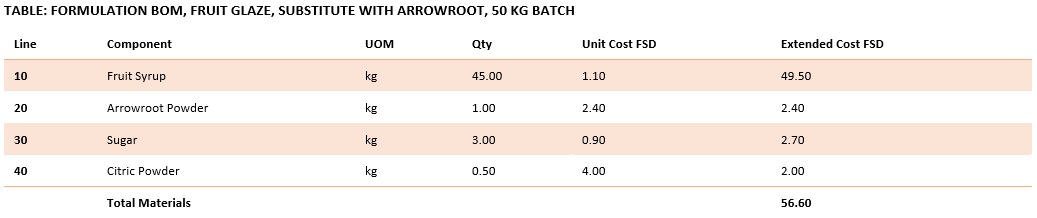
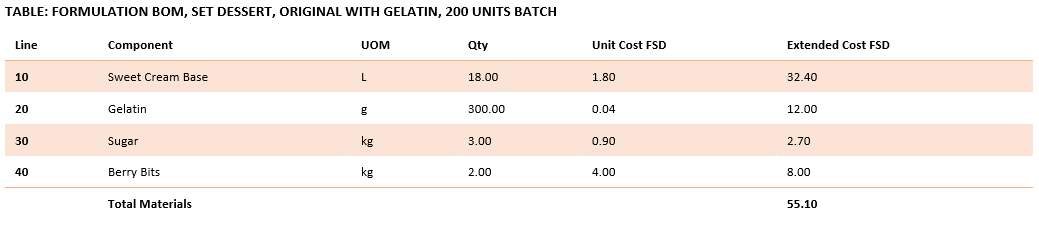
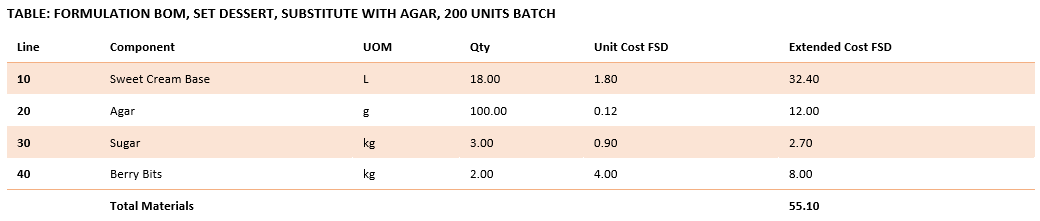
Bill Of Materials
The BOM defines the ingredients and packaging needed to make one standard three gallon tub of Frostberry Ice Cream. This batch size supports both wholesale tubs and counter service. A three gallon tub, 384 ounces, yields 48 scoops at 8 ounces each, or 64 scoops at 6 ounces each, or 24 sixteen ounce take away pints.
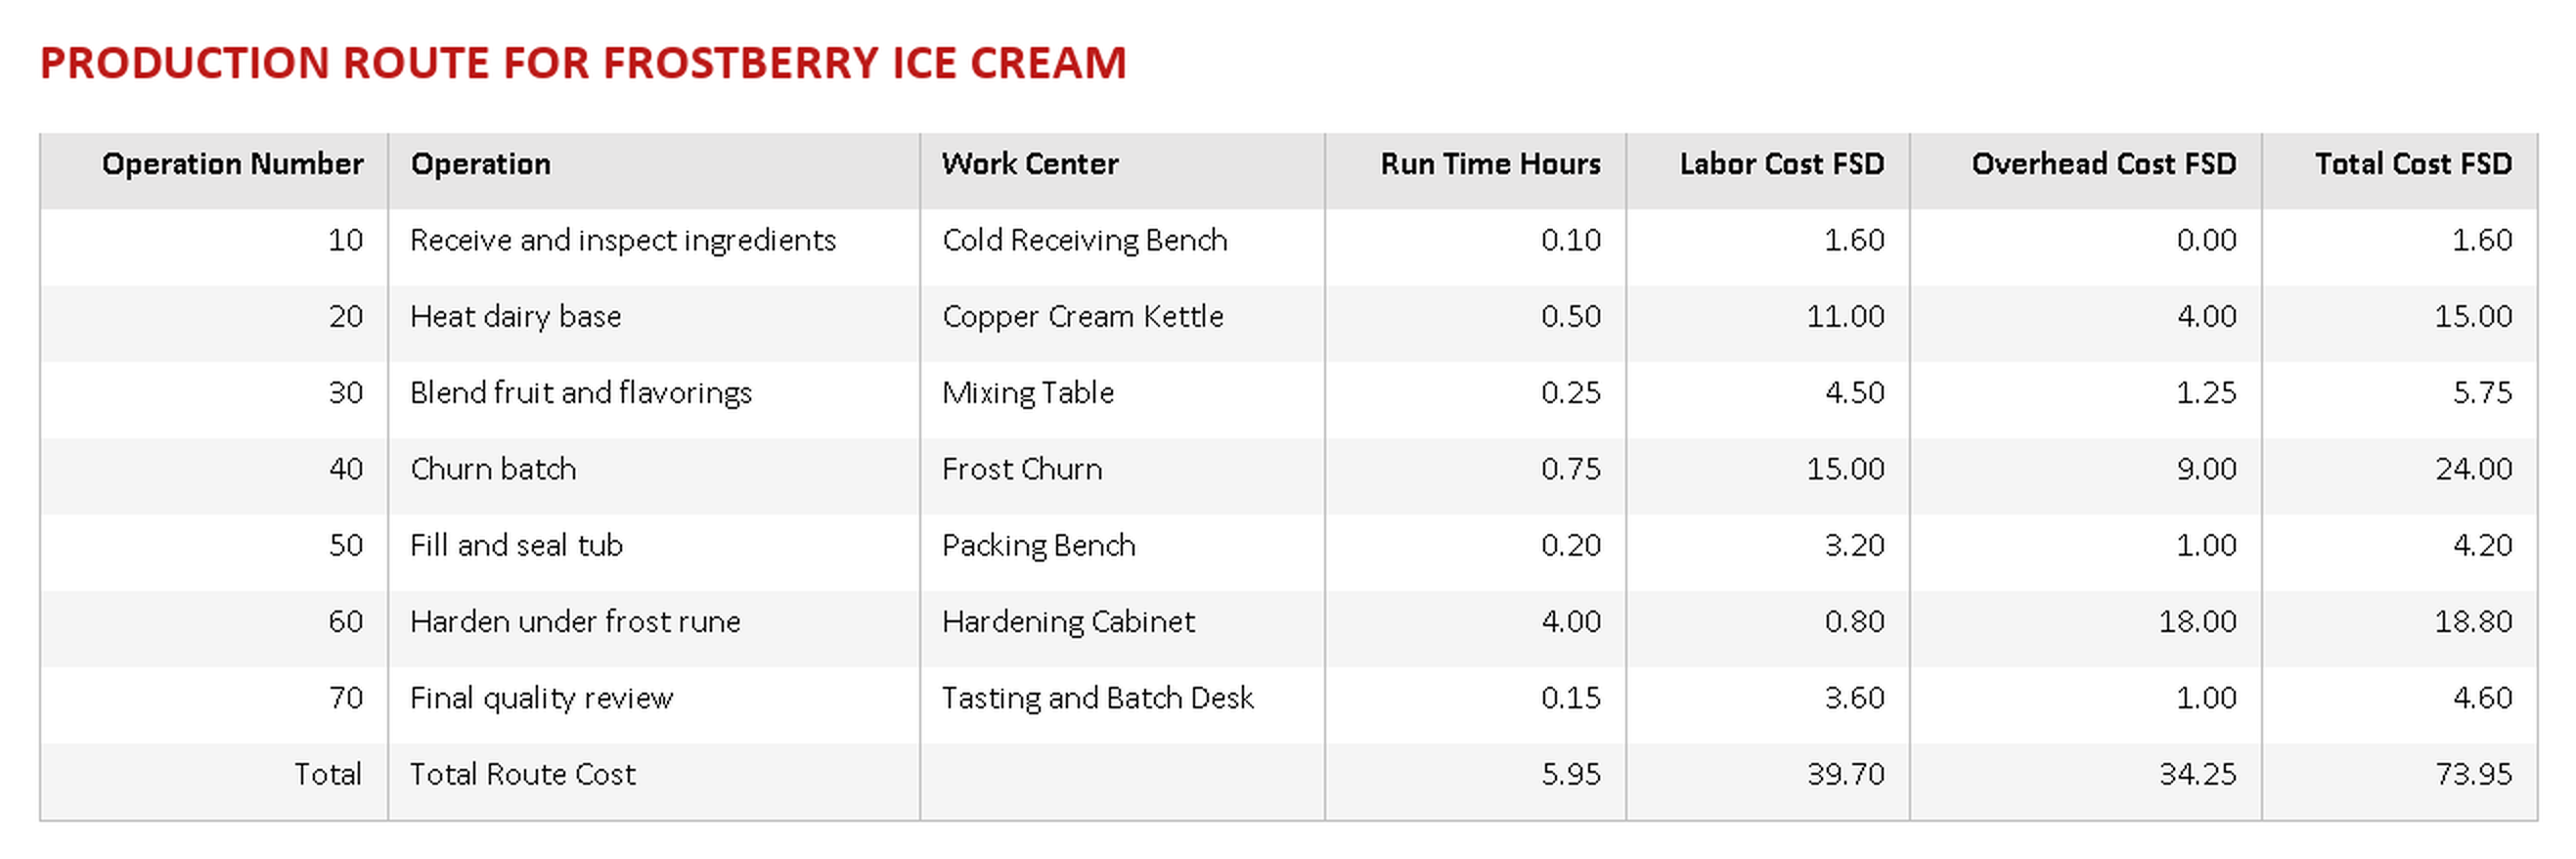
Production Route
The route defines the work steps required to produce the ice cream. For Frostmantle Creamery, the route is built around controlled receiving, dairy preparation, churn time, hardening, and final quality review.
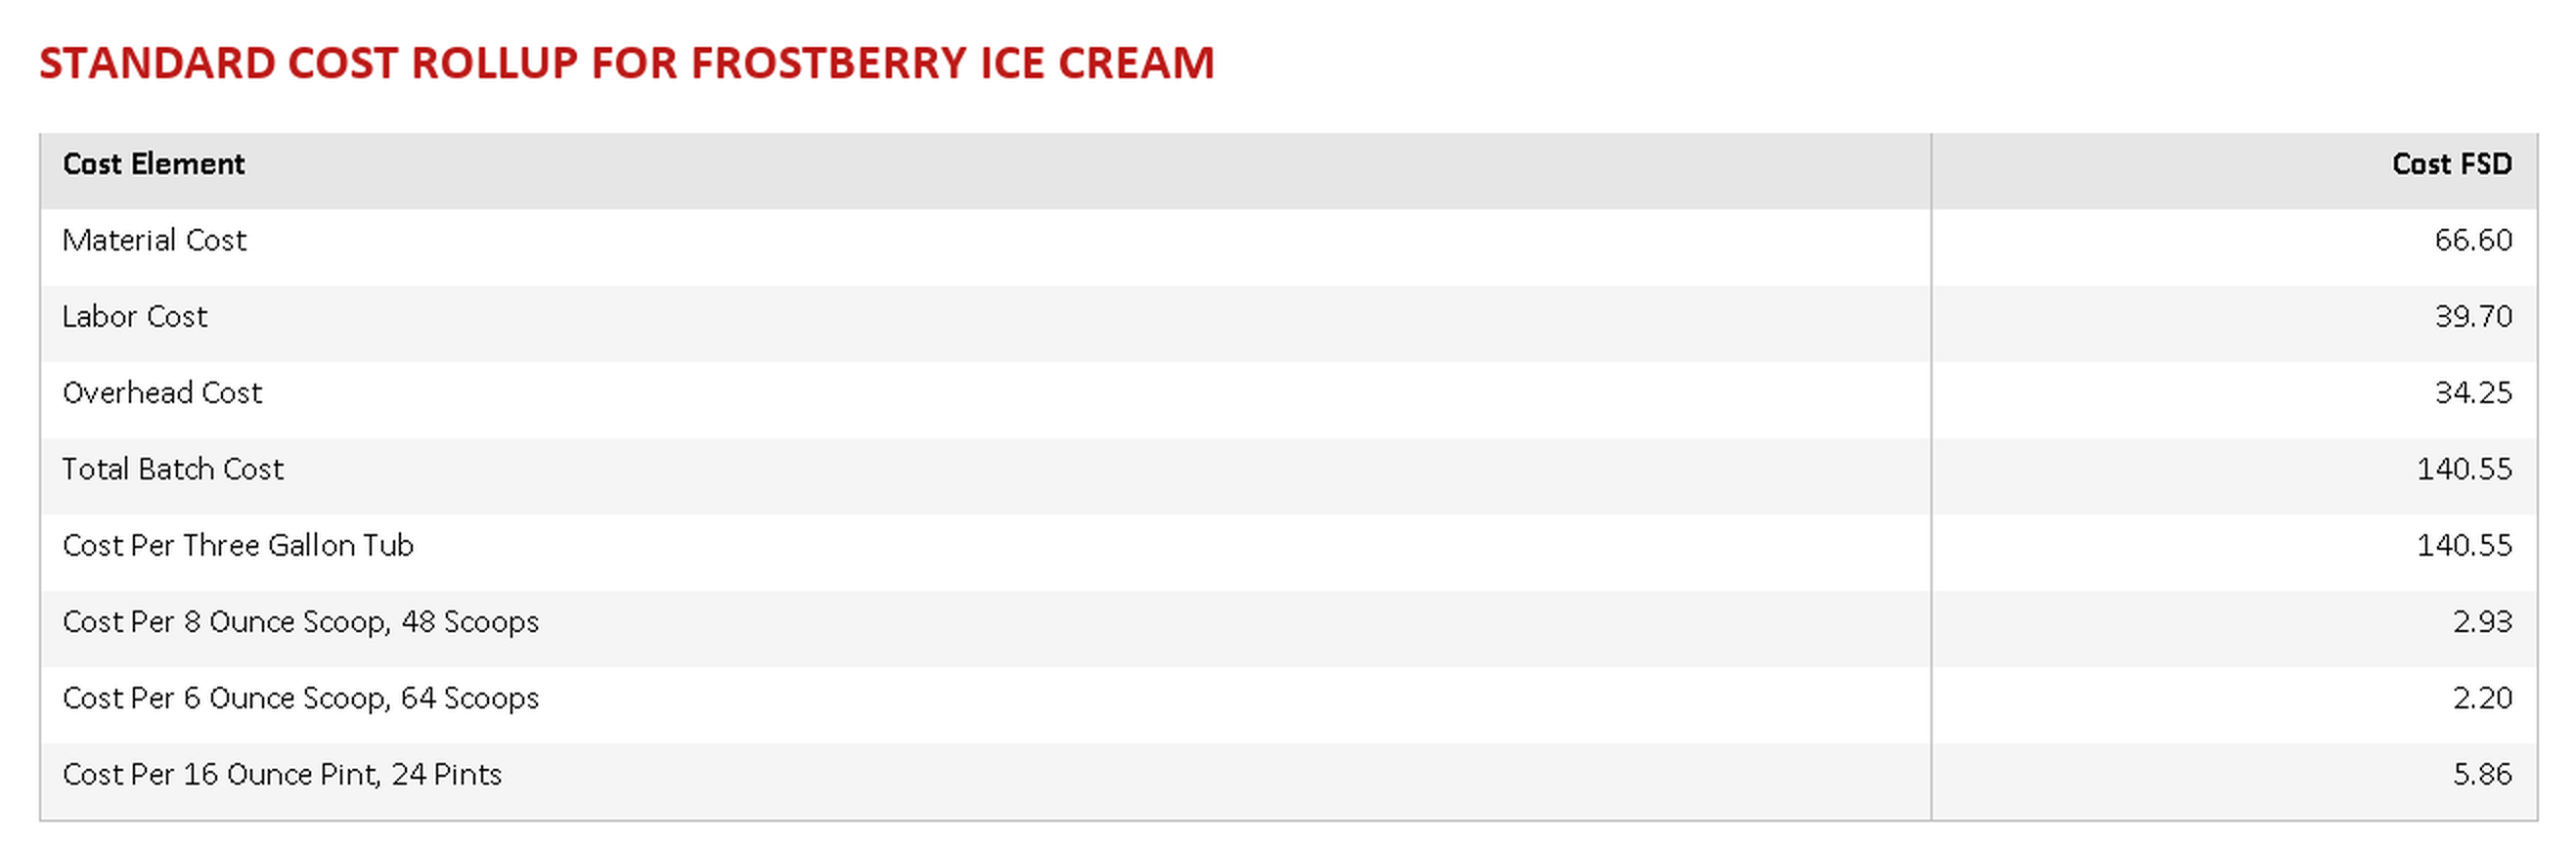
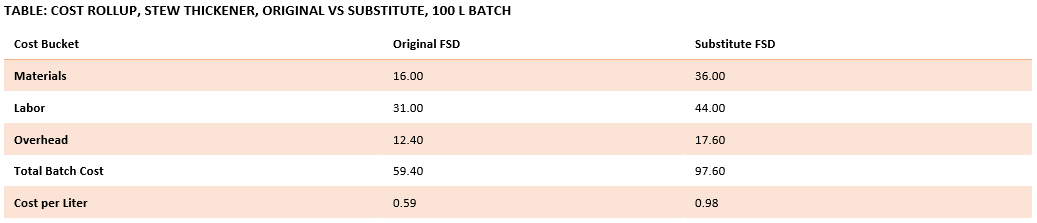
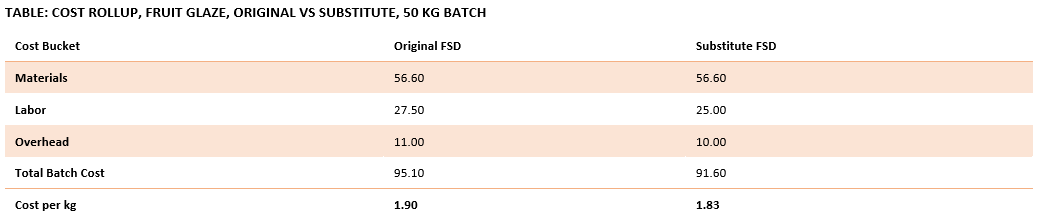
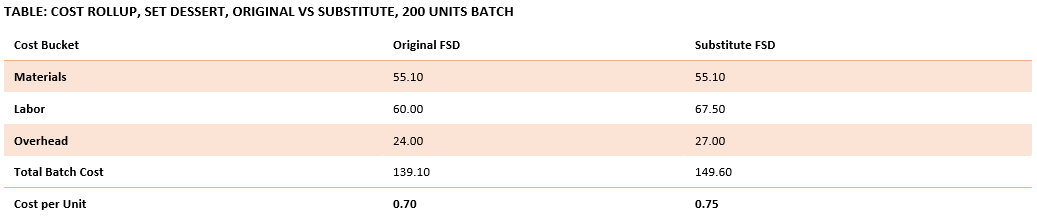
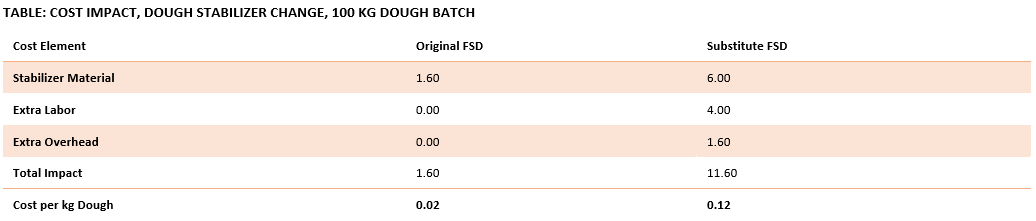
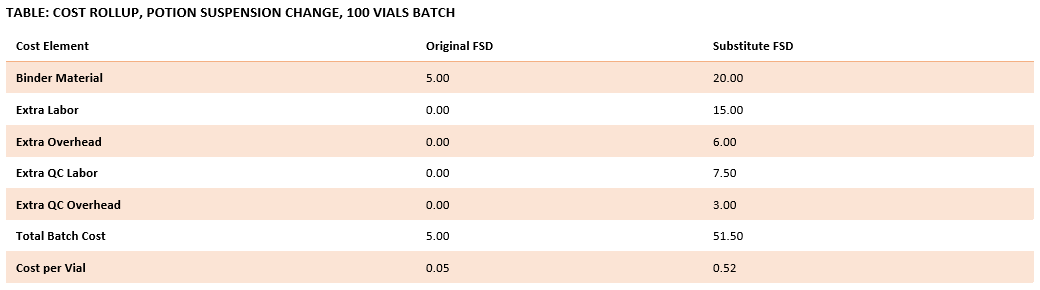
Cost Rollup
The cost rollup combines material, labor, and overhead into the final standard cost. The supply chain setup guide includes costing versions and item cost calculation as part of inventory setup, which supports this type of finished goods costing.
Suggested Sales Model
The sales model should separate retail counter sales from wholesale tub sales. Counter sales carry higher margin because the shop adds service, location value, and immediate consumption. Wholesale tubs carry lower margin but support tavern and inn volume.
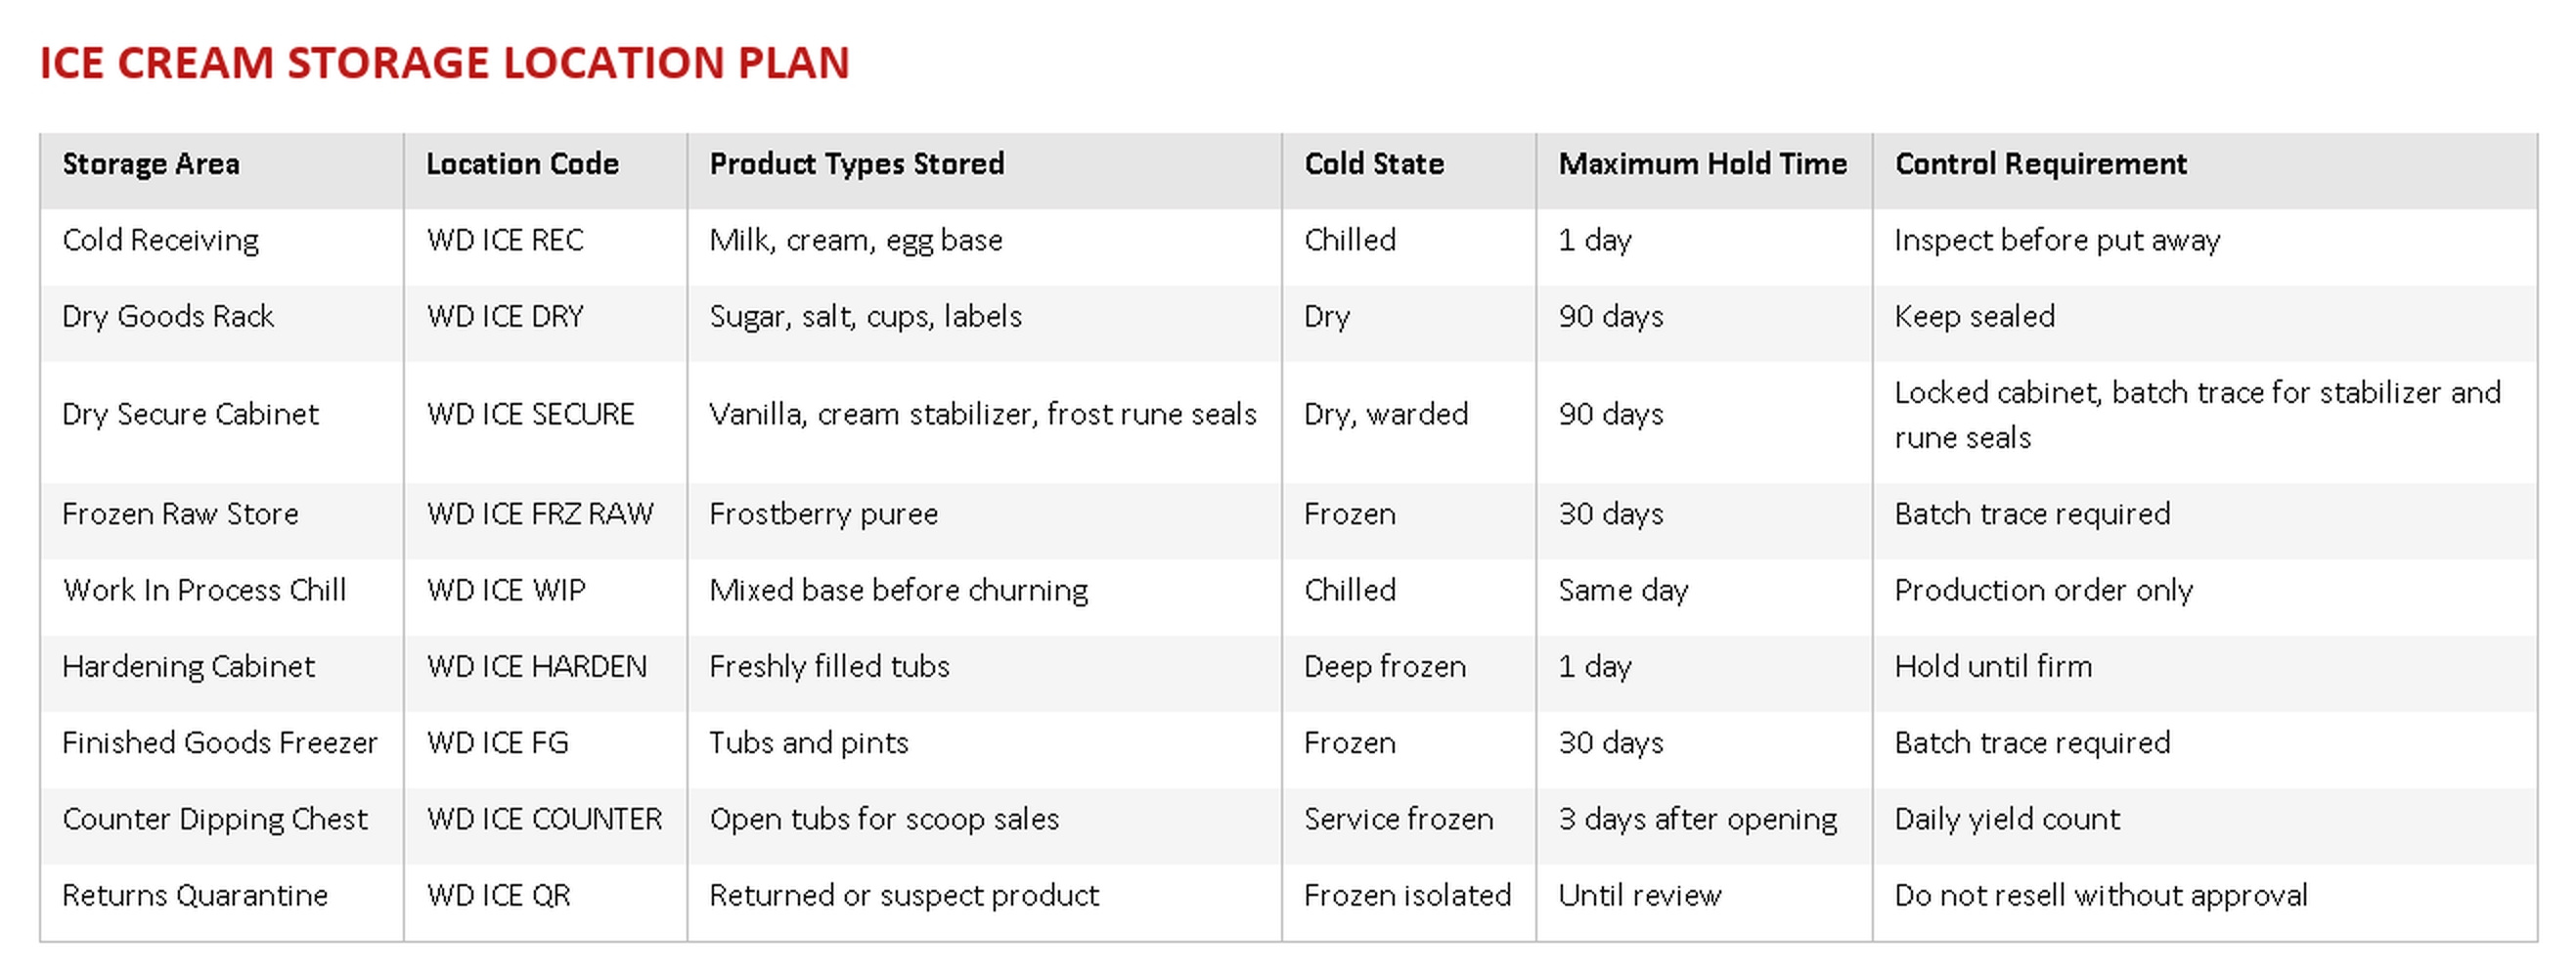
Storage Plan
The storage plan protects product quality and supports batch trace. The supply chain guide uses storage dimension groups to define how products are tracked by site, warehouse, and location. It also defines tracking dimensions for batch and serial control. For ice cream, batch control is required for dairy, fruit puree, finished tubs, and finished pints.
Batch And Quality Rules
Ice cream needs tighter trace than most shelf stable goods. Batch numbers should connect the finished tub to cream, milk, egg base, fruit puree, production date, work center, and quality result.
Flavor Portfolio Management
A single flavor is a good way to open the shop, but Frostmantle Creamery cannot stay competitive on Frostberry alone. Once the base process is stable, the company should manage flavors as a formal portfolio, with each flavor treated as its own item under the same production model. This keeps costing accurate and prevents recipe drift at the churn.
Every new flavor should pass through three gates before it reaches the counter. First, a small batch trial in the Mixing Table to confirm taste and texture. Second, a costing review to confirm the new BOM does not quietly erode margin. Third, a shelf trial to confirm the flavor holds its quality through the full 30 day best by window.
Seasonal flavors should be planned at least one production cycle ahead so that fruit, spice, and packaging can be procured on schedule. Limited release flavors like Shadowberry Midnight should be capped by production order so the shop does not overcommit rare fruit stock to counter sales at the expense of festival contracts.
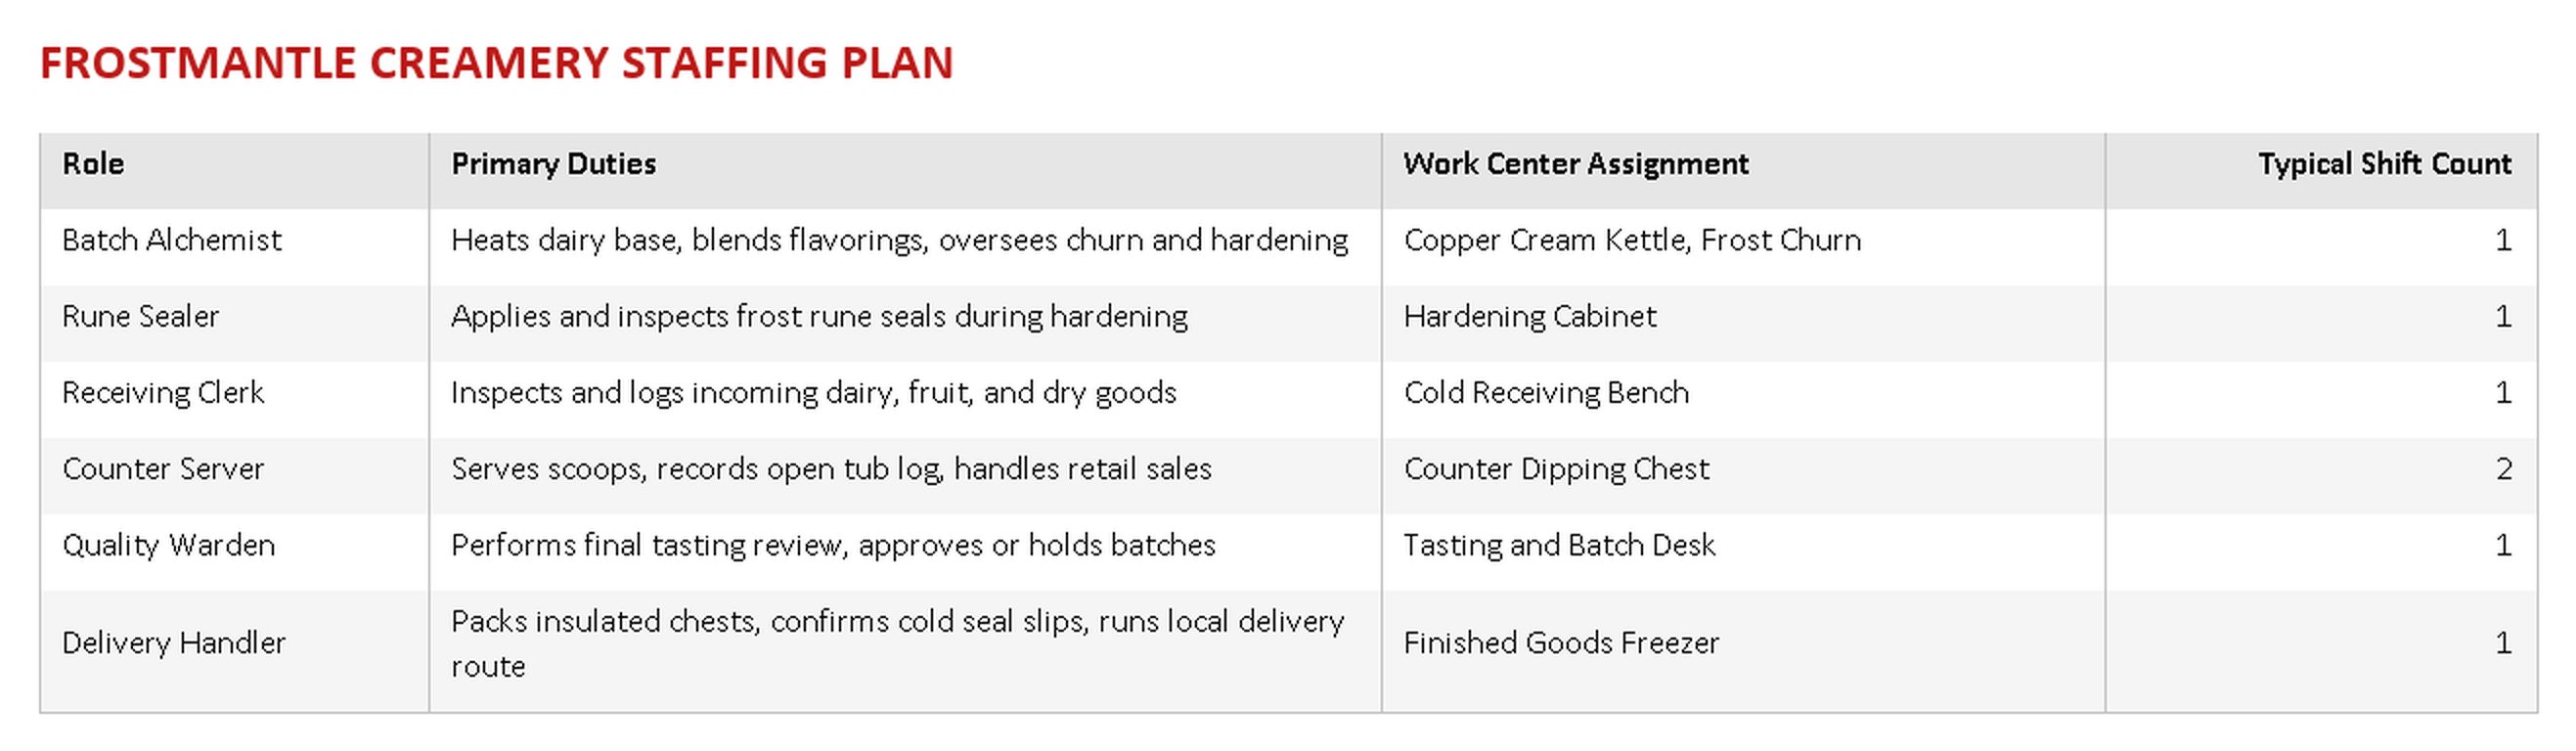
Staffing And Roles
Frostmantle Creamery cannot run on a single counter clerk. The shop needs distinct roles across production, service, and quality, each with clear responsibility so that batch discipline does not depend on any one person’s memory.
The Quality Warden should never be the same person who ran the churn on that batch. Separating production from final review keeps the quality hold honest and protects the shop from the temptation to wave through a marginal batch during a busy festival week.
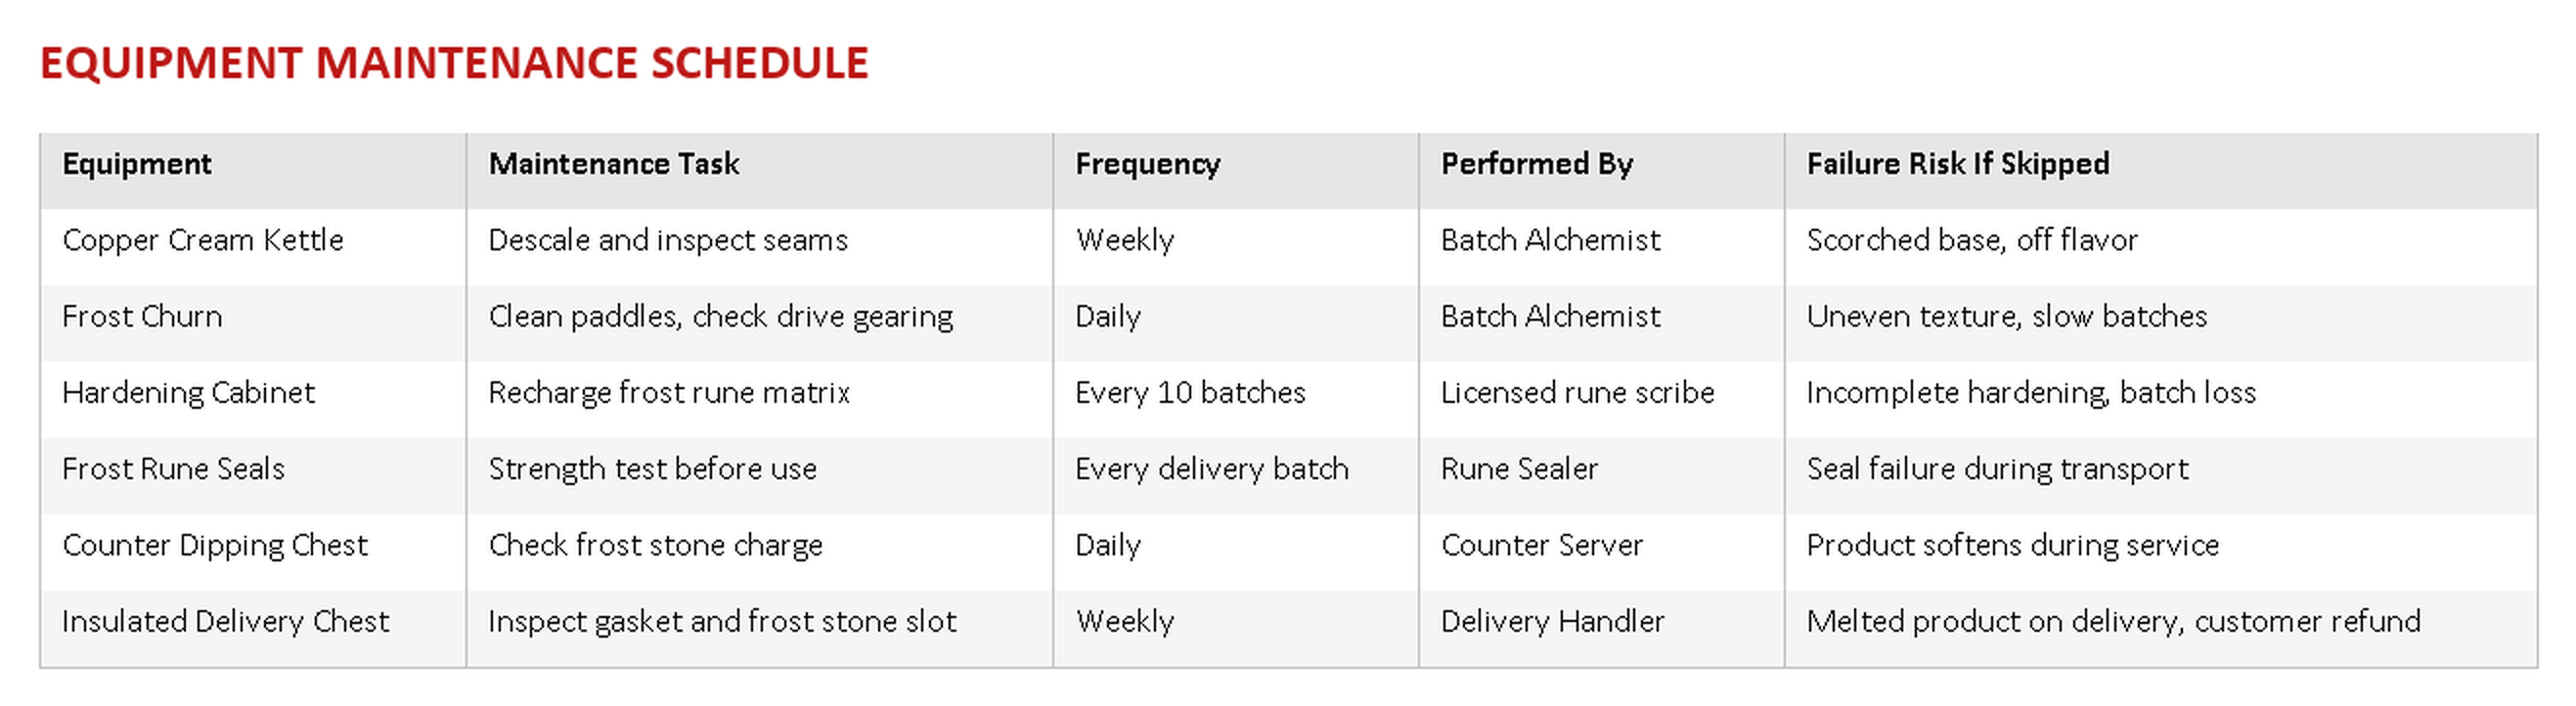
Equipment And Arcane Upkeep
The Frost Churn and Hardening Cabinet are the two pieces of equipment most likely to cause a shutdown if neglected. Both combine mechanical parts with an arcane component, so maintenance covers both craft and enchantment.
A recharge of the Hardening Cabinet’s frost rune matrix is a planned overhead cost, not a surprise expense. It should be scheduled on the production calendar the same way a caravan books a departure date, so a batch is never left waiting on an uncharged cabinet.
Waste, Spoilage, And Yield Variance
Standard costing assumes a three gallon tub yields exactly 48 scoops at 8 ounces or 64 scoops at 6 ounces. In practice, actual yield will vary due to melt loss during scooping, over pour by new counter staff, or a batch that hardens slightly under or over target. Frostmantle Creamery should track this as a yield variance, the same discipline the company already applies to other production variance analysis.
A variance of four scoops on one tub may look small, but at scale across a full festival weekend it becomes a meaningful drain on margin. The Quality Warden should record actual yield on every tub closed at the counter, and any variance above five percent should trigger a review of scoop size, melt handling, or staff training rather than being written off as ordinary spillage.
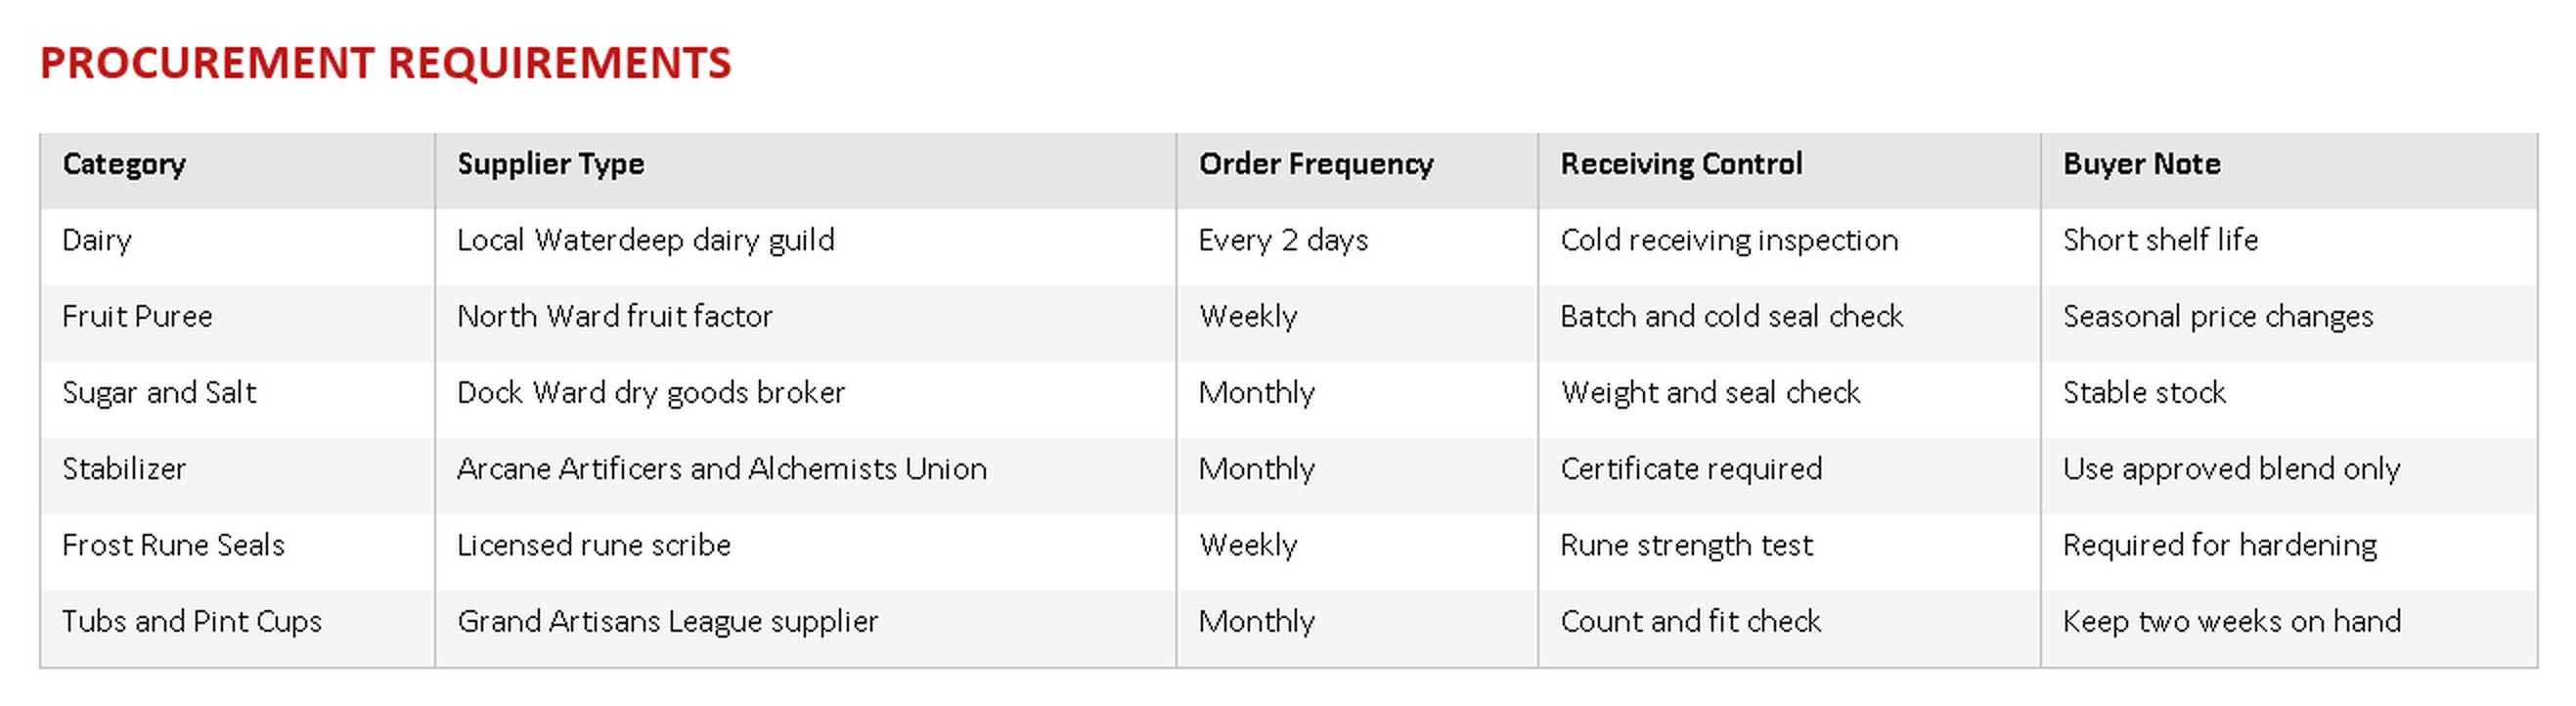
Procurement Requirements
The shop cannot rely on chance market buying. Dairy, fruit, packaging, and frost runes must be sourced from approved vendors. The supply chain guide includes procurement categories, purchase orders, vendor pricing, and purchase order approval as core setup areas.
Distribution Requirements
Distribution must be split into local service, local delivery, and regional wholesale. Scoops are sold only at the counter. Pints can be sold at the counter or delivered locally. Tubs can be delivered to inns, taverns, guild halls, and festival stalls.
The transportation articles for Waterdeep Trading Company describe route guides, hub types, carrier services, transit distances, scheduled routes, and multi segment freight planning for moving goods across Faerûn. Those same controls apply here, but with stricter timing because frozen goods cannot sit on a warm cart while a driver stops for lunch and a bard show.
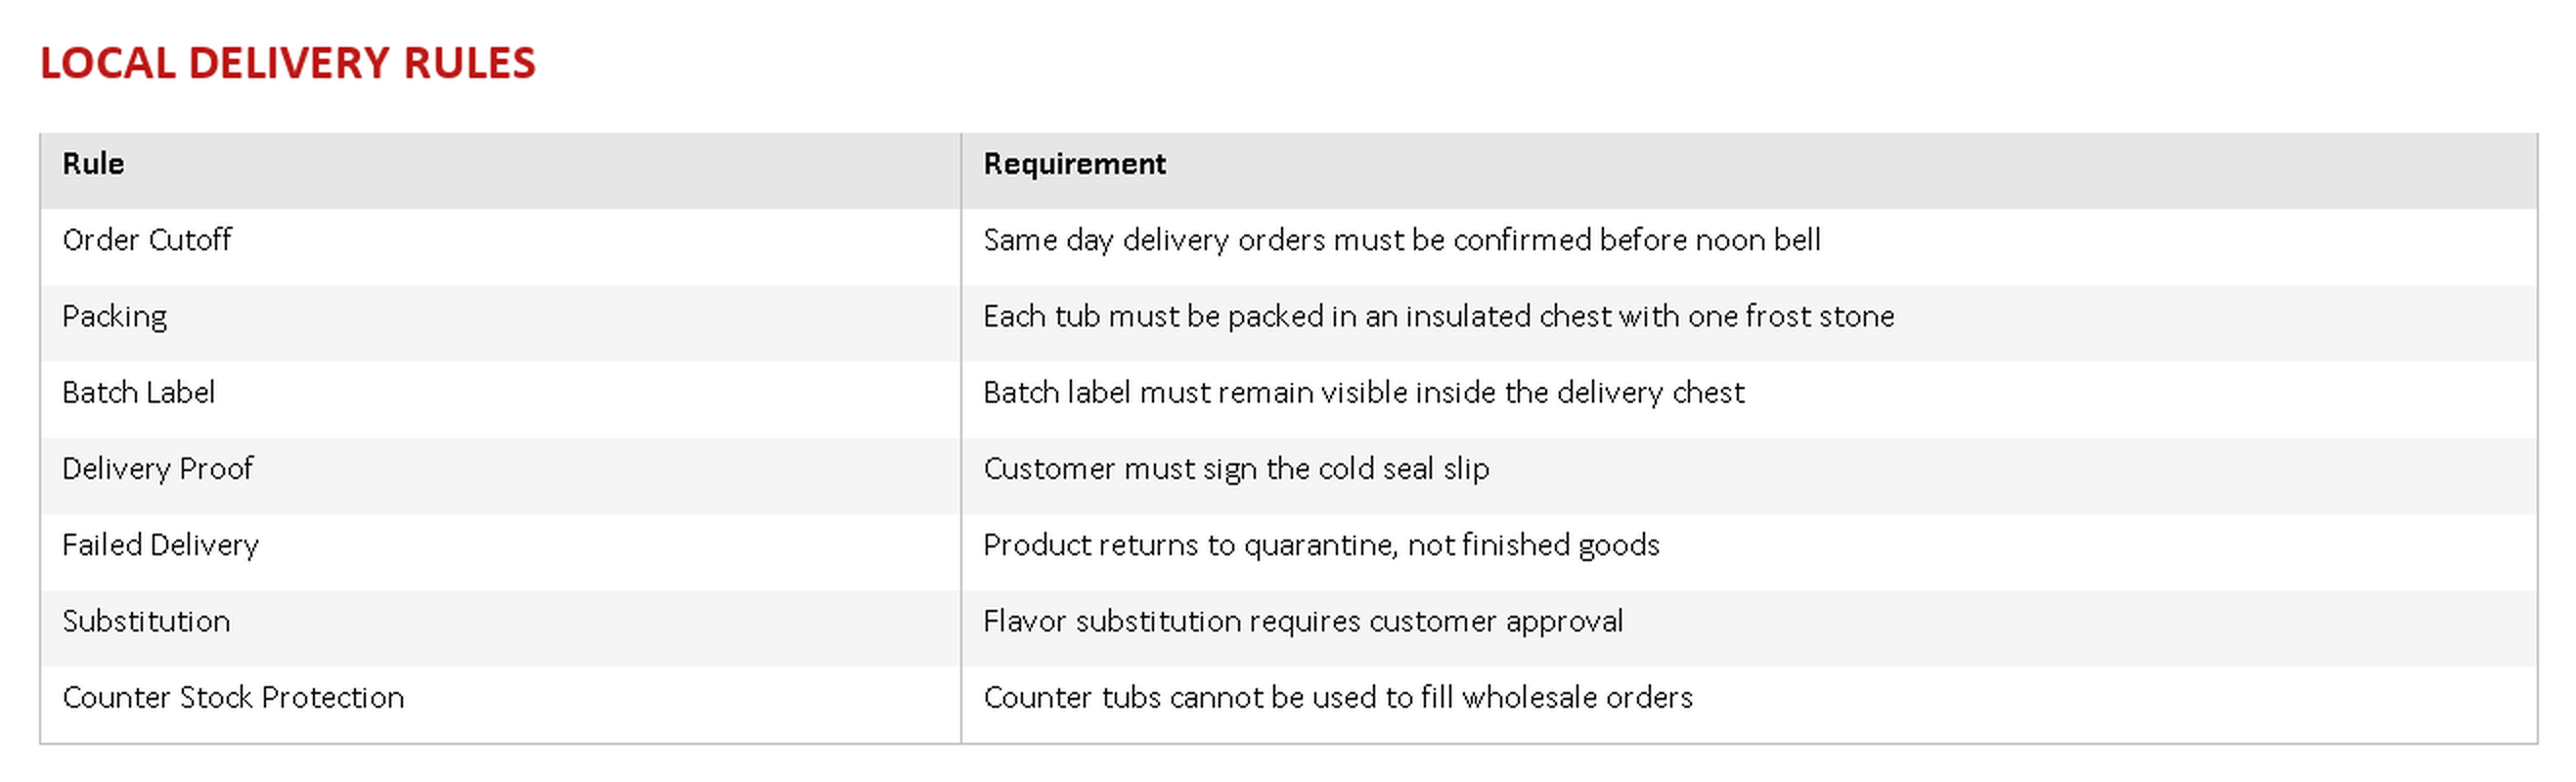
Local Delivery Operating Rules
Local deliveries should leave from the finished goods freezer only after the sales order is picked, checked, packed, and sealed. The sales order flow in the supply chain guide includes creating sales orders, confirming orders, picking and shipping, invoicing, and reviewing sales invoice vouchers.
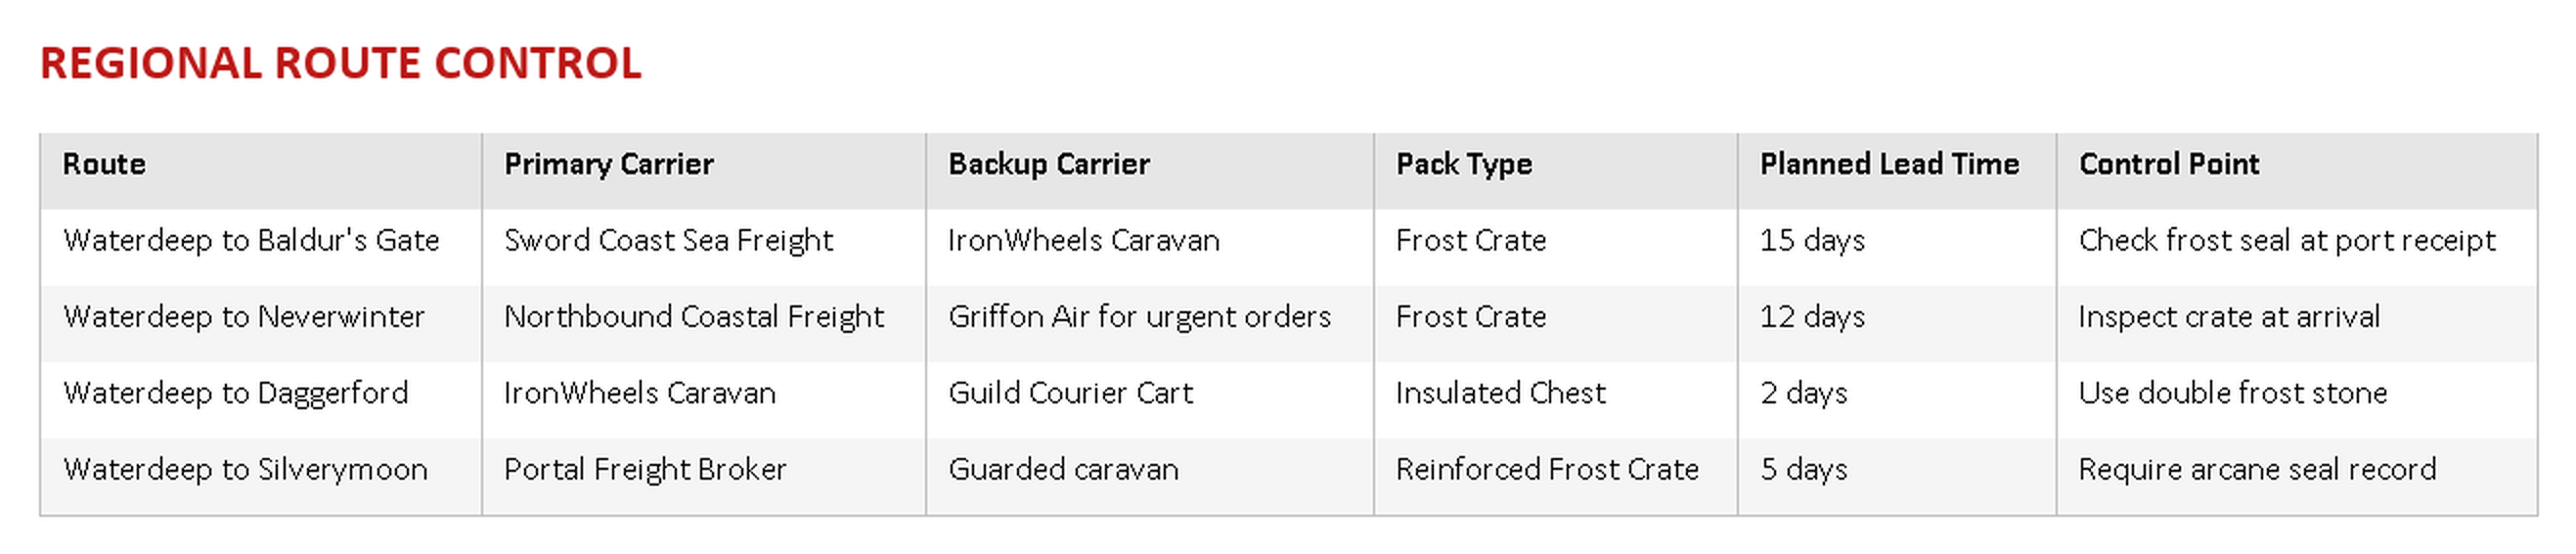
Regional Distribution Rules
Regional shipments should be limited to sealed tubs until the company has tested longer routes for pints. Ice cream shipped beyond Waterdeep should move through scheduled freight lanes with known carriers.
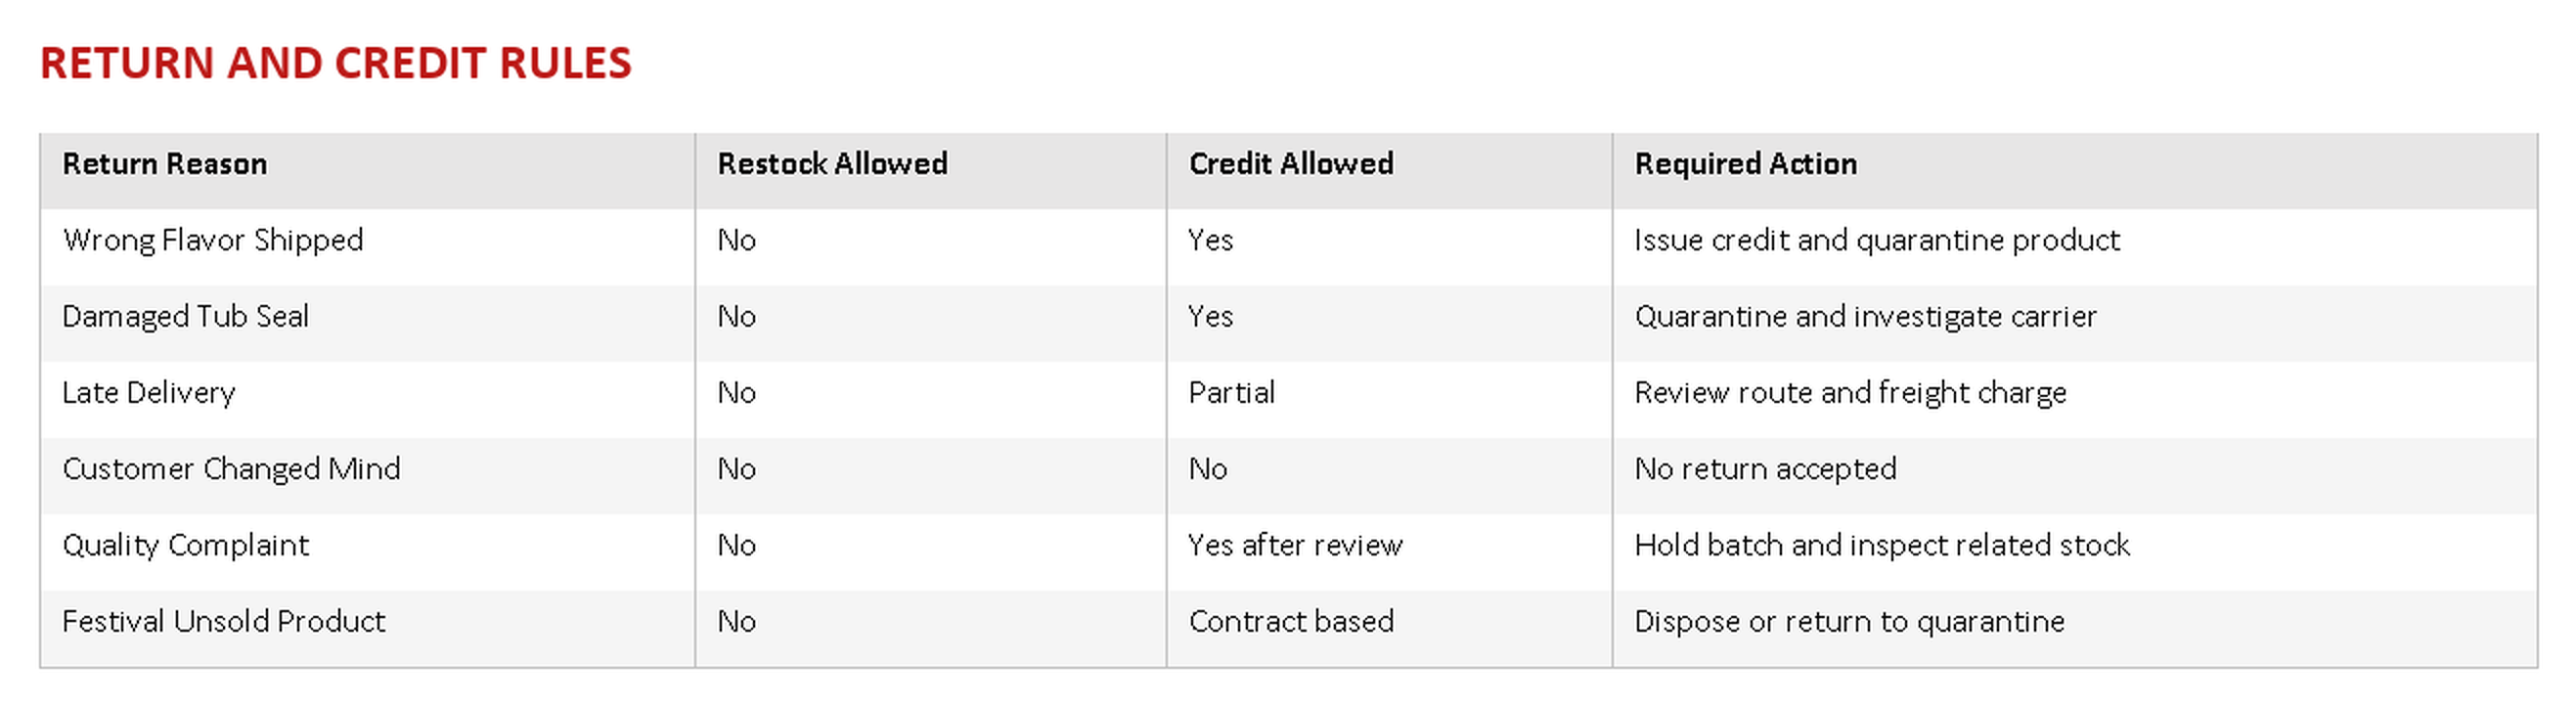
Returns And Credit Rules
Frozen products are risky returns. The shop should not restock returned ice cream unless it never left company control and the cold seal remained intact.
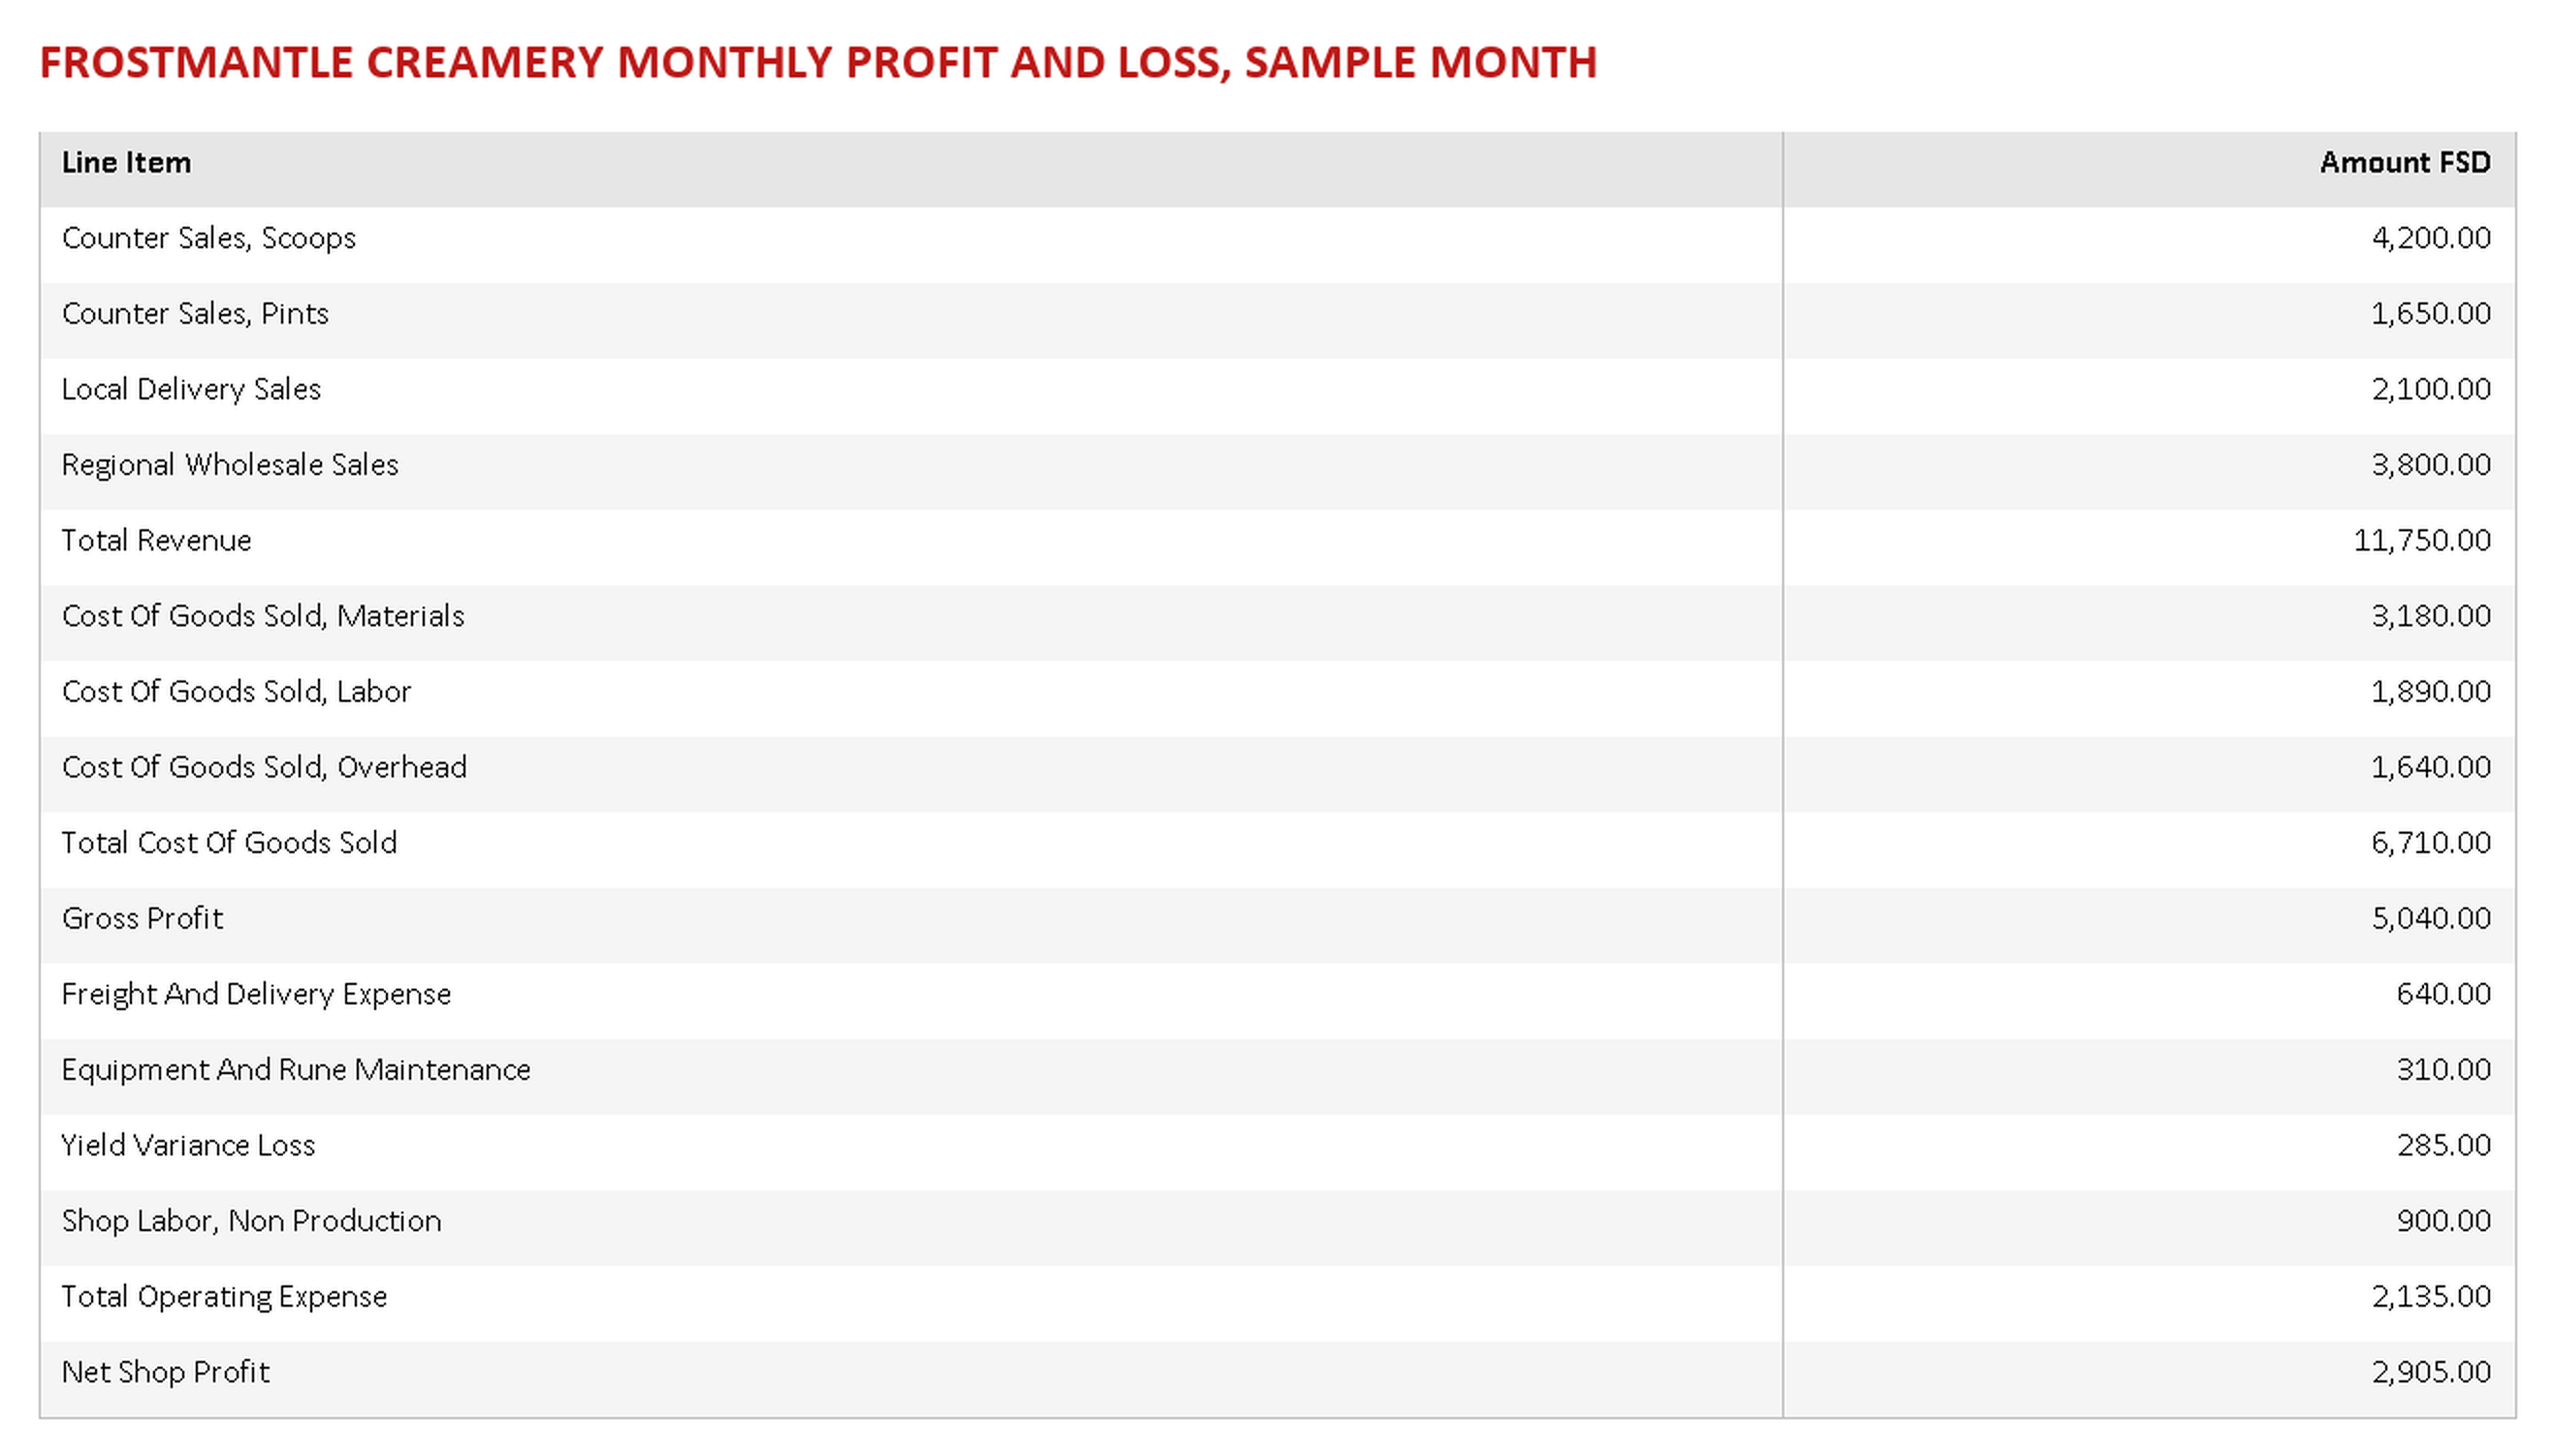
Shop Level Profit And Loss
Once Frostmantle Creamery is producing multiple flavors and running both counter and wholesale channels, ownership will want a simple monthly profit and loss view rather than only a per tub cost rollup. This gives Greta Ironfist a single page to judge whether the shop is pulling its weight within the wider Waterdeep Trading Company.
Tracking yield variance loss and maintenance cost as their own lines, rather than folding them quietly into cost of goods sold, gives the Quality Warden and the Batch Alchemist a direct incentive to protect margin at the churn and the counter.
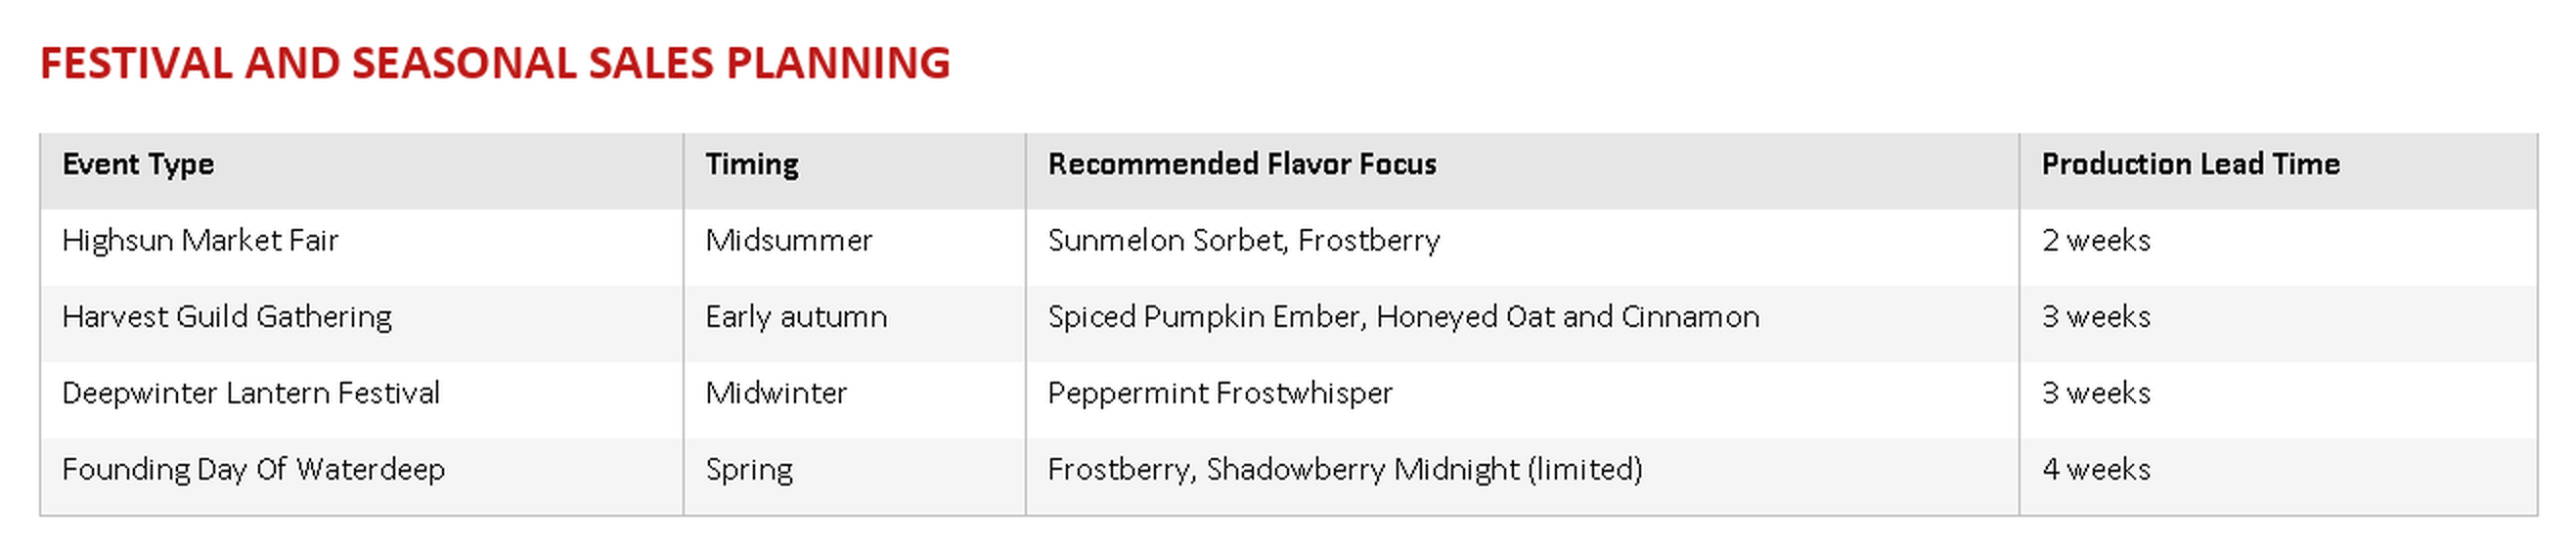
Marketing And Festival Circuit Model
Frostmantle Creamery benefits from Waterdeep’s calendar of festivals, fairs, and public gatherings. Rather than treating festival sales as a bonus, the shop should plan its production calendar around known festival dates, since these events can move a meaningful share of monthly tub volume in a single weekend.
Festival contracts should be confirmed and production booked before counter demand for the same period is estimated, since a festival stand cannot go back for more stock mid event the way a local tavern can place a same day order.
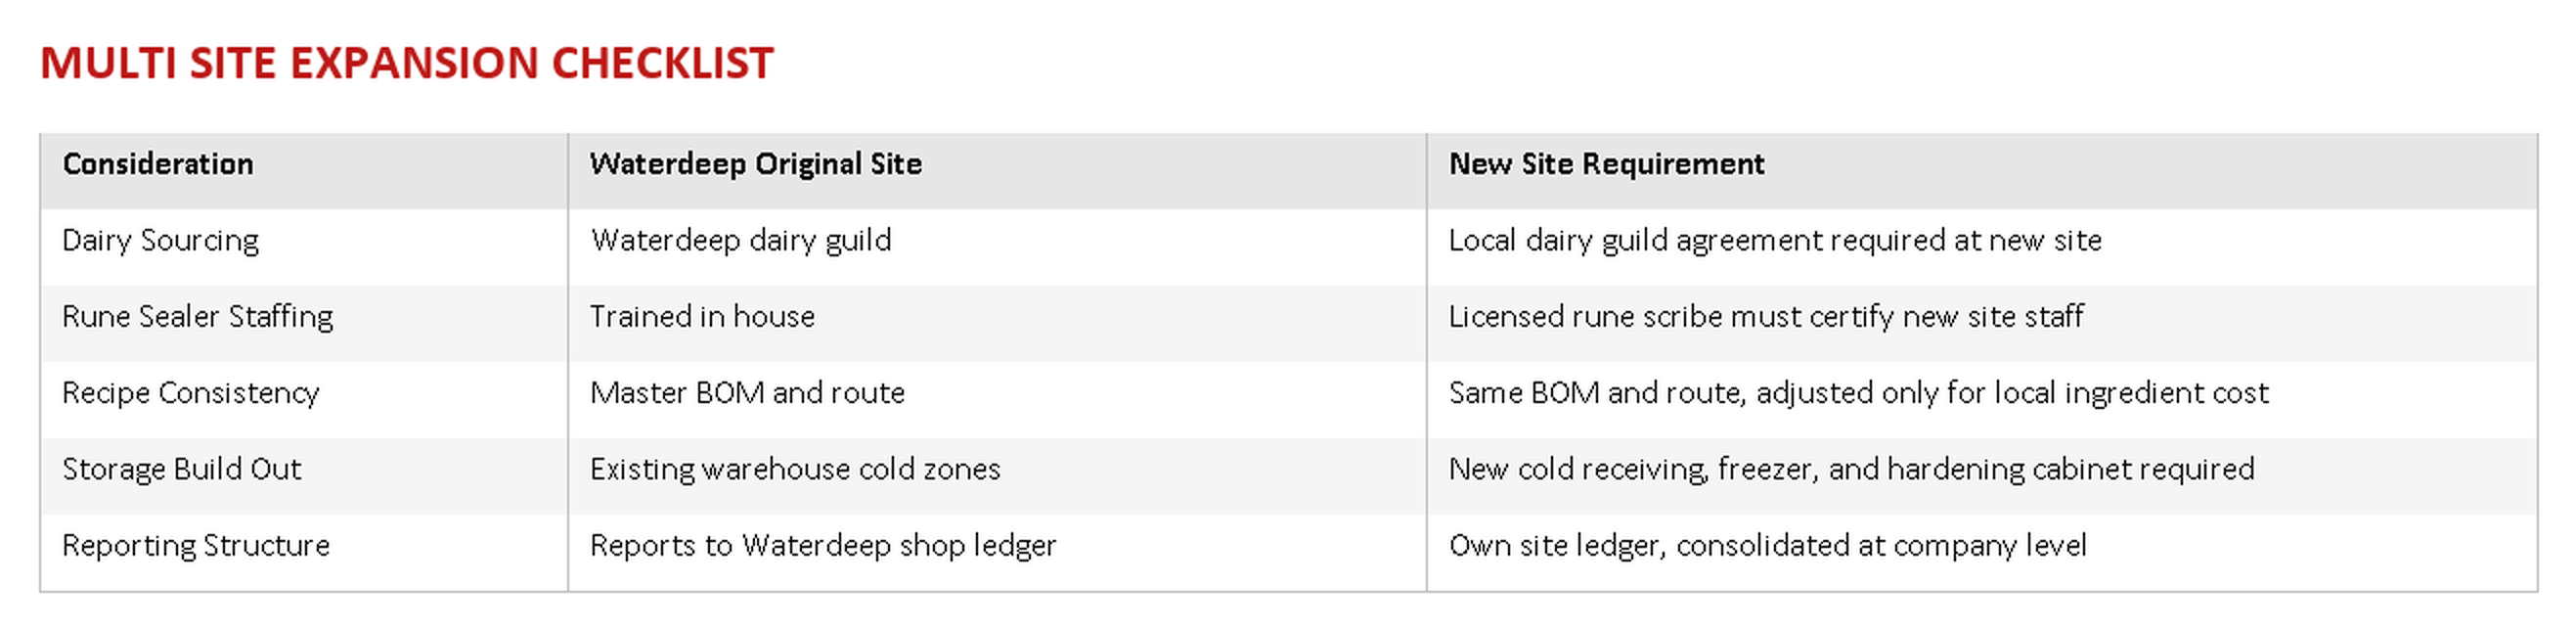
Multi Site Expansion Considerations
Once Frostmantle Creamery is stable in Waterdeep, the same model can be extended to Baldur’s Gate or Neverwinter as a second production site rather than only a wholesale destination. This avoids the 12 to 15 day freight lead time that currently limits regional tub sales and lets each site serve its own counter and local delivery customers directly.
Keeping the BOM and route identical across sites, and only adjusting the cost inputs for local pricing, preserves the ability to compare site performance directly rather than comparing two different recipes.
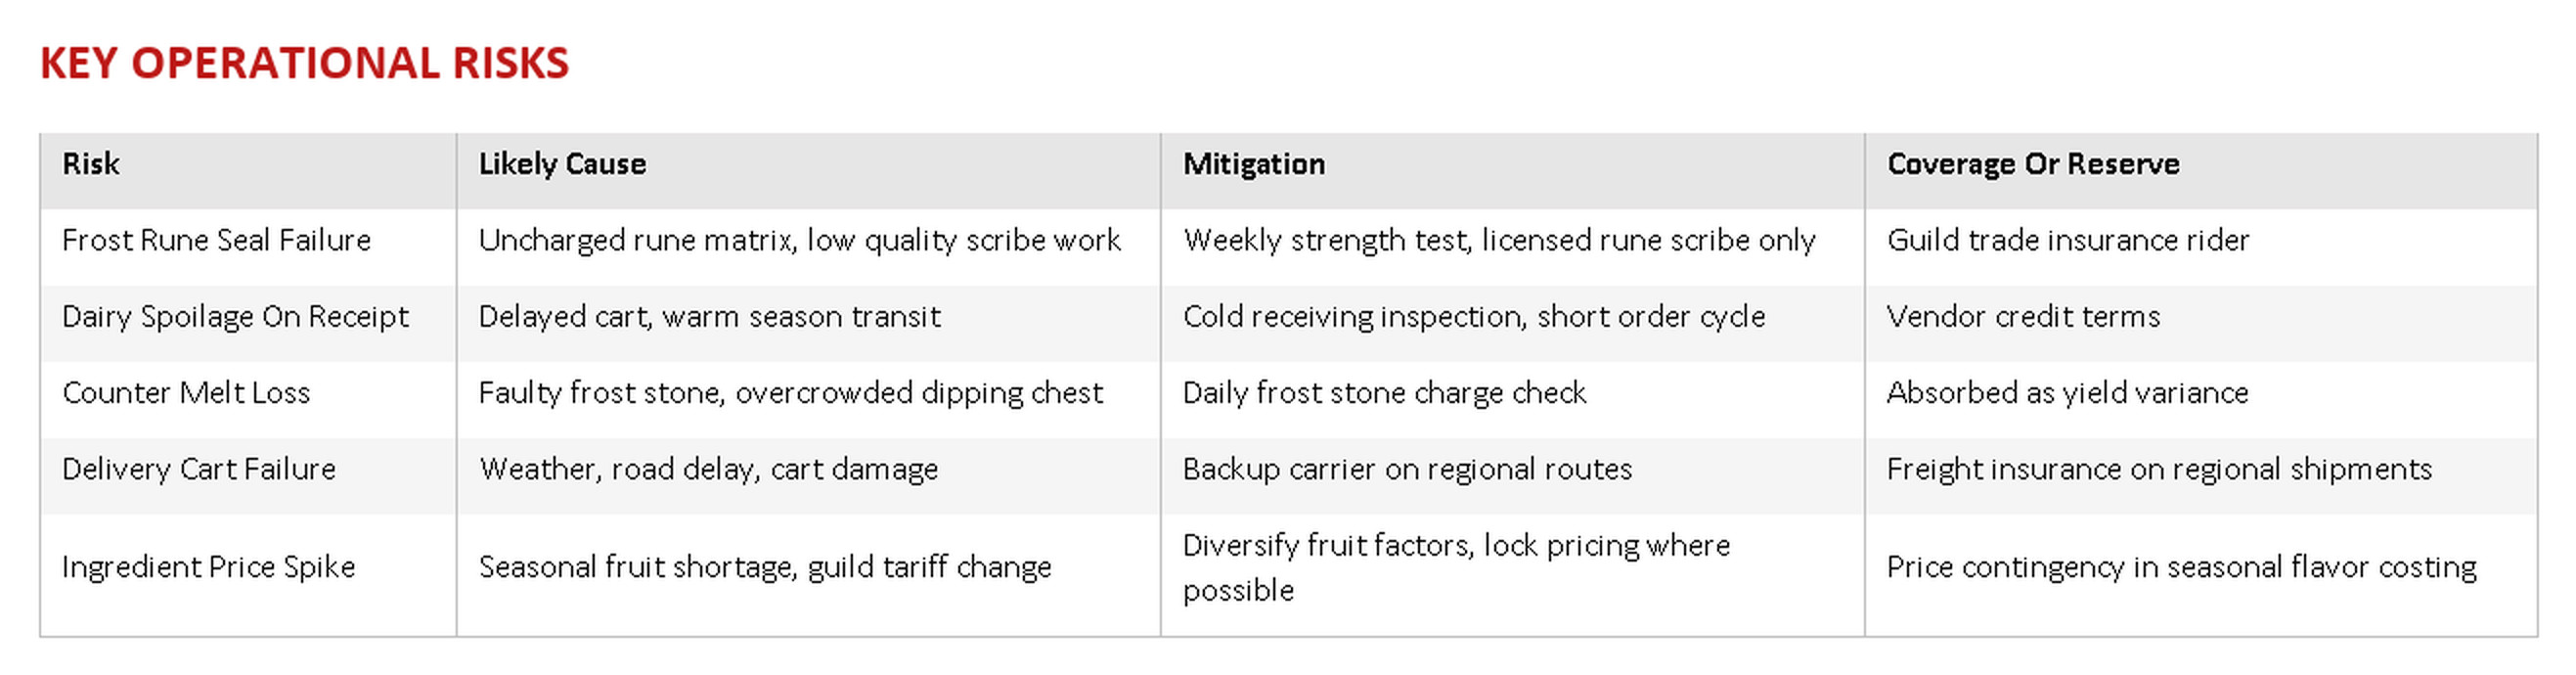
Risk And Insurance Considerations
The frost rune seal is the single point of failure most likely to threaten an entire batch or delivery run, since a weak seal can spoil product before anyone notices. The shop should treat this as a named risk with its own mitigation steps rather than an assumed background cost.
Faerûn Aware Considerations
The Waterdeep Trading Company should treat ice cream as both food and magic supported inventory. The dairy supply is mundane. The frost rune seal is magical. The route is production. The counter sale is retail. The delivery model is transport. The full process touches purchasing, inventory, production, sales, and quality.
A few operating points matter most.
Do not produce more than the freezer can hold.
Do not sell open tubs into wholesale orders.
Do not deliver without a frost stone or cold seal slip.
Do not accept returns into saleable stock.
Do not let flavor variety outrun batch control.
Do record scoop yield by tub, because waste and over serving can quietly eat the profit.
Do book festival production ahead of counter estimates, since a festival stand cannot restock mid event.
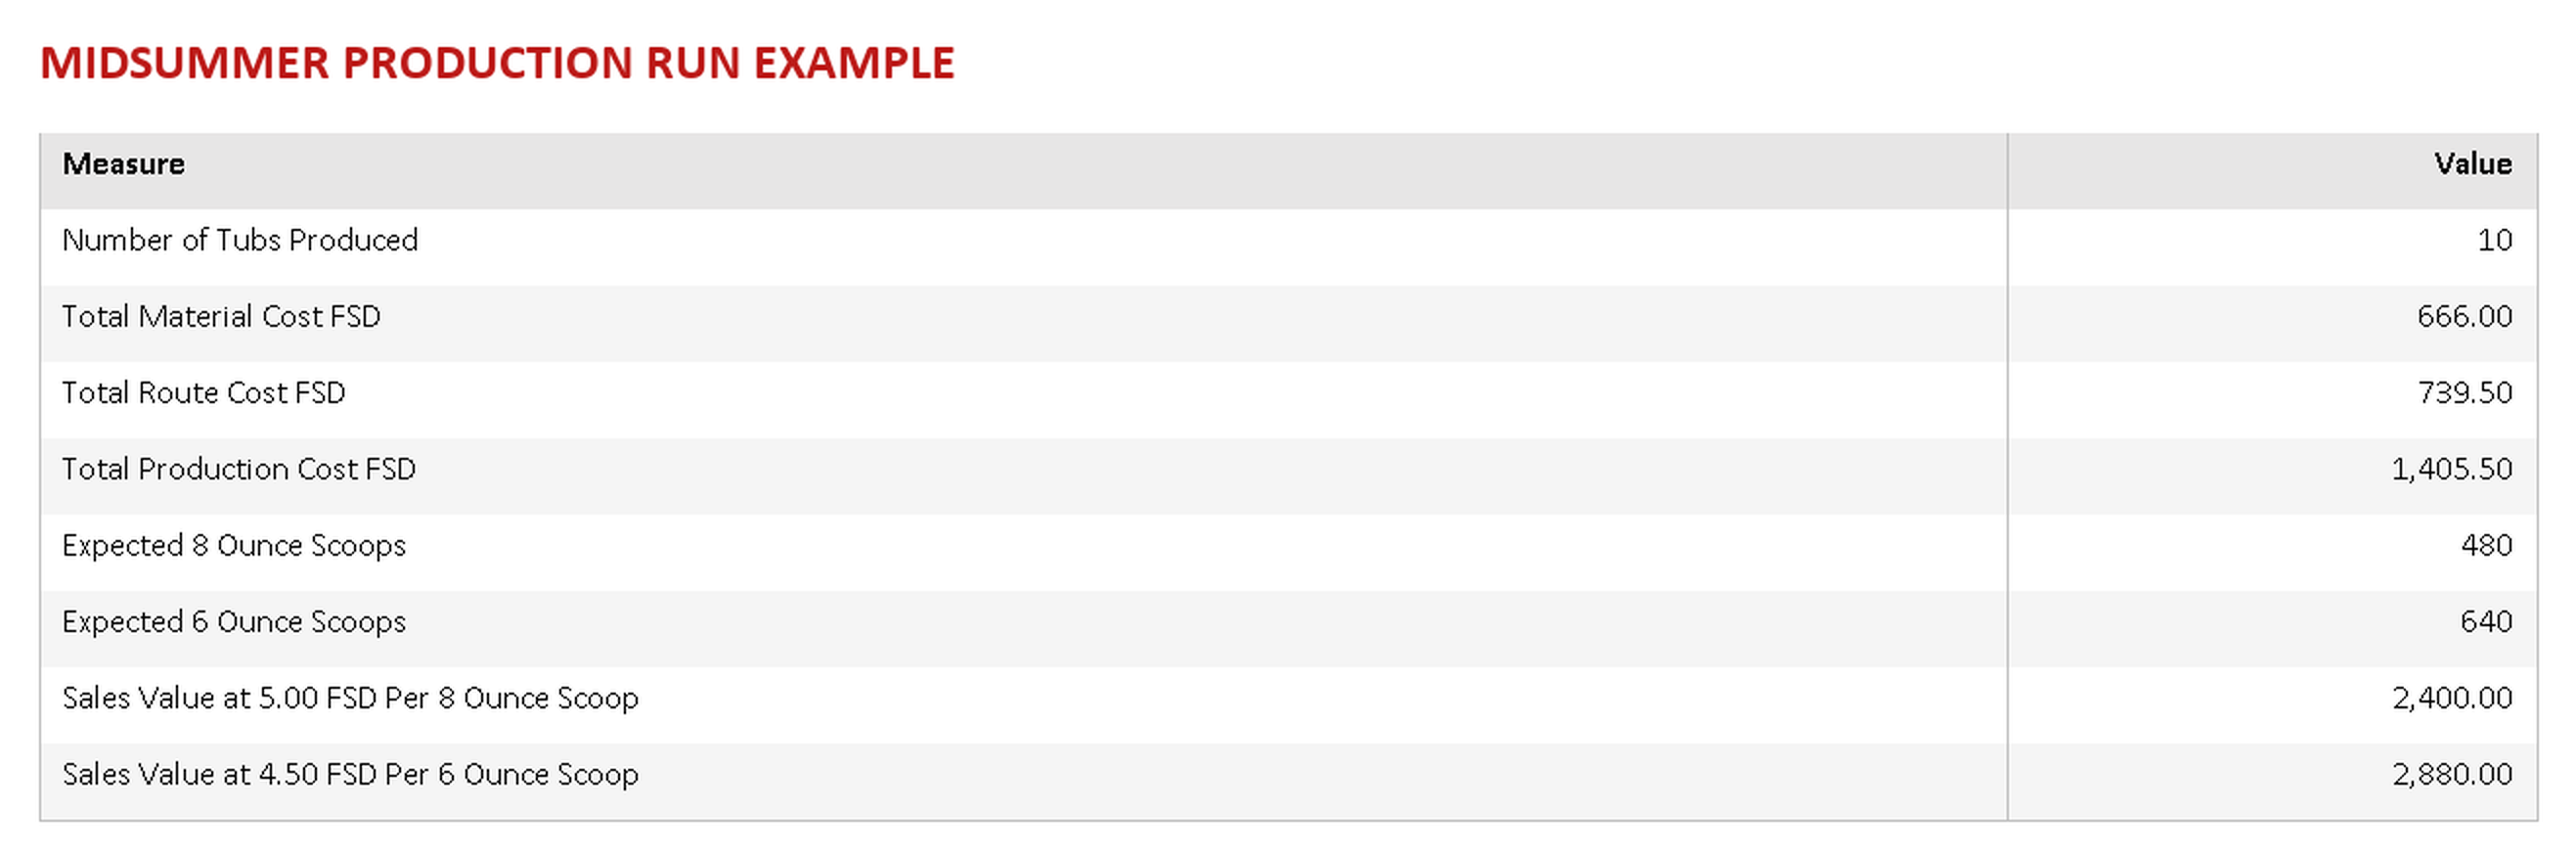
Worked Example
Greta Ironfist approves a production run of 10 tubs of Frostberry Ice Cream for a Midsummer market push.
The production team creates 10 production orders or one batch order for 10 tubs. The BOM consumes cream, milk, sugar, egg base, frostberry puree, stabilizer, frost rune seals, tubs, and labels. The route records labor and overhead from receiving through final quality review.
The 6 ounce scoop creates more serving opportunities and a stronger margin, while the 8 ounce scoop feels more generous and may be better for premium festival pricing. The company can use both, but the serving size should be locked by item, price, and counter policy.
Final Thoughts
Frostmantle Creamery is a strong fit for the Waterdeep Trading Company because it uses skills the company already has. It buys from guild suppliers, manages controlled inventory, tracks batches, serves retail customers, and ships to trade partners.
The difference is discipline. Ice cream punishes weak storage, loose batch control, and slow delivery. With a clear BOM, defined route, strict storage plan, well managed distribution rules, a governed flavor portfolio, honest yield tracking, and a shop level profit and loss view, the company can turn a simple frozen treat into a profitable, expandable Waterdeep product line.
For step by step configuration guides covering production orders, BOMs, routes, and inventory setup, see the Advanced Dungeons and Dynamics 365 Bare Bones Configuration Guides, a 7 book series available at https://www.amazon.com/dp/B0GYLPFKCF
CALL TO ACTION
Get your own AD&D365 Environment and guides at adnd365.com/start
The four ways people manage household money aren’t just personal finance patterns. They’re organizational patterns. They show up at every scale: corner stores, venture-backed startups, mid-market manufacturers, Fortune 500 companies.
The stakes are just higher. And the failure modes are more public.
Here’s the same progression, mapped to real business behavior, and what each system actually produces in terms of profitability, resilience, and growth.
System One: The Checkbook Business
The question they ask:Is there money in the account right now?
Small businesses live here more often than most owners would admit. The restaurant owner who checks the register at the end of service. The contractor who pays suppliers when a client check clears. The freelancer who looks at the bank balance before agreeing to take on a new expense.
This isn’t incompetence. Early-stage businesses often have no choice: the margin for error is so thin that real-time cash position is genuinely the most important number. Survival runs on today’s balance.
The problem is what gets invisible.
A checkbook business knows whether it can pay this bill. It does not know whether it will be profitable this month. It does not know whether the good month it just had covered the overhead it carries, or whether it was just an unusually large receivable that finally cleared. It cannot distinguish between a solvent business having a cash-tight week and an insolvent business having a deceptively comfortable one.
The profitability trap: Many checkbook businesses are profitable on paper and bankrupt in practice. This is one of the most common ways small businesses die: not from lack of customers, not from lack of revenue, but from a sixty-day receivables gap that the owner couldn’t see coming because the system only showed today.
The technical term for this is cash flow insolvency: you have more assets than liabilities, which means you’re profitable, but you cannot pay your current obligations because the money is in the wrong place at the wrong time.
The balance looks fine until it doesn’t. And when it doesn’t, there’s no warning, because the system wasn’t designed to give one.
Real-world fingerprint: A profitable small business that always feels financially precarious. Owners who carry stress about money even in good months. Occasional crises (a big client pays late, a quarterly tax bill lands) that feel like catastrophes but are actually predictable, because they happen every year.
System Two: The Forecasting Business That Misses
The question they ask:What will revenue be this quarter?
This is where most growth-stage companies live, and where a remarkable number of them stay, stuck in a cycle of projections that don’t land.
The forecasting business has graduated from “what’s in the account” to “what are we expecting.” It runs pipeline reviews. It builds revenue projections. It presents a three-month outlook to leadership or investors. This is meaningful progress. Time is in the model now.
But the forecasts are almost always optimistic.
Sales teams project the pipeline as if every deal in the funnel will close, and close on schedule. Revenue gets projected; costs get underestimated. The plan says the new sales hire will be productive by month three; reality says month five. The contract that was “90% likely to close in Q2” pushed to Q3. The expense that was “one-time” recurs.
Month after month, the forecast is confident. Month after month, actuals come in below it.
The profitability trap: When forecasts are systematically optimistic, companies make commitments they shouldn’t. They hire ahead of revenue. They sign leases based on projected growth. They make promises to investors that require a growth rate the business can’t sustain. The result isn’t one bad quarter; it’s a structural gap between the business as it exists and the business as it was planned, and every decision made on the plan is now wrong.
The deeper problem is that optimistic forecasting hides whether the business model actually works. If you’re perpetually revising down, you can’t tell whether you’re a fundamentally profitable company having execution problems, or an unprofitable company whose numbers only look promising in the forecast.
Some of the most spectacular business failures in recent decades followed this pattern exactly. Companies with enormous revenue, strong unit economics in certain segments, and explosive growth, that were never actually profitable because the forecast kept promising that profitability was one more growth push away. The forecast became the operating reality, and the actual operating reality was never examined.
Real-world fingerprint: The company that’s always “on track for a great Q4.” Leadership that explains misses as timing issues, not model issues. Investors who hear “we’re accelerating into profitability” for six consecutive quarters. Employees who can’t quite tell whether the business is doing well or not, because the answer seems to depend on which version of the plan you’re comparing against.
System Three: The Budgeting Business
The question they ask:How did we do against the plan?
This is where professional management begins to look like professional management.
The budgeting business sets an operating plan at the start of the year: revenue targets broken down by product line, cost of goods, gross margin, departmental operating expenses, EBITDA target. Every month, actual results are compared to the plan. Variances are explained. Significant deviations trigger action.
This changes everything.
When you track budget versus actual with discipline, a few things happen that don’t happen in lower-order systems. First, you know quickly when something is wrong: not when the bank account empties, but when the variance shows up in the data. Second, the business develops institutional knowledge about how it actually operates versus how it thought it operated. Third, accountability becomes real: the sales leader can’t wave at the pipeline anymore, because the numbers are compared to a commitment.
Most importantly: a business running a real budget almost always generates more consistent, predictable profit than an equivalent business that doesn’t, because the act of planning and measuring drives better decisions.
The profitability mechanism: Budget discipline reduces the two most common causes of unexpected losses: untracked cost creep and unchecked optimism on revenue. When every department knows what it’s allocated and every shortfall gets explained, the business develops cost awareness that’s nearly impossible to maintain without the structure. Gross margins stabilize. Operating leverage improves. The business starts to compound.
This is why investors, acquirers, and lenders ask for budget-versus-actual comparisons. Not because they’re curious about the plan, but because the discipline of building and tracking a plan is itself predictive of management quality. A company that can build a realistic plan and execute close to it is a fundamentally different risk profile than one that can’t.
Real-world fingerprint: Quarterly business reviews with actual variance analysis. A CFO who knows, from memory, the gross margin by product line. A sales team that has monthly targets, not just an annual number. Financial reporting that comes out within a week of month-end, because the systems are set up to produce it. Debt covenants that get met because the business knew three months out whether it was on track.
System Four: The Capital-Planning Business
The question they ask:Where does this dollar earn the best return over time?
This is where great businesses separate from good ones.
The capital-planning business does everything the budgeting business does, and adds a layer of long-term, deliberate resource allocation. It doesn’t just ask whether this quarter’s expenses are on plan. It asks: what should this company invest in over the next three to five years to build durable profitability? Where should retained earnings go? Which capital expenditures earn above the cost of capital? Where are we building a competitive advantage, and where are we just spending?
This is the language of capital allocation, arguably the most important skill in running a business, and the one most frequently treated as secondary to sales, product, or operations.
The mechanism is thinking in returns, not just costs. A budget asks: are we spending what we planned? Capital planning asks: is the spending generating the return we need? The first question is about control. The second is about strategy.
The profitability mechanism: Businesses that allocate capital well build compounding advantages. The investment in equipment that reduces unit cost. The product development spend that expands addressable market. The customer acquisition that generates ten-year lifetime value. The acquisition that adds capability the business couldn’t build faster internally.
Done well, capital planning means that profitability doesn’t just persist; it grows. The business today is structurally more profitable than the business three years ago, because the intervening years of deliberate investment built something that competitors can’t easily replicate.
Berkshire Hathaway is the canonical example of this system at scale. Buffett has described his job, fundamentally, as capital allocation: deciding where each dollar of retained earnings earns the best long-term return. The operating businesses run their budgets. His job is to decide where the cumulative profitability of those businesses gets reinvested.
Most businesses never get here because they’re still solving earlier problems. But the ones that do, the ones that develop a real framework for evaluating long-term capital deployment against expected return, tend to generate profitability that compounds rather than flatlines.
Real-world fingerprint: A CFO who can articulate the company’s return on invested capital (ROIC) and compare it to the weighted average cost of capital (WACC). Capital expenditure proposals that include payback period analysis. A board conversation about portfolio allocation: which business lines to invest in, which to harvest, which to exit. Retained earnings that are deployed deliberately, not just accumulated. A five-year financial model that gets updated quarterly and actually informs decisions.
The Profitability Table
System
Business Type
Profit Pattern
Most Common Failure
Checkbook
Early-stage, survival-mode
Unpredictable; solvent on paper, crisis-prone in practice
Cash flow insolvency; profitable businesses going under
Never actually achieving the “next quarter” profitability
Budgeting
Mature operating business
Consistent, predictable, improvable
Profitable but not compounding; running in place
Capital Planning
High-performance, long-horizon
Compounding; structural improvement over time
None. This is the goal.
Why Businesses Get Stuck
The natural question is: why doesn’t every business just run capital planning? If it’s the best system, why doesn’t everyone use it?
The same reason people don’t run household budgets.
Budgeting requires discipline in the present to prevent pain in the future. Capital planning requires thinking clearly about the future while managing the present. Both require honest accounting, which means accepting bad news as data rather than explaining it away. All of this is harder than it sounds when you’re dealing with payroll, customers, competition, and a thousand daily decisions that feel more urgent than next year’s plan.
The businesses that move up the ladder are the ones where someone (usually a founder who lived through a cash flow crisis, or a CFO who’s seen what variance blindness costs) made the deliberate decision that the current system wasn’t good enough. That better information was worth the work required to have it.
The irony is that the work gets easier as the system improves. A business with a real budget closes its books faster, makes decisions more confidently, and recovers from setbacks more cleanly than one running on balance checks and optimistic forecasts. The discipline creates capacity, not just control.
The Household Connection
This is exactly why the household and the business are the same problem at different scales.
The person who checks their bank balance every Friday morning is running the same system as the small business owner who checks the register. The family that talks about “making it to the next paycheck” is experiencing the same structural problem as the startup that talks about “making it to the next funding round.”
The mental models transfer completely. The vocabulary is different. The amounts are different. The underlying structure (how money is tracked, what questions get asked, how far ahead the thinking extends) is identical.
Which means the upgrade path is also identical.
You don’t have to be a business to benefit from running like one. You don’t have to have investors or a board or a CFO to ask better questions about where your money goes and what return it’s generating.
The four systems aren’t corporate tools. They’re ways of thinking. The businesses that use the most sophisticated version aren’t more rigorous because they’re businesses; they’re more rigorous because they decided better information was worth the effort to have it.
That decision is available to anyone.
This post is part of the Home ERP series, exploring how enterprise resource planning concepts apply to the households we all already run.
Want to go deeper?Running a Home Like a Business walks through the complete system (budgets, cash flow, capital planning, and more) through the story of one family that runs their household with the discipline of a well-managed company.
The world of trade does not belong to Faerûn alone. Commerce has always found its way to the edges of known charts, into harbors where no guild charter holds authority and no lord’s tax collector dares to venture. It is in those contested waters that the Black Tide Trading Company has made its name, and it is through that company’s operations that a new chapter in the Advanced Dungeons and Dynamics 365 series now opens.
This article introduces the Black Tide Trading Company, the pirate-genre companion to the Waterdeep Trading Company. It is a different world, a different currency, and a different set of trade pressures, but the underlying disciplines of accounts receivable, inventory management, procurement, and payroll apply just as surely on the deck of a Caribbean trader as they do in the vaults of Waterdeep’s merchant lords.
A Different Stage, The Same Discipline
The base Advanced Dungeons and Dynamics 365 guides use the Waterdeep Trading Company as the example organization. Every legal entity, every customer account, every vendor relationship, and every fiscal period is configured around that company and its operations across Faerûn.
The Black Tide Trading Company supplement works differently. It is a genre overlay, a companion document that sits alongside each base guide and provides alternative configuration values for readers who want to work through the same ERP concepts in a maritime trading environment. Where the base guide says Waterdeep, the supplement says Tortuga. Where the base guide specifies Waterdeep Gold, the supplement specifies the Piece of Eight.
The concepts taught are identical. The setting is entirely its own.
The Setting: The Caribbean, 1718
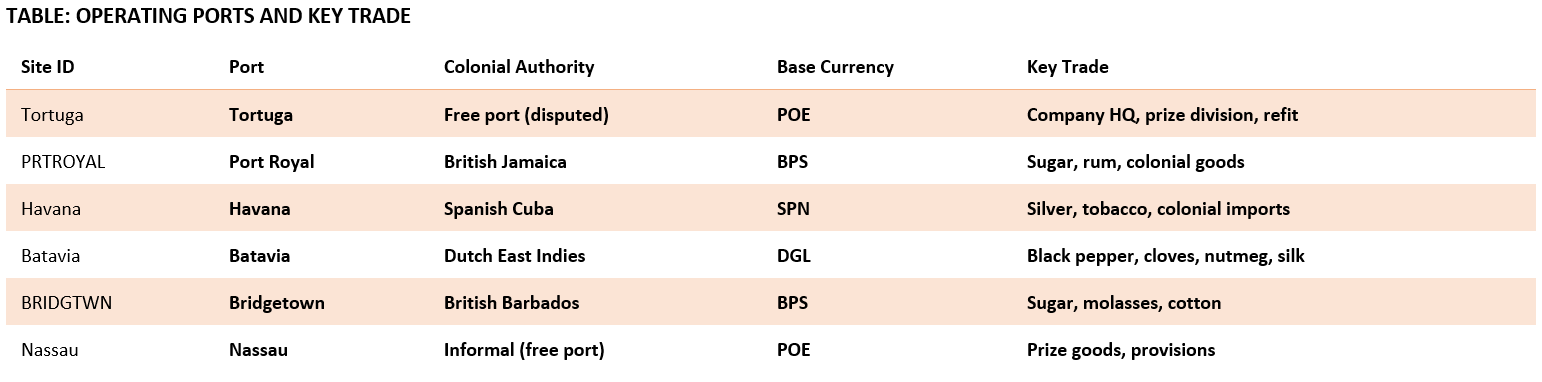
The year is 1718. The Caribbean is divided among the competing ambitions of four colonial powers. Spain controls Havana and the silver trade routes running north and east. Britain holds Port Royal and commands the Atlantic passage. The Dutch East India Company operates out of Batavia with a near-total monopoly on Asian spices. The French maintain interests in the Windward Islands, with sugar and colonial supply contracts moving through their own networks.
Into this contested maritime world sails the Black Tide Trading Company. It is not a pirate outfit in the theatrical sense. It flies no Jolly Roger and raids no merchant vessels. Instead, it occupies the profitable grey zone between licensed privateer and licensed trading house, moving cargo across jurisdictional lines that more cautious merchants refuse to cross. Its competitors are not other pirates. They are over-regulated colonial trading houses that cannot react quickly when a pepper crop fails or a Dutch spice convoy arrives six weeks ahead of schedule.
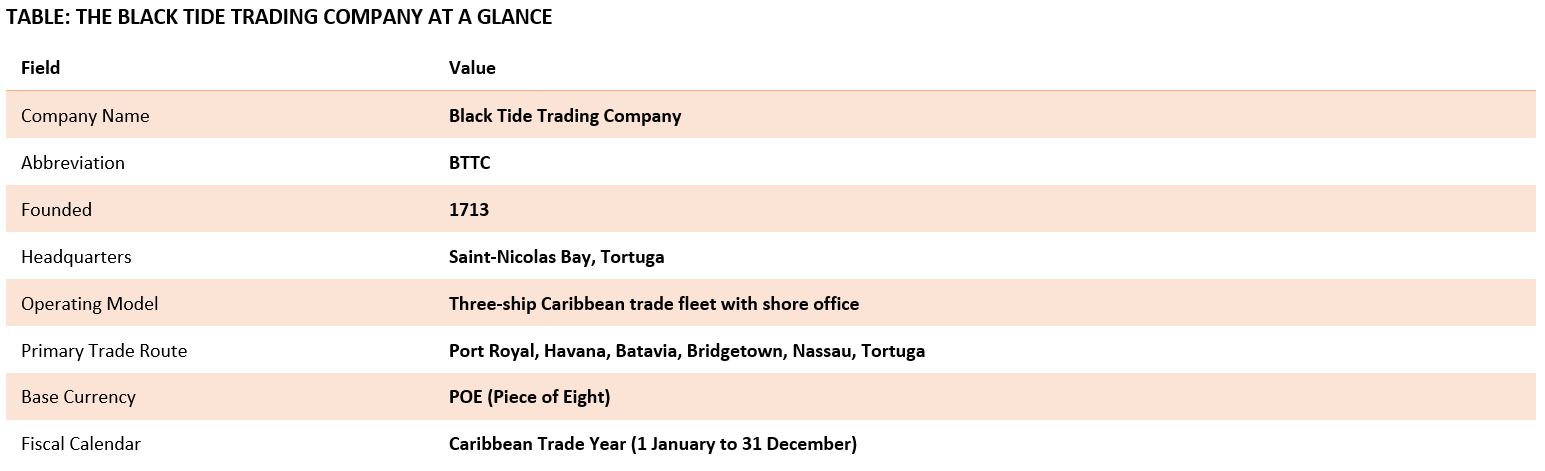
The company operates out of Tortuga, headquartered at the Black Tide Counting House on Saint-Nicolas Bay, and maintains agents and accounts across six ports.
The Fleet: Three Ships, Six Ports
Every voyage the BTTC undertakes is a logistics puzzle. Cargo must be procured months in advance in Batavia, transported across two oceans, and sold into Caribbean markets where prices shift with colonial politics, weather, and supply disruptions. The company’s three ships are its primary inventory-holding units, functioning in the ERP configuration as mobile warehouses.
The following table describes the three vessels that form the backbone of BTTC operations.
Cargo is loaded at one port and unloaded at another, with each port configured as a separate site in the ERP structure. The six operating ports below represent the geographic scope of BTTC trade.
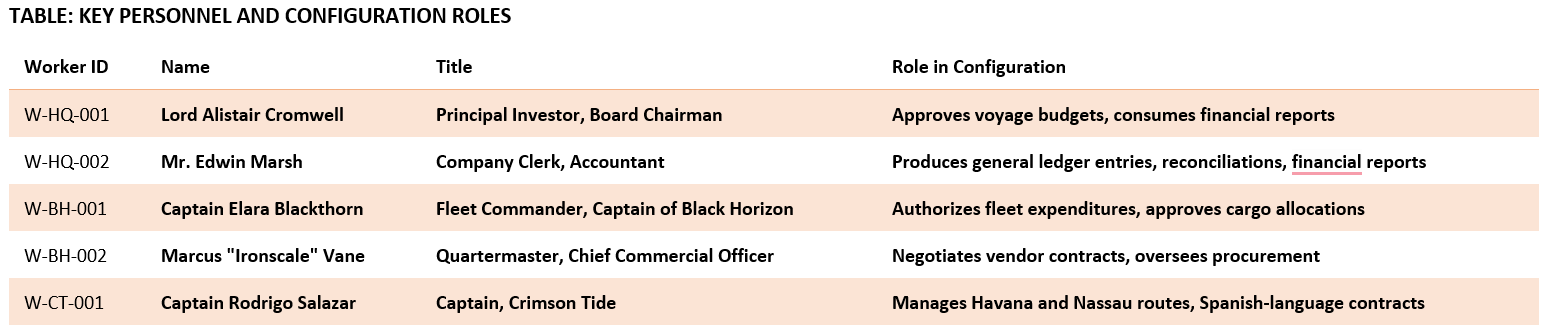
The People: Who Runs the Black Tide
Five individuals make most of the financial decisions that the BTTC configuration guides ask learners to work through. Understanding who they are and what they are responsible for helps place the configuration tasks in their proper operational context.
The following table summarizes the key personnel and their roles within the company.
The company employs sixty workers in total, organized across three ship crews, a Tortuga shore team, and a network of five port agents stationed at each operating location.
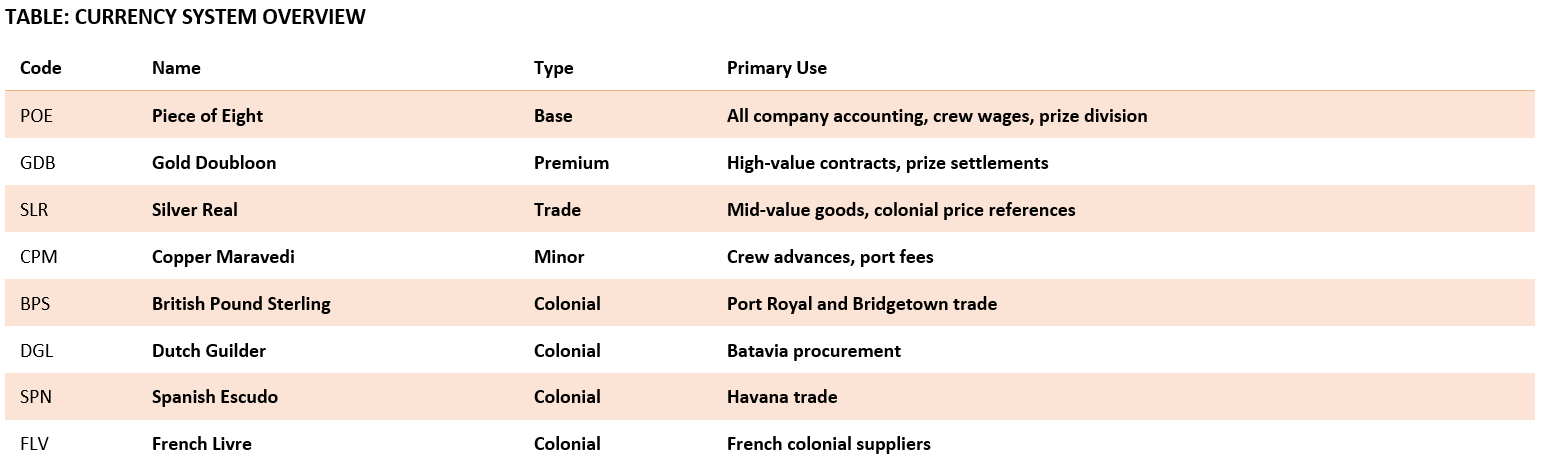
The Currency: Trading Across Jurisdictions
One of the most distinctive aspects of BTTC operations is the multi-currency environment. Where the Waterdeep Trading Company operates primarily in Waterdeep Gold, the BTTC moves goods across four colonial currency zones and maintains six additional internal and specialty currencies for crew wages, prize cargo, and luxury trade.
The Piece of Eight is the company’s base currency and serves as the interoperability unit across all accounts. Exchange rates are expressed as POE cross-rates.
The following table shows the core and colonial currencies configured for BTTC operations.
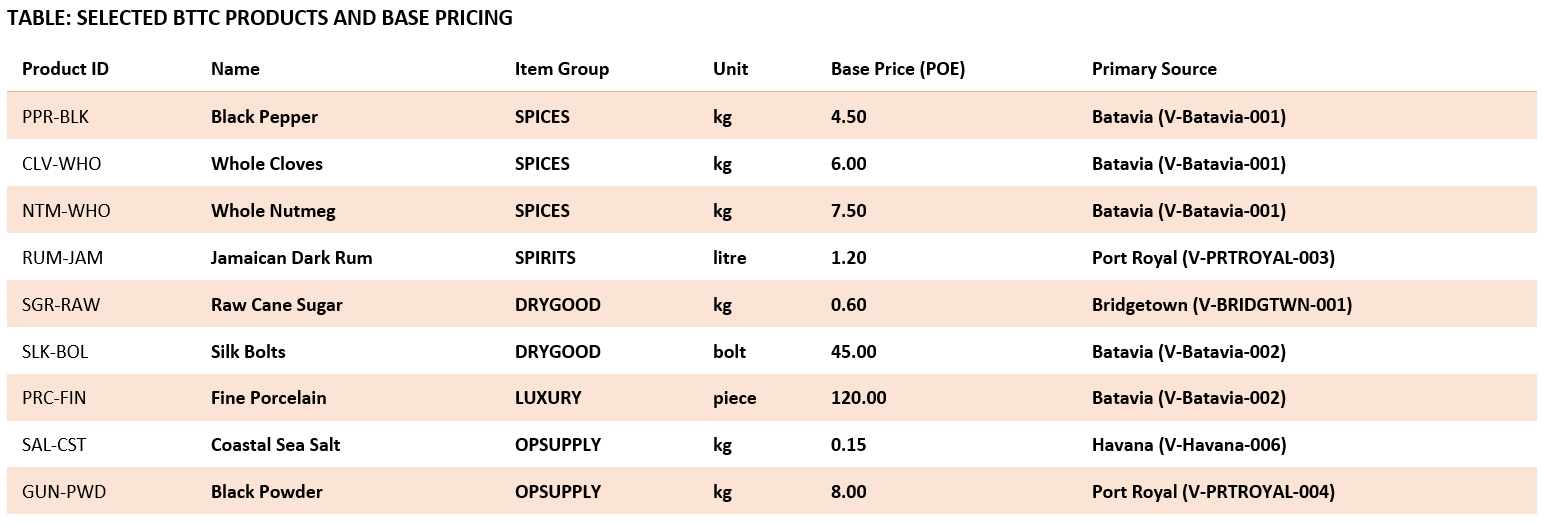
The Products: What the BTTC Trades
The company carries twenty commodity products spanning Asian spices sourced in Batavia, Caribbean spirits and agricultural goods from Port Royal, Bridgetown, and Havana, and operational supplies that keep the fleet moving. Products are grouped by trade route logic rather than product type, with spices, spirits, dry goods, raw materials, and operational supplies each managed as distinct item groups.
Black pepper is the company’s highest-volume product and the commodity at the center of the primary adventure scenario. It drives the best margins when markets are stable, and it represents the company’s most significant financial exposure when supply and demand fall out of alignment.
The following table shows a selection of key products and their base pricing.
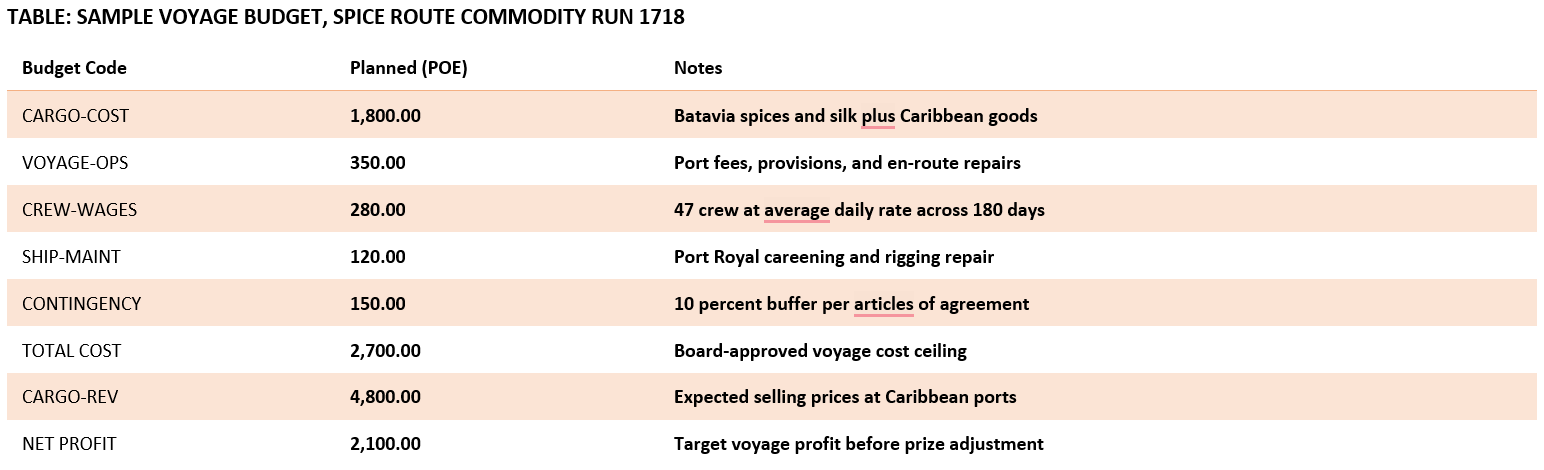
The Adventure: A Planning Failure at Sea
The primary adventure scenario built around the BTTC configuration data is the Spice Route Commodity Run of 1718. The Black Horizon departs Tortuga in March, sails to Batavia, loads a full hold of black pepper and mixed spices, and returns to the Caribbean by September.
The scenario is designed around a demand planning failure. The BTTC loaded more pepper than the market could absorb at the expected sale price. A Dutch spice convoy arrived ahead of schedule, flooding Port Royal and Bridgetown with cheaper pepper, and the company’s revenue projections collapsed below the approved voyage budget.
The sample voyage budget below shows what Lord Cromwell approved before departure, and what Clerk Marsh was left to reconcile upon return.
This is the configuration that learners analyze when they complete the adventure. The variance between planned and actual, and the systems that should have flagged the risk earlier, are the practical lessons that the BTTC scenario is built to teach.
How to Use the Supplement
The Black Tide Trading Company supplement is structured to work alongside the base AD&D365 configuration guides, not to replace them. Each guide in the supplement mirrors its corresponding base guide and provides BTTC-specific values for every field that learners are asked to configure.
The approach is straightforward. Open the base guide in one window and the supplement in another. When the base guide asks for a company name, currency code, fiscal calendar, or customer record, find the matching BTTC value in the supplement and enter that instead. The same configuration steps apply. Only the data changes.
This design means that readers who work through the base guides using the Waterdeep Trading Company can return to the same guides and complete a second pass with the BTTC, reinforcing every concept in a different operational context.
Final Thoughts
The Black Tide Trading Company is a different kind of organization from the Waterdeep Trading Company. It operates in a harder world with fewer protections, more currency exposure, a crew that expects a share of every profit, and a voyage budget that can unravel when the Dutch arrive early. But the disciplines it relies on, well-configured accounts, accurate inventory tracking, defensible procurement records, and a payroll system that can calculate voyage shares to the last Piece of Eight, are the same disciplines that any well-run trading operation depends on.
Whether the ledger is kept in Waterdeep Gold or Pieces of Eight, good accounting keeps the ship afloat.
Support the AD&D365 Project on Patreon. To grow this world, we’ve launched an official Patreon page where supporters can access exclusive content, tools, and training labs, and even influence the project’s future. Your support fuels more than just development; it expands the guildhall, forges new scrolls, and empowers the next generation of configuration wizards. Begin your journey: https://www.patreon.com/adnd365/
A Grateful Salute to Our Patrons. To all those who stand behind the vision, thank you for helping bring this world to life. Our Benefactors, Andre Breillatt and Eryndor Fiscairn‡, your boundless generosity fuels the arcane core of this project. Without your magic, the weave would falter. Our Apprentices, the spell engines turn, and the training labs thrive thanks to our current Apprentices: Michael Ramirez and Andreth Bael’Rathyn‡. Special thanks to our past Apprentices, whose contributions helped us get here: Ralf Weber, Wendy Rijners, Shashi Mahesh, Julia Tejera, Ben Ekokobe, Tiago Xavier, Naveen Boyinapelli, Marcos Tadeu Wolf, Kathryn Greene, Jason Brown, Mark Christy, and Ashish Singh.Our Initiates, Jesper Livbjerg, Peter Lorre, Gregory Brigden, and Martin Grahm, your commitment marks the start of the deeper path, stepping beyond mere observation into the active shaping of this realm. Our Followers, your steady presence along the journey is a beacon of encouragement: Rusty Cavalier,Eric Shuss, Sunil Panchal, Sarah D. Morgan, Nick Ramchandani, Daniel Kjærsgaard, and Tomasz Pałys. And our Voyeurs, Harry Burgh, Abdelrahman Nabil, and Basil Quarrell, ever watching from the shadows, clearly intrigued… but not enough to part with a single gold piece. Your silent curiosity is noted and mildly judged.
Want to design your own economic models in Faerûn? Get your own AD&D365 Environment and guides at adnd365.com/start, and request access to the public view of the current database at https://public.adnd365.com – Login npc@adnd365.com, Password N0nPl@yC#822!
Every ERP concept in this lab has a CRM twin. The names changed, the forms got wider, and there are more required fields, but the underlying business logic is the same. This lab maps what we already know to where it lives in Finance and Operations.
We are not building anything new yet. We are reading, navigating, and comparing. By the end, the D365 F&O navigation should feel like a dialect of a language we already speak.
Overview
This lab maps six core CRM entities to their ERP equivalents. We will navigate to each F&O form, compare the record structure to what we know from CRM, and identify which fields are new, which are renamed, and which behave differently.
We will complete six activities:
Open a customer record and compare it to a CRM account.
Review customer groups and compare them to CRM account types or segments.
Open a released product and compare it to a CRM product catalog entry.
Navigate the site and warehouse hierarchy and understand physical inventory tracking.
Open a vendor record and understand the purchase side of the same entity model.
Review currency codes and understand multi-currency in ERP.
Each activity is a guided navigation exercise. No records are created or modified.
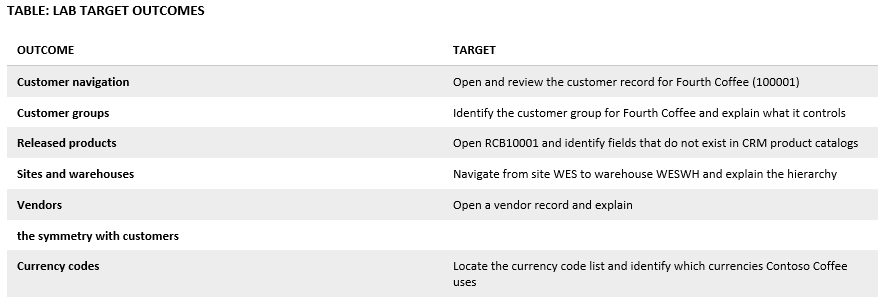
Objective
By completing this lab, we will be able to navigate six core F&O entity forms and explain the CRM-to-ERP mapping for each.
The following table defines the target outcomes for each entity mapping exercise.
TABLE: LAB TARGET OUTCOMES
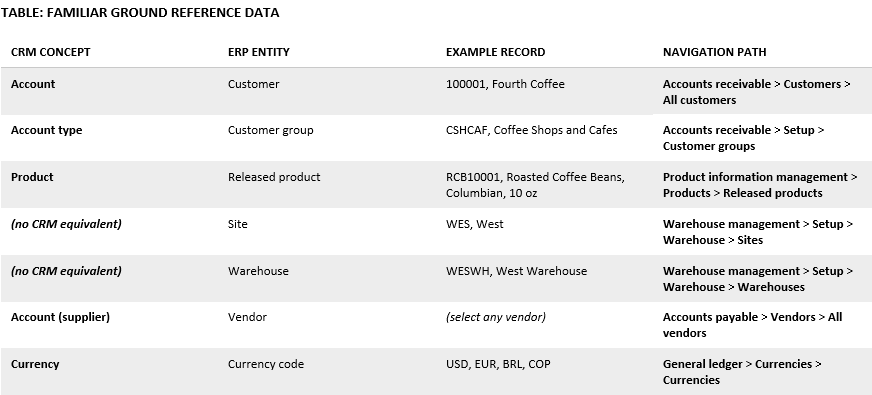
Reference Data
The following reference values support navigation during this lab. All records already exist in the Contoso Coffee database.
This article examines how the Waterdeep Trading Company applies shop floor automation across its workshops, forges, kitchens, and docks to eliminate recording delays, reduce production losses, and maintain consistent quality. It covers the foundational principles of state-based tracking, the events that drive automation, and the area-specific controls used across different production environments. A worked example traces a heated cauldron batch from ingredient issue through to inventory creation. Readers seeking a concise overview may read only the opening and closing sections. The middle section provides expanded detail on events, area-specific controls, and the worked example for those wanting a deeper understanding of how automation operates in practice.
What Shop Floor Automation Means in Faerûn
In the workshops, kitchens, forges, and docks of Faerûn, work does not pause to wait for parchment and ink. As trade volume increased, the Waterdeep Trading Company found that memory, shouted confirmations, and end-of-day notes could no longer protect quality or coin.
Shop floor automation in Faerûn is the practice of observing work as it happens and recording it at the exact moment of change. Runes shift, seals bind, counters advance, and ledgers update without delay. This is not about replacing workers or removing judgment. It is about defining clear stations, clear states, and clear outcomes so that work can speak for itself.
When ingredients are issued, a batch formally exists. When heat reaches its required level, the heating step is complete. When a seal is applied, inventory becomes real. Each change in state carries meaning, and each meaning is recorded at once. The shop floor becomes the source of truth.
Why It Matters to the Waterdeep Trading Company
As operations expanded, three risks emerged simultaneously. Work was being completed without timely records, costs were absorbed without being traced, and goods were moving before proof existed that they should.
Automation closes these gaps by ensuring that every meaningful change creates a record at the moment it occurs. Nothing relies on recall, and nothing waits for a clerk to catch up. For a company operating across Waterdeep, Baldur’s Gate, Silverymoon, and beyond, this consistency is not a luxury. It is the foundation of trustworthy trade.
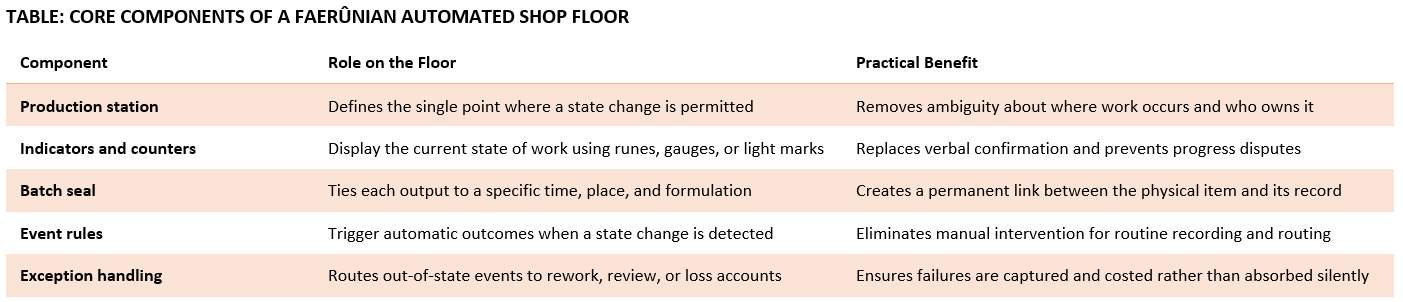
Core Components of a Faerûnian Automated Floor
Production begins at clearly defined stations, each responsible for a single type of action such as mixing, heating, shaping, sealing, or packing. A station is not just a place; it is the point where the state is allowed to change.
Indicators and counters make those state changes visible. Runes, scales, gauges, and light marks show whether work is idle, active, complete, or failed. These replace verbal confirmation and remove ambiguity from progress checks.
Every output receives a batch seal tied to time, place, and formulation. The seal acts as both permission and proof, linking the physical item to its recorded history.
Event rules connect state changes to outcomes. When a state changes, inventory may be recorded, cost captured, release blocked, or review requested, all without waiting for human intervention.
The following table summarizes each core component, its role on the floor, and the practical benefit it delivers to the Waterdeep Trading Company.
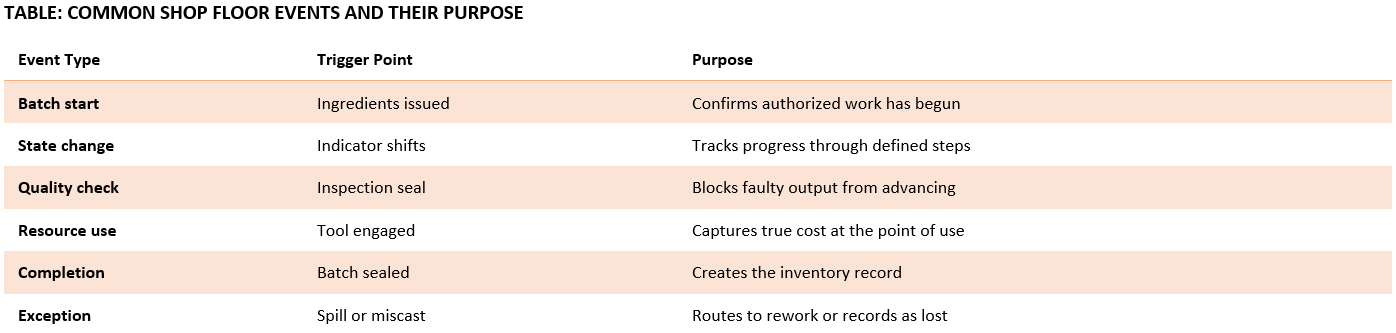
Events That Drive Automation
Automation depends on recognizing events rather than intentions. A batch does not exist because someone planned it; it exists because ingredients were issued. A step is not complete because time passed; it is complete because an indicator changed state.
The following table identifies the most common shop floor events, their triggers, and the purpose each serves in the production record.
Each event is small on its own, but together they create full visibility into how work moves across the floor. The power of this approach is that no single worker is responsible for maintaining the full picture. The floor assembles itself automatically, event by event.
It is also worth noting what these events are not. They are not scheduled reminders or periodic reviews. They fire at the moment of change, which means the record is always current, never reconstructed from memory, and never dependent on a clerk completing their rounds.
Automated Tracking by Area
Different production environments present different challenges, and automation must be configured to match each one. The following sections describe how the Waterdeep Trading Company applies event-based tracking across its four primary operational areas.
Alchemical and Craft Production
In alchemical workshops and craft halls, formulations are locked to approved versions. A station configured for a specific blend will refuse inputs from outdated or unapproved formulas before work begins. Any substitution of an ingredient or supplier immediately flags the batch for review rather than allowing production to continue on an untested basis.
This prevents unsafe output from reaching the warehouse and ensures that strength, composition, and consistency remain within the tolerances set by the guild’s master artificers. When a batch is flagged, it moves to a holding state until a qualified inspector reviews and either approves or rejects it. The cost of the flagged batch is captured regardless of outcome, so waste is never invisible.
Kitchens and Food Halls
In kitchens and guild dining halls, cooking stations track both portions prepared and portions issued. Daily preparation limits are enforced automatically; when a threshold is reached, the station closes, and preparation stops without requiring a supervisor to intervene.
Rollover rules define what happens to prepared food at the close of each day. Depending on the item and the guild contract in place, food may be transferred to same-day service, logged as waste, or scheduled for disposal. These rules keep illness risk low and ensure that waste is recorded as a real cost rather than quietly absorbed into overhead.
Forges and Workshops
In forges and manufacturing workshops, tools and molds are treated as shared resources with defined availability states. When a tool is assigned to a batch, it cannot be assigned elsewhere until it is released. This prevents double-booking and ensures that the tool cost recorded against a batch reflects actual usage rather than an estimate.
Wear and repair needs are logged as events rather than complaints. When a tool reaches a defined usage count or shows signs of degradation, a maintenance event is created automatically. This makes repair needs visible before failure occurs, protecting both the tool and the production schedule that depends on it.
Docks and Warehouses
On docks and in warehouse facilities, arrival and departure are recorded at the moment of physical movement. Each load is tied to a batch seal, a route designation, and a named handler. When a discrepancy appears between what was dispatched and what arrived, the record points immediately to the point of separation rather than requiring a full investigation of all parties in the chain.
This is especially valuable for the Waterdeep Trading Company’s long-haul routes between the Sword Coast and inland cities such as Neverwinter, Silverymoon, and Baldur’s Gate, where goods may pass through multiple hands and several days of travel before reaching their destination.
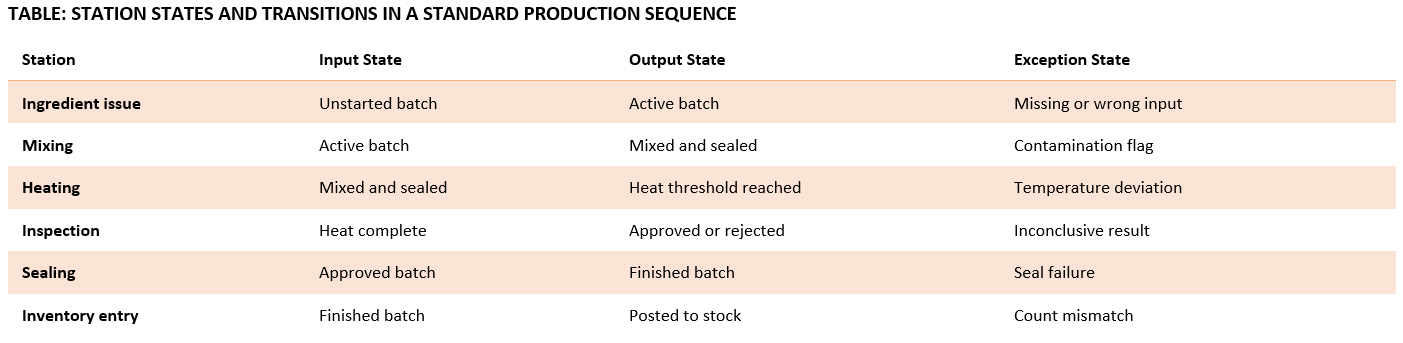
Station Design and Flow Principles
A well-designed automated floor is organized so that each station has exactly one input state and one output state. Work enters a station in a defined condition, and it leaves in a different, defined condition. Anything outside those two states is an exception.
The following table illustrates a standard station sequence for craft production and the state transitions that automation tracks at each point.
Each transition is recorded as an event. If a station skips a state, the system flags the gap. If a state is repeated, it is logged as a duplicate. Neither is allowed to pass silently.
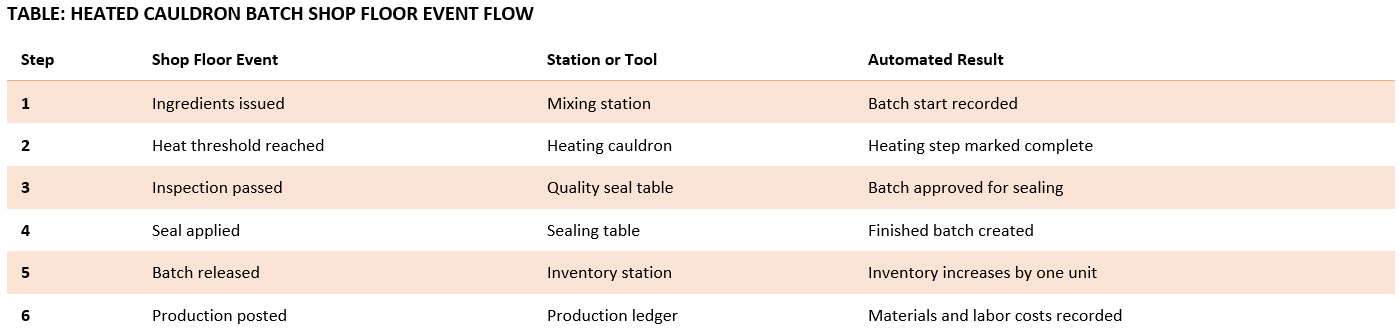
Worked Example: Automated Heated Cauldron Batch
The following example traces a single heated cauldron batch through the Waterdeep workshop from first issue to final inventory entry. Each step represents a change in state, not a task recalled later.
When the seal is applied at step four, the inventory record and cost entry are already prepared. No notes are rewritten, and there is no delay between the work done and the records being updated. If the inspection at step three had failed, the batch would have moved to a rework or loss state, and both the cost of materials and the cost of the failed inspection would have been captured before any further action was taken.
The floor reports for itself. Every cauldron that leaves the workshop carries a full history of how it was made, who touched it, and what it cost.
Controls and Safeguards
Automation strengthens oversight rather than weakening it. Stations cannot proceed without correct inputs, seals cannot be reused, and exceptions require review before release. Every action leaves a trace that can be followed back to its origin.
This protects both the product and the company name associated with it. For a guild operating across multiple cities, that protection is a commercial asset as much as it is an operational one.
Realms-Aware Considerations
Faerûn is not uniform, and automation must respect that. Magic-dense cities such as Waterdeep and Silverymoon support fine-grained indicators and real-time runic tracking. Frontier towns and rural waypoints rely on simpler marks paired with manual confirmation steps.
Guild rules may impose additional checks on top of standard event flows, particularly in trades regulated by bodies such as the Baldur’s Gate Blacksmiths Guild or the Arcane Artificers and Alchemists Union. Seasonal conditions, festival disruptions, and caravan delays can also affect timing and flow, and the event model must account for pauses without treating them as failures.
Automation works best when it matches the place it serves. A system designed for a Waterdeep forge will need adjustment before it is useful in a Luskan dockyard.
Final Thoughts
Shop floor automation in Faerûn gives work a voice. When production speaks at the moment, it changes, losses shrink, quality stabilizes, and ledgers remain true. The Waterdeep Trading Company does not rely on memory to run its operations. It relies on events, states, and seals, as well as a floor that records itself.
For any guild looking to grow without losing control, this discipline is not optional. It is the difference between a ledger that reflects what happened and a ledger that reflects what someone hoped happened.
Support the AD&D365 Project on Patreon.
To grow this world, we’ve launched an official Patreon page where supporters can access exclusive content, tools, and training labs, and even influence the project’s future. Your support fuels more than just development; it expands the guildhall, forges new scrolls, and empowers the next generation of configuration wizards. Begin your journey: https://www.patreon.com/adnd365/
A Grateful Salute to Our Patrons
To everyone who supports this world, thank you for helping keep it alive and growing.
Our Benefactor:Andre Breillatt. Your generosity powers the heart of this project. Because of you, everything continues to grow and move forward.
Our Apprentices:Michael Ramirez and Andreth Bael’Rathyn‡. The engines keep turning, and the training halls stay alive because of you.
With special thanks to our past Apprentices, whose early support built the foundation: Ralf Weber, Wendy Rijners, Shashi Mahesh, Julia Tejera, Ben Ekokobe, Tiago Xavier, Naveen Boyinapelli, Marcos Tadeu Wolf, Kathryn Greene, Jason Brown, Mark Christy, and Ashish Singh.
Our Initiates:Sarah D. Morgan, Jesper Livbjerg, Harry Burgh, Martin Frahm, Gregory Brigden, and Peter Lorre. You’ve stepped beyond watching and into shaping what this becomes.
Our Followers:Rusty Cavalier, Eric Shuss, and Michael Ramirez. Your steady backing keeps progress steady.
Our Voyeurs (Free Members):Deborah, Zarana, Daniel Tchakounte, Will Morrison, Danuelle Geldenhuys, Stuart, JoeNorthMan, Kshitiz Sinha, Michael A., Danijel Vucic, Damio, Zamir Gori, LK, Reza Al, Amith Prasanna, Suprit Naregal, Monika Duplessis, Brianna Otto, PW, Laura J, Alan Megahy, Carsten, Carri, Marcel Barrow, Greg, Ahmet, Franky, Abdullah, Basil Quarrell, Abdelrahman Nabil, NPC, Manimaran Shanmugam, and Shoaib Rafi. Ever watching from the shadows, curious but not yet parting with a single gold piece. Your quiet interest is noticed and lightly judged.
Want to design your own economic models in Faerûn? Get your own AD&D365 Environment and guides at adnd365.com/start, and request access to the public view of the current database at https://public.adnd365.com – Login npc@adnd365.com, Password N0nPl@yC#822!
Rolling cart inventory management is the practice of treating mobile material carts as formal, governed sub-locations within a warehouse structure. This article explains how the Waterdeep Trading Company assigns items to carts, sets par levels to prevent stockouts, and follows a disciplined restocking cycle across its forge halls, enchanting workshops, and dispatch stations. Operations managers, materials planners, and guild inventory stewards will find this guide useful for establishing or improving cart-level controls at any site across Faerûn.
Introduction
Across the markets of Waterdeep, within the forge halls of Baldur’s Gate, and along the trade routes stretching toward Silverymoon, the Waterdeep Trading Company relies not only on grand warehouses and guarded vaults, but on something far humbler: the rolling cart.
Whether stationed beside an enchanter’s bench, a blacksmith’s anvil, or a packing table in the dispatch hall, rolling carts act as mobile inventory nodes. When managed well, they reduce wasted motion, prevent stockouts, and protect margins. When neglected, they become silent drains on coin and productivity.
In a formal inventory structure, a rolling cart is treated as a sub-location within a warehouse. Each cart carries its own assigned site, warehouse code, location identifier, storage dimension group, and default replenishment policy. Rather than forcing artisans to retrieve materials from a distant rack or vault, carts position high-usage items within arm’s reach. This increases throughput and reduces idle labor, and, from a materials management standpoint, the cart serves as a controlled buffer between bulk storage and production consumption.
What Is Rolling Cart Inventory Management?
Rolling cart inventory management is the structured control of materials stored in mobile carts that support production, repair, enchantment, or packing operations. It includes defining which items belong on each cart, setting minimum and maximum quantities, tracking consumption against production orders, replenishing from central warehouse stock, and counting inventory on a scheduled basis.
Unlike primary warehouse inventory, cart inventory turns quickly and is at a higher risk of shrinkage, misplacement, or undocumented use. For that reason, governance must be tighter, not looser.
Why It Matters
Poorly managed carts lead to hidden shrinkage, duplicate purchases, production delays, and the need for emergency procurement at premium prices. Across multiple sites and product lines, these losses compound quickly and erode the margins that keep a trading company competitive.
Well-managed carts produce measurable gains: reduced idle labor time, lower overall warehouse movement, predictable consumption trends, and improved gross margin control. Rolling carts may seem modest in isolation, but across the full network of Waterdeep Trading Company operations, their collective financial impact is anything but minor.
Materials Management at the Cart Level
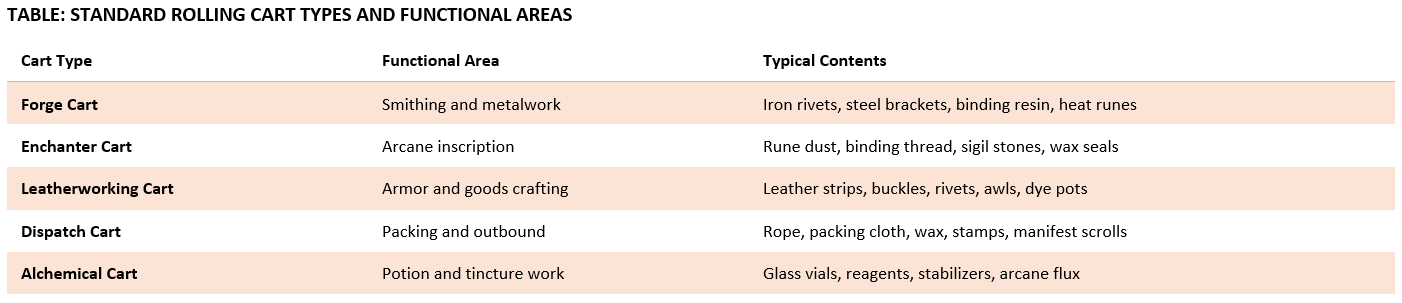
Rolling carts typically hold fast-moving raw materials, small components and fittings, consumables such as oil, flux, ink, or arcane dust, and frequently used enchanted parts. The Waterdeep Trading Company assigns each cart to a functional area aligned with production routing.
The table below lists the standard cart types used across Waterdeep Trading Company operations, along with their assigned areas and typical contents.
Each cart has a predefined item list that aligns with its production routing. Only approved items may be stocked; no bulk reserve inventory is held on carts. Every withdrawal must be posted to a production or service order, and each cart is assigned to a named, responsible guild member. This transforms the cart from a loose supply tray into a managed micro-warehouse.
Establishing Par Levels
Par levels define how much of each item must remain on the cart to support uninterrupted operations. The Waterdeep Trading Company uses a straightforward but disciplined formula:
Daily Usage multiplied by Lead Time, plus Safety Buffer, equals Par Level.
The safety buffer accounts for demand spikes, delivery delays, and seasonal variation. Without it, even a single missed replenishment can halt production run and trigger costly emergency procurement.
The table below shows a sample par configuration for a Forge Cart, including the maximum working quantity, the replenishment trigger point, and the required buffer to prevent disruption.
Par levels are reviewed quarterly or whenever demand patterns shift significantly. Sites operating in remote or high-risk locations should increase safety buffers to account for longer, less predictable lead times.
The table below shows how par level adjustments might apply across different regions of Faerûn for the same item.
This comparison illustrates why a single company-wide par level is insufficient. Each site must be assessed on its own supply conditions.
Restocking Process and Governance
Restocking is not a casual refill. It follows a defined workflow that ensures every movement of materials is recorded and verified. The five steps below represent the standard restocking cycle used by the Waterdeep Trading Company.
Step 1. Consumption Posting. Materials issued from the cart must be tied to a production order, sales order, or internal job before they leave the cart location. Unposted withdrawals are a primary source of inventory shrinkage and must be treated as a control failure.
Step 2. Reorder Trigger. When the on-hand quantity reaches the reorder point, a replenishment request is generated automatically or flagged to the cart steward. The trigger should be monitored daily in high-volume environments.
Step 3. Internal Transfer. Warehouse staff transfer the required materials from bulk storage to the cart location using a formal transfer journal. No materials should move without a corresponding document, even for internal movements.
Step 4. Verification Count. The cart steward confirms that quantities match the transfer journal before providing sign-off. Discrepancies must be investigated before the transfer is closed.
Step 5. Audit Cycle Count. Due to high turnover, carts are counted weekly as part of the standard inventory audit cycle. Surprise counts should also be performed at least monthly to identify unrecorded withdrawals and assess compliance.
Replenishment Models
The Waterdeep Trading Company applies three replenishment models depending on material type, volume, and supply conditions. Selecting the wrong model for a given item can result in either chronic shortages or wasteful overstocking.
Fixed Par Replenishment refills the cart back to its full par level each time a reorder is triggered. This model works best for high-volume standard components consumed consistently across production runs. It is simple to manage and easy for cart stewards to verify at a glance.
Minimum Trigger Replenishment initiates a restock only when the reorder point is reached. This suits mid-volume materials where demand is predictable but not constant. It reduces unnecessary material movement and keeps warehouse labor costs lower than with a fixed-par approach.
Demand-Based Replenishment ties restocking to scheduled production orders rather than fixed thresholds. This model is best for rare arcane components or controlled substances where over-ordering carries risk, whether due to cost, storage restrictions, or guild regulations. Restocking quantities are calculated from confirmed order requirements rather than standing par targets.
The table below summarizes when each model is most appropriate.
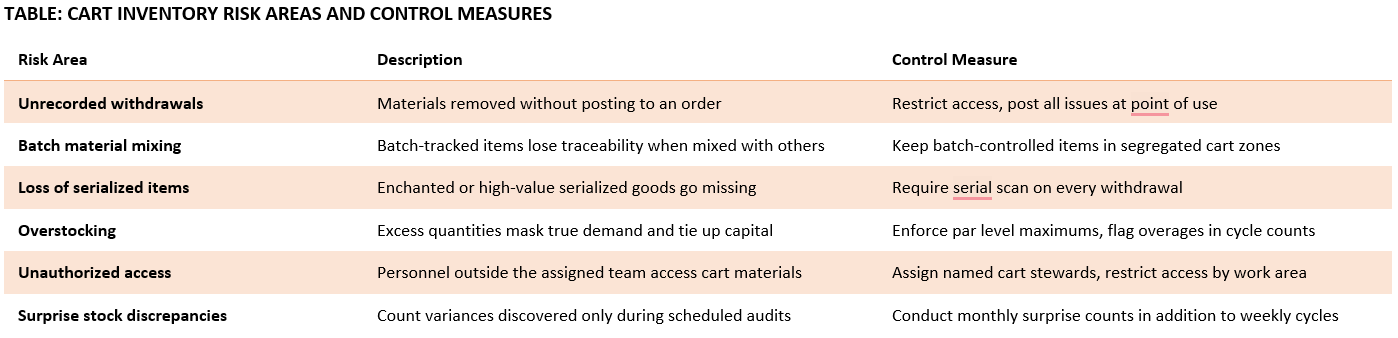
Risk Areas and Control Measures
Rolling carts introduce risk due to their mobility and accessibility. Unlike fixed rack locations, carts can be moved, shared between work areas, or accessed by personnel outside their assigned team. The table below identifies the most common risk categories and the controls the Waterdeep Trading Company applies to address them.
Proper tracking dimensions prevent traceability failures and protect the integrity of production records. Any control gap at the cart level can propagate through costing, batch tracking, and financial reporting, making what appears to be a minor operational issue into a significant audit concern.
Realms-Aware Considerations
The geography and infrastructure of Faerûn introduce variables that a simple par formula cannot always capture. In cities like Waterdeep, lead times are short, and replenishment can occur daily. In frontier settlements near the High Forest or along extended caravan routes, restocking delays may span several tendays, requiring par levels to be increased accordingly.
Arcane materials also require special storage conditions, which can restrict which carts are permitted to carry them. Guild regulations may further define handling protocols, particularly for enchanted or alchemical components. Operations managers should review cart configurations whenever a new site is established or when trade route conditions change significantly.
Final Thoughts
Rolling carts are not minor conveniences. They are controlled inventory nodes that support production efficiency across Faerûn. When governed through disciplined materials management, defined par levels, and structured restocking, they strengthen operational reliability and protect the coin of the Waterdeep Trading Company. Even the smallest mobile shelf, when managed with care, contributes to stable margins and uninterrupted trade.
Support the AD&D365 Project on Patreon.
To grow this world, we’ve launched an official Patreon page where supporters can access exclusive content, tools, and training labs, and even influence the project’s future. Your support fuels more than just development; it expands the guildhall, forges new scrolls, and empowers the next generation of configuration wizards. Begin your journey: https://www.patreon.com/adnd365/
A Grateful Salute to Our Patrons
To everyone who supports this world, thank you for helping keep it alive and growing.
Our Benefactor:Andre Breillatt. Your generosity powers the heart of this project. Because of you, everything continues to grow and move forward.
Our Apprentices:Michael Ramirez and Andreth Bael’Rathyn‡. The engines keep turning, and the training halls stay alive because of you.
With special thanks to our past Apprentices, whose early support built the foundation: Ralf Weber, Wendy Rijners, Shashi Mahesh, Julia Tejera, Ben Ekokobe, Tiago Xavier, Naveen Boyinapelli, Marcos Tadeu Wolf, Kathryn Greene, Jason Brown, Mark Christy, and Ashish Singh.
Our Initiates:Sarah D. Morgan, Jesper Livbjerg, Harry Burgh, Martin Frahm, Gregory Brigden, and Peter Lorre. You’ve stepped beyond watching and into shaping what this becomes.
Our Followers:Rusty Cavalier, Eric Shuss, and Michael Ramirez. Your steady backing keeps progress steady.
Our Voyeurs (Free Members):Deborah, Zarana, Daniel Tchakounte, Will Morrison, Danuelle Geldenhuys, Stuart, JoeNorthMan, Kshitiz Sinha, Michael A., Danijel Vucic, Damio, Zamir Gori, LK, Reza Al, Amith Prasanna, Suprit Naregal, Monika Duplessis, Brianna Otto, PW, Laura J, Alan Megahy, Carsten, Carri, Marcel Barrow, Greg, Ahmet, Franky, Abdullah, Basil Quarrell, Abdelrahman Nabil, NPC, Manimaran Shanmugam, and Shoaib Rafi. Ever watching from the shadows, curious but not yet parting with a single gold piece. Your quiet interest is noticed and lightly judged.
Want to design your own economic models in Faerûn? Get your own AD&D365 Environment and guides at adnd365.com/start, and request access to the public view of the current database at https://public.adnd365.com – Login npc@adnd365.com, Password N0nPl@yC#822!
Physical assets across Faerûn differ by how they exist in space. Some occupy a single location, some stretch between points, and some cover entire areas. Each type behaves, fails, and incurs different costs. The Waterdeep Trading Company classifies its holdings into point-based assets (warehouses, towers), linear assets (roads, walls), and polygon-based assets (districts, mining claims). This classification determines inspection schedules, maintenance strategies, accounting treatment, and risk management. Understanding these distinctions prevents waste, protects coin, and keeps trade flowing even when disaster strikes.
Introduction
In the bustling realm of Faerûn, the Waterdeep Trading Company controls more than goods and coin. From the stone docks of Baldur’s Gate to the winding Trade Way and the fortified warehouses of the Dock Ward, the company manages a vast network of physical holdings. Roads, warehouses, docks, districts, mines, caravan routes, and fortified towers all fall under its stewardship.
But not all assets are the same. A warehouse is not a road. A road is not a mining claim. Each behaves differently, creates different costs, and carries different risks. Treating them all as simple ledger entries leads to poor records, weak cost control, and disputes with guilds and city rulers.
To avoid this, the Waterdeep Trading Company classifies its physical assets into three distinct types: point-based, linear, and polygon-based. This classification is not an academic exercise. It reflects how assets actually exist in space, how they fail, and how they must be maintained.
What These Asset Types Are
Physical assets differ in how they exist in space. Some exist at a single location. Some stretch from one place to another. Some cover an entire area. Each type needs its own rules for value, upkeep, and control.
Point-based assets exist at a single fixed location, with a clear position and defined footprint. Warehouses, dock cranes, watchtowers, city gates, and market stalls all qualify. You can mark them on a map with one dot.
Linear assets run from one location to another with length and direction. Trade roads, caravan routes, city walls, aqueducts, and tunnels all function this way. They have multiple points of failure along their length.
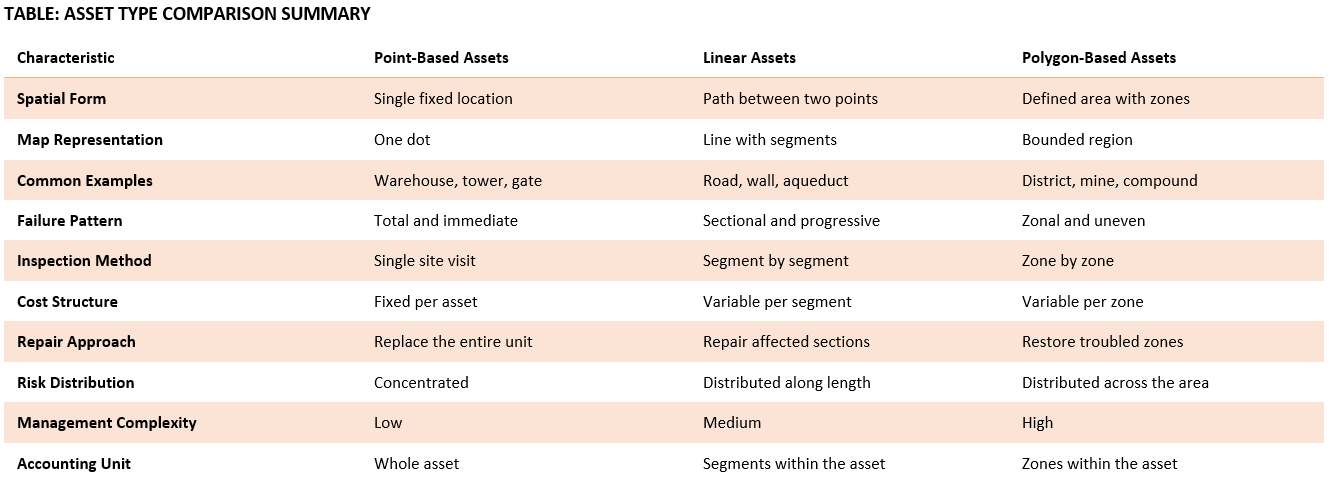
Polygon-based assets cover an area with boundaries and internal variation. Mining claims, market districts, warehouse compounds, port zones, and agricultural estates all represent this type. They cannot be reduced to a single point or line.
The following table summarizes the key characteristics of each asset type, showing how they differ in spatial existence, failure patterns, management complexity, and accounting treatment. This comparison provides a foundation for understanding why classification matters.
Why the Classification Matters
Treating all assets the same causes errors. Point assets fail suddenly. Linear assets fail locally. Polygon assets fail unevenly. Each type needs different inspection cycles, cost posting rules, risk planning, and control methods.
The Waterdeep Trading Company avoids disputes, losses, and surprise costs by keeping these distinctions clear. When a guild challenges ownership, the company knows exactly what is claimed. When a disaster strikes, the company knows exactly what is lost. When costs rise, the company knows exactly where to cut.
This is not abstract theory. This is practical survival in a world where roads collapse, warehouses burn, and mining claims flood. The company that correctly classifies its assets is the one that stays profitable.
Point-Based Assets: Single Location Holdings
A point-based asset exists at one fixed location. It has a clear position, a defined footprint, and a single set of ownership records. You can mark it on a map with one dot and know exactly what you control.
Common Examples in Faerûn
Warehouses in Waterdeep, dock cranes at a harbor, watchtowers along the Trade Way, city gates, arcane relay towers, and market stalls owned outright all qualify as point-based assets. Each has a single address, a single deed, and a single point of failure.
Why It Matters
Point assets are easy to value and audit. They have clear ownership, direct maintenance costs, and can be secured or lost as a whole. When a warehouse burns, the entire asset is affected at once. When a watchtower falls to raiders, the loss is complete and immediate.
This makes point assets straightforward to insure, defend, and replace. The costs are predictable. The risks are visible. The control is absolute.
Operational Management
Point assets require single-point inspections. The entire asset can be assessed in one visit. Guards can be posted at one location. Repairs affect the whole structure at once. Insurance premiums are calculated on total replacement value.
The company maintains detailed records for each point asset, including construction date, original cost, accumulated depreciation, current condition rating, and estimated remaining useful life. Annual inspections determine whether the asset remains serviceable or requires major intervention.
Accounting Treatment
Point assets are treated as capital holdings. They are capitalized at purchase or construction cost, depreciated over time, and repaired or replaced as single units. When the company buys a warehouse, the full purchase price is recorded as an asset. When it burns, the full value is written off.
Depreciation is calculated using the straight-line method based on the expected useful life. A stone warehouse might depreciate over 50 years. A wooden market stall might depreciate over 15 years. Major improvements extend useful life and increase book value. Minor repairs are expensed in the current period.
The following table shows typical point assets and the main costs the Waterdeep Trading Company tracks for each type. These cost drivers determine how much the company spends annually to keep each asset operational and protected.
Risk Assessment
Point assets face concentrated risk. A single fire, flood, or raid can destroy the entire holding. This makes location selection critical. Warehouses near water sources are at risk of flooding. Watchtowers in contested territory face the risk of raids. Market stalls in high-traffic areas face a higher risk of theft.
The company mitigates risk through strategic placement, redundant holdings, and comprehensive insurance. No single point asset carries more than 10 percent of the company’s total property value. This prevents catastrophic loss from a single incident.
Linear Assets: Path and Boundary Holdings
A linear asset runs between two locations. It has length, direction, and multiple points of failure. Unlike a point asset, a linear asset cannot fail all at once. Damage in one section affects the whole, but the asset continues to exist in parts.
Common Examples in Faerûn
Trade roads, caravan routes, city walls, aqueducts, underground tunnels, and river shipping lanes under charter all function as linear assets. A road from Waterdeep to Daggerford is one asset, but damage at any mile affects the whole. A city wall protects an entire perimeter, but a breach in one section compromises the entire defense.
Why It Matters
Linear assets fail in sections, not all at once. Costs vary by segment. Risk changes by location. A bridge collapse impacts trade even if the rest of the road is intact. A wall breach in one quarter does not mean the entire fortification must be rebuilt.
This makes linear assets more complex to manage. Inspection must be continuous. Repairs must be targeted. Risk assessment must be granular. The company that treats a road as a single unit will waste coin repairing strong sections while ignoring weak ones.
Operational Control
The company tracks linear assets by segments. Each segment has length, condition, upkeep cost, and risk rating. This allows partial closures and targeted repairs. When a bridge on the Trade Way collapses, the company closes only the affected segment. Trade is rerouted. Repairs are budgeted for one section, not the entire road.
Segment length is determined by natural divisions. Bridges, gates, and terrain changes all mark segment boundaries. A road through flat farmland might be segmented every 10 miles. A road through mountains might be segmented at every pass, bridge, and switchback.
Condition ratings follow a standard scale: Excellent, Good, Fair, Poor, Critical. Excellent segments require minimal maintenance. Critical segments require immediate intervention. The company prioritizes repairs based on condition rating and strategic importance.
Accounting Treatment
Linear assets are capitalized as a whole but maintained in parts. Repairs are often expensed per segment. Major rebuilds increase asset value. A complete road repaving increases the asset’s capitalized value. A minor pothole repair is expensed in the current period.
The total asset value is divided proportionally by segment length and quality. A stone-paved segment in good condition carries a higher book value than a dirt segment in poor condition. This allows precise loss calculation when a segment fails.
The following table demonstrates how the Waterdeep Trading Company divides linear assets into manageable sections for tracking condition and maintenance costs. Each segment is monitored separately, allowing precise cost control and targeted intervention.
Risk Assessment
Linear assets face distributed risk. Damage to one segment degrades the entire asset but does not destroy it. This creates complex risk scenarios. A road with one weak bridge is only as reliable as that bridge. A wall with one breached section is only as secure as that breach.
The company conducts rolling inspections, reviewing each segment on a scheduled cycle. High-risk segments are inspected quarterly. Low-risk segments are inspected annually. This prevents surprise failures and allows proactive maintenance.
Weather patterns, bandit activity, monster migration routes, and political instability all affect segment risk ratings. A road through peaceful farmland has a low risk. A road through contested borderlands has a high risk. The company adjusts maintenance budgets and insurance premiums accordingly.
Segment Optimization
The company continuously evaluates whether to maintain, reroute, or abandon segments. A road segment that costs more to maintain than it generates in toll revenue is a candidate for abandonment. A wall segment that protects nothing of value is a candidate for decommissioning.
This optimization prevents wasted resources. The company does not maintain roads that no one travels or walls that protect empty fields. Resources are concentrated on segments that generate value and protect critical holdings.
Polygon-Based Assets: Area and Territory Holdings
A polygon-based asset covers an area. It has boundaries, internal variation, and shared control. Unlike point assets, which exist at a single location, or linear assets, which stretch between two points, polygon assets occupy space. They have zones, districts, and territories within their boundaries.
Common Examples in Faerûn
Mining claims, forested timber rights, market districts, warehouse compounds, port zones, agricultural estates, and city wards under charter all represent polygon-based assets. These assets cannot be reduced to a single point or line. They have internal complexity, varied terrain, and multiple sources of value.
Why It Matters
Polygon assets generate value across space. Different sections may earn different revenue, face different risks, or require different upkeep. A mine produces more in one vein than another. A district has streets that profit and streets that drain coin. A warehouse compound has yards that earn rent and yards that sit empty.
This makes polygon assets the most complex to manage. Value is distributed unevenly. Costs are hard to predict. Risk varies by zone. The company that treats a market district as a single asset will miss the profitable streets and overpay for the failing ones.
Operational Control
Polygon assets are divided into zones for management and accounting. Each zone has defined boundaries, assigned use, revenue potential, and cost structure. The company tracks performance by zone, identifying which areas generate profit and which areas drain resources.
Zone boundaries follow natural divisions. In a market district, zones might align with streets or blocks. In a mining claim, zones might align with veins or shafts. In a warehouse compound, zones might align with yards or buildings.
Zone use determines value. A loading zone generates more revenue than a storage zone. An active mining zone generates more revenue than a flooded zone. A high-traffic market zone generates more revenue than a back-alley zone.
Accounting Treatment
Polygon assets are often treated as controlled territories. Value comes from output, rent, taxation rights, and access control. Costs are tracked by zone within the area. When the company controls a mining claim, it does not record one asset. It records multiple zones, each with its own cost structure and revenue potential.
Total asset value is allocated by zone based on productive capacity and revenue history. A zone that generates 40 percent of total revenue carries 40 percent of total asset value. This allows precise profitability analysis and investment decisions.
The following table illustrates how area-based assets are divided into zones, each with its own use classification and annual cost allocation. This zoning approach allows the company to identify which areas generate profit and which areas drain resources.
Risk Assessment
Polygon assets face zoned risk. Damage to one zone degrades that zone but may not affect others. A fire in one warehouse yard does not burn the entire compound. A collapse in one mine shaft does not close the entire mine. A riot in one market street does not shut down the entire district.
This creates risk management opportunities. The company can isolate high-risk zones with barriers, separate operations, and independent access. A flooded mine shaft is sealed off while other shafts continue production. A riot-prone market street is fenced while other streets continue to trade.
However, polygon assets also face systemic risk. A plague in one district zone can spread to others. A fire in one compound yard can jump to others. Contamination in one mine vein can poison others. The company must balance zone isolation with systemic monitoring.
Zone Optimization
The company continuously evaluates zone performance and allocation. Underperforming zones are candidates for reallocation, subleasing, or abandonment. The South Yard in the table above generates no revenue but costs 95 gold pieces annually. The company has three options: find a tenant, repurpose the space, or abandon it.
High-performing zones receive additional investment. The West Yard generates the highest margin in the compound. The company might expand loading capacity, add equipment, or improve access to capture more business. This optimization maximizes return on territory holdings.
Worked Example: Trade Access Between Waterdeep and Daggerford
The company controls trade access between Waterdeep and Daggerford through three distinct asset types. Each serves a different purpose, fails in different ways, and costs differently. Understanding how they interact demonstrates the practical value of asset classification.
The Point Asset: Toll House
The toll house at Waterdeep city gate is a classic point asset. This structure collects fees from all travelers entering the city. It has a single location, a single function, and a single point of failure.
The toll house is valued at 2,400 gold pieces with annual maintenance costs of 180 gold pieces. It generates 3,200 gold pieces in annual toll revenue. If the toll burns, the tolls stop instantly. The entire asset is lost at once. Trade can continue, but revenue collection stops until the structure is rebuilt.
The company maintains fire insurance on the toll house with a replacement value policy. In the event of total loss, insurance covers rebuilding costs minus a 10 percent deductible. This protects the company from catastrophic loss while incentivizing fire prevention.
The Linear Asset: The Road
The road itself stretches 30 miles from Waterdeep to Daggerford. This linear asset has three segments, each with its own condition and cost structure, as shown in the earlier table.
Total road value is 18,000 gold pieces with annual maintenance costs of 560 gold pieces across all segments. The road generates indirect revenue by enabling trade, but its value is measured in trade volume enabled rather than direct tolls.
If the road washes out at one bridge in segment two, trade slows but does not stop everywhere. Caravans reroute through segments one and three at reduced speed. Repairs are budgeted at 1,200 gold pieces for the affected segment only. The asset continues to function at reduced capacity while repairs proceed.
The company prioritizes segment two for major investment because its poor condition creates the highest risk of trade disruption. A 2,000-gold-piece upgrade would improve conditions from Poor to Good, reduce annual maintenance from 260 to 140 gold pieces, and eliminate high-risk closures.
The Polygon Asset: Market District
The bonded market district at the Daggerford end covers 12 acres, divided into six zones. Each zone has different characteristics, costs, and revenue potential. The company holds exclusive trade rights to the district under a charter from the Daggerford City Council.
The total district value is 45,000 gold pieces, with annual costs of 1,850 gold pieces and annual revenue of 6,400 gold pieces. Net margin is 4,550 gold pieces, making this the most profitable component of the trade access system.
If the market district experiences unrest in one zone, revenue drops only in that zone. Some merchants close. Some stay open. The asset degrades in parts, not all at once. The company can isolate troubled zones, increase security, negotiate with local guilds, and restore order incrementally.
Zone three, the central market square, generates 35 percent of total district revenue on only 15 percent of total space. This makes it the most valuable zone per acre. The company invests heavily in maintaining square conditions, strong guild relationships, and a strong security presence to protect this revenue stream.
Integrated Risk Management
Each asset type in this system requires different risk management. The toll house needs fire insurance and security guards. The road needs weather monitoring and segment inspection. The market district needs guild relationships and zone security.
A catastrophic event affects each asset differently. A military invasion might destroy the toll house, block the road, and shutter the market district. But recovery follows different paths. The toll house is being rebuilt as a unit. The road is cleared segment by segment. The market district reopens zone by zone.
Understanding these differences allows the company to prioritize recovery, allocate resources efficiently, and restore trade quickly. The company that treats all three as simple assets will waste time, coin, and opportunity in crisis response.
The Strategic Value of Asset Classification
Point, linear, and polygon-based assets are not abstract ideas. They reflect how land, roads, and holdings actually behave across Faerûn. A warehouse is not a road. A road is not a mining claim. Each has its own rules, risks, and costs.
By classifying assets correctly, the Waterdeep Trading Company protects its coin, plans repairs properly, argues contracts clearly, and keeps trade flowing even when trouble strikes. This classification shapes everything from insurance premiums to maintenance schedules to legal disputes.
Realms Aware Considerations
Faerûn adds extra pressure to asset control. Magic damage is often localized. A fireball strikes one warehouse, not the entire compound. Monsters target roads more than buildings. Bandits attack caravans on open stretches, not fortified gates. City charters define area rights tightly. A market district may belong to the company, but the streets belong to the city.
Guild claims often overlap zones. The Blacksmiths Guild may claim rights to one quarter of a mining district. The Merchants Guild may claim exclusive access to one street in a market. The company that ignores asset type will find itself in legal fights, guild fines, or lost trade privileges.
By correctly classifying assets, the company knows exactly what it owns, what it controls, and what it must defend. This clarity prevents disputes before they start and protects the company’s reputation across Faerûn.
Final Thoughts
Whether you oversee a single warehouse or a network of caravan routes, this classification system will serve you well. The principles are universal. The benefits are immediate. The company that masters asset classification is the company that survives and prospers across Faerûn.
Start with a simple inventory. List every physical asset you control. Mark each as a point, a line, or a polygon. Adjust your ledgers, your inspections, and your risk planning accordingly. The investment is small. The protection is substantial. Your coin, your reputation, and your trade depend on it.
Support the AD&D365 Project on Patreon.
To grow this world, we’ve launched an official Patreon page where supporters can access exclusive content, tools, and training labs, and even influence the project’s future. Your support fuels more than just development; it expands the guildhall, forges new scrolls, and empowers the next generation of configuration wizards. Begin your journey: https://www.patreon.com/adnd365/
A Grateful Salute to Our Patrons
To everyone who supports this world, thank you for helping keep it alive and growing.
Our Benefactors:Rovado and Andre Breillatt. Your generosity powers the heart of this project. Because of you, everything continues to grow and move forward.
Our Apprentices:Michael Ramirez and Andreth Bael’Rathyn‡. The engines keep turning, and the training halls stay alive because of you.
With special thanks to our past Apprentices, whose early support built the foundation: Ralf Weber, Wendy Rijners, Shashi Mahesh, Julia Tejera, Ben Ekokobe, Tiago Xavier, Naveen Boyinapelli, Marcos Tadeu Wolf, Kathryn Greene, Jason Brown, Mark Christy, and Ashish Singh.
Our Initiates:Sarah D. Morgan, Jesper Livbjerg, Harry Burgh, Martin Frahm, Gregory Brigden, and Peter Lorre. You’ve stepped beyond watching and into shaping what this becomes.
Our Followers:Rusty Cavalier, Eric Shuss, Jeff Berberich, and Michael Ramirez. Your steady backing keeps progress steady.
Our Voyeurs (Free Members):Deborah, Zarana, Daniel Tchakounte, Will Morrison, Danuelle Geldenhuys, Stuart, JoeNorthMan, Kshitiz Sinha, Michael A., Danijel Vucic, Damio, Zamir Gori, LK, Reza Al, Amith Prasanna, Suprit Naregal, Monika Duplessis, Brianna Otto, PW, Laura J, Alan Megahy, Carsten, Carri, Marcel Barrow, Greg, Ahmet, Franky, Abdullah, Basil Quarrell, Abdelrahman Nabil, NPC, Manimaran Shanmugam, and Shoaib Rafi. Ever watching from the shadows, curious but not yet parting with a single gold piece. Your quiet interest is noticed and lightly judged.
Want to design your own economic models in Faerûn? Get your own AD&D365 Environment and guides at adnd365.com/start, and request access to the public view of the current database at https://public.adnd365.com – Login npc@adnd365.com, Password N0nPl@yC#822!
In the kitchens, bakeries, and alchemical halls of Faerûn, formulation is a controlled practice. At the Waterdeep Trading Company, recipes are treated as production records, not suggestions. When ingredients become scarce, restricted by guild charter, or shift in price, production continues only after the formulation is revised. The most delicate revisions occur when a substitute does not behave the same as the original component.
Potency-based substitution allows production to continue while protecting quality, safety, and margin. It also introduces risk if quantities, processing steps, and costing are not adjusted together. This article explains how formulation practices determine potency, how ratios are applied, and how those changes propagate through the bill of materials, routing, and final cost.
What Formulation Means in Production
Formulation defines the precise makeup of a product. It establishes quantities, processing order, activation conditions, and expected yield. At the Waterdeep Trading Company, formulation directly controls consistency, labor effort, inspection effort, and unit cost.
In Faerûn, formulation must also account for regional variation. Herbs grown near ley lines behave differently from those grown inland. Water purity alters reactions. Arcane materials fluctuate in strength depending on the source. As a result, formulation records must be exact and updated when components change.
Every formulation record includes a bill of materials listing each component, its quantity, and its unit of measure. The formulation also references a route, which defines the operations, sequence, and timing required to transform those materials into a finished product. When a component is substituted, both the bill of materials and the route may need to be adjusted.
Why Potency Cannot Be Ignored
Potency measures how much effect a component delivers per unit. A stronger component requires less material to achieve the same result. A weaker one needs more. Substituting without adjusting quantity leads to predictable failure. Sauces become paste, dough loses structure, and potions separate in the vial.
Ratio control exists to protect both the product and the ledger. Every change in potency must result in a corresponding change in quantity and, often, a process change. When a substitute is more potent, the original quantity is divided by the potency ratio. When a substitute is less potent, the original quantity is multiplied by that ratio.
Beyond quantity, potency changes ripple through the entire cost structure. More potent materials often cost more per unit but require less total material. They may also demand more precise handling, longer processing time, or additional quality control. Less potent materials may reduce unit cost but increase labor, overhead, and waste. These trade-offs must be calculated before release.
The Ratio Rule and Reference Table
When a substitute is stronger, the original quantity is divided by the potency ratio. When a substitute is weaker, the original quantity is multiplied by that ratio. This rule is always validated through small batch testing before release.
The following table summarizes the potency ratios used across common production categories at the Waterdeep Trading Company and serves as a reference tool during formulation approval.
These ratios adjust quantity only. Processing steps, labor effort, inspection rules, and costs must be reviewed continuously before production release. Each substitution must be documented in the formulation record with the effective date, approval authority, and reason for change. The revised formulation becomes the new production standard until the next approved revision.
Detailed Examples Across Production Categories
The following sections provide worked examples that show how potency-based substitution affects formulation, routing, and costing across five production environments: kitchen thickening, glaze production, set desserts, bakery dough, and alchemical potions. Each example includes original and substitute bills of materials, route changes, and full cost rollups.
Thickening and Binding in Kitchen Production
One of the most common formulation changes involves the use of thickening agents. When wheat flour becomes expensive or unreliable, xanthan gum is often used as a substitute. Xanthan gum is much stronger, dramatically altering the formulation.
The following table establishes the baseline quantities and cost before any substitution for a flour-based stew base thickener.
When xanthan gum replaces flour, the quantity drops sharply, but the unit cost rises. The next table shows the revised formulation after substitution.
The change in material cost alone does not show the full impact. Xanthan gum requires more precise weighing, slower addition, and extra inspection. The next table explains the route changes that accompany the formulation change, demonstrating how process time increases with more potent ingredients.
The following table shows the complete cost impact across all cost buckets, illustrating how potency changes propagate through labor and overhead, not just materials.
Glaze Formulation and Heat Sensitivity
Fruit glazes commonly rely on cornstarch. When clarity or supply becomes an issue, arrowroot is substituted. Arrowroot is stronger and activates faster, which affects both quantity and cook time.
The following table shows the original glaze formulation using cornstarch as the primary thickener.
The substitute formulation uses less arrowroot at a higher unit cost, demonstrating how potency adjustments affect both quantity and pricing.
In this case, material cost stays flat, but faster activation reduces labor time. The cost rollup reflects this shift, showing net savings despite the higher unit cost of the substitute.
Gelling Agents and Set Products
Gelatin and agar both create structure, but agar is much stronger and behaves differently during cooling. This change affects both formulation and routing, particularly in heat application and set time.
The following table shows the original formulation for a set dessert using gelatin as the structural agent.
When agar is substituted, the quantity drops significantly due to its stronger gelling power, but the material cost remains the same due to higher unit pricing.
Agar requires stronger heat activation, which increases labor and overhead. The following table shows the total cost impact across all elements.
Dough Stabilization in Bakeries
Substitutions for guar gum and xanthan gum affect elasticity and handling. The material change is small, but labor precision increases due to the need for more controlled mixing and hydration.
The following table compares the cost impact when switching stabilizers in a dough formulation.
Potency in Alchemical Formulation
Potion crafting magnifies potency risk. When sap binders are replaced by arcane resin, the quantity drops, but handling requirements increase sharply. The concentrated nature of arcane resin requires additional quality control and precision labor.
The following table shows the full cost impact when arcane resin replaces tree sap binder in a suspension formulation.
Final Thoughts
Formulation practices are the foundation of reliable production in Faerûn. Potency-based substitution keeps the Waterdeep Trading Company operating through shortages and trade disruptions, but only when quantities, routes, and costing are updated together.
The substitution process follows a consistent pattern across all production categories. First, the ratio is applied to adjust the component quantity. Second, the route is reviewed for changes in processing time, precision requirements, or quality control. Third, the full cost rollup is calculated to capture the impacts of material, labor, and overhead. Finally, the revised formulation is tested in a small batch before release.
Formulation is not a note in the margin. It is the control that protects quality, safety, and margin with every batch. The counting halls track the coin, but the formulation record ensures there is coin to count.
Support the AD&D365 Project on Patreon.
To grow this world, we’ve launched an official Patreon page where supporters can access exclusive content, tools, and training labs, and even influence the project’s future. Your support fuels more than just development; it expands the guildhall, forges new scrolls, and empowers the next generation of configuration wizards. Begin your journey: https://www.patreon.com/adnd365/
A Grateful Salute to Our Patrons
To everyone who supports this world, thank you for helping keep it alive and growing.
Our Benefactors:Rovado and Andre Breillatt. Your generosity powers the heart of this project. Because of you, everything continues to grow and move forward.
Our Apprentices:Michael Ramirez and Andreth Bael’Rathyn‡. The engines keep turning, and the training halls stay alive because of you.
With special thanks to our past Apprentices, whose early support built the foundation: Ralf Weber, Wendy Rijners, Shashi Mahesh, Julia Tejera, Ben Ekokobe, Tiago Xavier, Naveen Boyinapelli, Marcos Tadeu Wolf, Kathryn Greene, Jason Brown, Mark Christy, and Ashish Singh.
Our Initiates:Sarah D. Morgan, Jesper Livbjerg, Harry Burgh, Martin Frahm, Gregory Brigden, and Peter Lorre. You’ve stepped beyond watching and into shaping what this becomes.
Our Followers:Rusty Cavalier, Eric Shuss, Jeff Berberich, and Michael Ramirez. Your steady backing keeps progress steady.
Our Voyeurs (Free Members):Deborah, Zarana, Daniel Tchakounte, Will Morrison, Danuelle Geldenhuys, Stuart, JoeNorthMan, Kshitiz Sinha, Michael A., Danijel Vucic, Damio, Zamir Gori, LK, Reza Al, Amith Prasanna, Suprit Naregal, Monika Duplessis, Brianna Otto, PW, Laura J, Alan Megahy, Carsten, Carri, Marcel Barrow, Greg, Ahmet, Franky, Abdullah, Basil Quarrell, Abdelrahman Nabil, NPC, Manimaran Shanmugam, and Shoaib Rafi. Ever watching from the shadows, curious but not yet parting with a single gold piece. Your quiet interest is noticed and lightly judged.
Want to design your own economic models in Faerûn? Get your own AD&D365 Environment and guides at adnd365.com/start, and request access to the public view of the current database at https://public.adnd365.com – Login npc@adnd365.com, Password N0nPl@yC#822!
In the counting houses and ledger halls of Faerûn, the moment a shipment leaves the warehouse is not the moment profit is certain. Goods may travel safely from Waterdeep to Baldur’s Gate, invoices may be issued without error, and coin may arrive on time. Yet even then, revenue remains vulnerable.
Claims raised after delivery can reshape margins, strain guild relationships, and consume precious clerk hours if they are not properly understood and managed. For the Waterdeep Trading Company, mastering post-sale adjustments is as critical as negotiating the initial contract.
Three terms dominate this realm of delayed accounting: billbacks, chargebacks, and deductions. They are often spoken of together, as though they were siblings born of the same problem. They are not. Each represents a distinct kind of post-sale adjustment, governed by a different authority, triggered by different circumstances, and requiring different responses.
This article clarifies what each term truly means within the context of Faerûn trade. It then presents a complete trade cycle in which all three adjustments appear together, demonstrating how they interact, how they are resolved, and how final revenue is determined when the ledger dust settles.
The Three Types of Post-Sale Adjustments: An Overview
Before diving into the mechanics, it helps to understand what sets these three adjustment types apart at a fundamental level.
A billback is a backward-looking claim rooted in agreed commercial terms. It appears after invoices have been paid because certain contract terms cannot be calculated until a period ends or a threshold is reached. Billbacks are delayed math, not disputes. They reflect volume rebates, retroactive pricing adjustments, or seasonal discount tiers that trigger only after cumulative activity is known.
A chargeback is enforced, not requested. It is a claim imposed by a guild, regulatory authority, or buyer with contractual enforcement power. Chargebacks result from compliance failures, missed delivery windows, failed inspections, or violated quality standards. They are consequences, not conversations.
A deduction occurs at the moment of payment. The buyer remits less than the invoice total and provides a reason for the shortfall. Unlike chargebacks, deductions are not enforced by an external authority. Unlike billbacks, they are not delayed. They arrive as unresolved claims that must be investigated, accepted, rejected, or recovered through evidence and negotiation.
The core distinction lies in authority, timing, and resolution. Billbacks are contractual and anticipated. Chargebacks are punitive and enforced. Deductions are disputed and require proof.
Understanding these distinctions protects clarity, enables root cause analysis, and ensures each type of problem receives the appropriate response.
What Is a Billback?
A billback is a backward-looking claim rooted in agreed commercial terms. It typically appears after invoices have already been issued and, in many cases, already paid.
In simple terms, a billback says: the payment was correct when it happened, but the contract now says the coin is owed back.
Billbacks are contractual, not operational. They do not suggest failure, damage, or error in the delivery process. They exist because certain terms cannot be calculated at the moment of invoicing. They require completion of a period, achievement of a threshold, or confirmation of a total before the adjustment amount becomes known.
Common Billback Situations in Faerûn Trade
A buyer agrees to a quarterly or annual volume rebate. Early invoices are paid at full price. Once the total volume is confirmed at period end, the buyer claims the rebate value back through a billback.
A trade agreement is applied late or updated retroactively by the guild authority. Prior invoices must be adjusted to align with the corrected pricing structure.
A seasonal discount tier is triggered only after cumulative purchases cross a defined threshold. The billback captures the retroactive discount on earlier transactions.
Billbacks are delayed math, not disputes. They reflect agreements that unfold over time rather than errors that require correction.
Why Billbacks Matter
Billbacks affect revenue timing and margin accuracy. If they are not tracked separately from gross sales, early profitability appears higher than it actually is. Quarterly reports may show strength that erodes by year’s end.
For the Waterdeep Trading Company, billbacks are forecast, accrued, and settled deliberately. They are not surprises. They are anticipated consequences of contract design. Tracking them separately ensures that reported profit remains honest and that pricing decisions reflect true net revenue rather than inflated invoice totals.
What Is a Chargeback?
A chargeback is enforced, not requested.
It is a claim imposed by a guild, regulatory authority, clearinghouse, or a buyer with contractual enforcement power. Once a chargeback is issued, the seller cannot negotiate, dispute, or decline it. The adjustment happens.
In Faerûn, chargebacks often arrive bearing guild seals, magistrate writs, or official dock stamps. Coin may already be withheld or reclaimed before the seller even receives notice of the event that triggered it.
Common Chargeback Situations in Faerûn Trade
A shipment fails a mandatory guild inspection at a port or border crossing, triggering a fixed penalty specified in trade law or charter.
Required certification is missing, expired, or invalid at the point of delivery, resulting in mandatory compliance surcharges.
A delivery misses a contractually protected delivery window, such as a festival provisioning deadline or a military supply commitment. The late arrival activates a penalty clause.
An item violates labeling, packaging, or quality standards set by a regional guild or authority, and the violation carries a predefined financial consequence.
Chargebacks are consequences, not conversations. They represent the financial cost of non-compliance or operational failure as defined by the external authority.
Why Chargebacks Matter
Chargebacks highlight risk and process breakdown. They point directly to routing decisions, compliance gaps, quality control weaknesses, or timing failures that need immediate correction.
The Waterdeep Trading Company tracks chargebacks separately from other adjustments, enabling them to be analyzed as operational signals rather than dismissed as pricing noise. A pattern of chargebacks from a particular route, warehouse, or inspector suggests a systemic problem that must be addressed before it becomes ruinous.
What Is a Deduction?
A deduction occurs at the moment of payment.
The buyer receives an invoice but remits less than the full amount and provides a reason, claim, or explanation for the shortfall. Unlike a chargeback, a deduction is not enforced by an external authority. Unlike a billback, it is not delayed until the end of the period. It simply arrives, unresolved, sitting in the ledger as an open question.
A deduction is the buyer saying, “We believe you owe us this coin, and we are keeping it until you prove otherwise.”
Common Deduction Situations in Faerûn Trade
The buyer claims a shortage in the shipment or asserts that the invoice overstates the quantity delivered.
The buyer alleges damage, spoilage, or quality defects discovered upon receipt.
The buyer disputes packaging errors, missing documentation, incorrect labeling, or broken seals.
The buyer disagrees with the price charged, citing a prior quote, promotional rate, or misunderstanding.
Some deductions are valid. Some are partially justified. Some are entirely wrong. The problem is that deductions arrive as claims rather than proven facts. They must be investigated.
Why Deductions Matter
Deductions require time, evidence, and judgment. Ignored deductions quietly become losses. Mishandled deductions damage trust and invite future abuse.
At the Waterdeep Trading Company, deductions are treated as cases, not write-offs. Each one is assigned to a clerk and supported by dock records, inspection notes, and contract terms. Each one must be accepted, rejected, or recovered through negotiation or evidence.
Core Differences That Matter
Understanding the distinctions between these three adjustment types is essential for accurate margin analysis, accountability, and corrective action. The table below summarizes the key differences that separate billbacks, chargebacks, and deductions.
Keeping these three adjustment types separate in the ledger protects clarity, enables root cause analysis, and ensures that each type of problem receives the appropriate response.
Worked Example: Billbacks, Chargebacks, and Deductions in a Single Trade Cycle
To demonstrate how these three adjustments interact in practice, the following example walks through a complete trade cycle involving the Waterdeep Trading Company and a regional tavern chain operating across the Sword Coast.
A quarterly supply contract governs pricing, quality standards, delivery timing, and volume-based incentives. Over the course of the quarter, all three adjustment types appear. The example shows how each one arises, how it is handled, and how final net revenue is determined.
Step 1: The Original Sale
The tavern chain places an order for 100 crates of Harbor Brown Ale, a popular regional brew produced in Waterdeep and distributed along coastal trade routes.
The relevant contract terms are as follows:
Base price is 18.00 FSD per crate.
A volume rebate of 2.00 FSD per crate applies retroactively if quarterly purchases exceed 300 crates.
Delivery must occur within five days of dispatch to avoid penalties.
All shipments must pass guild quality inspection at the destination dock.
The invoice is issued, and the buyer receives the goods in good order. Payment is made in full.
The buyer receives the goods and pays the full amount of 1,800.00 FSD without issue.
Step 2: A Deduction Appears
On a later shipment within the same quarter, the buyer remits only 1,760.00 FSD against an invoice total of 1,800.00 FSD. Enclosed with the payment is a note claiming that two crates were damaged upon arrival.
The claimed value of the damage is 40.00 FSD, representing two crates at 20.00 FSD each after accounting for partial salvage.
This creates an open deduction in the ledger that requires investigation and resolution.
The deduction is logged and assigned to a trade clerk for review.
Step 3: Deduction Investigation and Resolution
The clerk retrieves dock records, inspection notes, and delivery logs from both the Waterdeep warehouse and the destination tavern. The evidence is evaluated.
One crate shows verified damage, confirmed by a guild inspector’s seal, noting a cracked barrel and spoiled contents.
One crate damage claim is unverified. No inspection record supports the claim, and the delivery manifest shows no notation of damage at receipt.
Based on this evidence, the Waterdeep Trading Company makes the following resolution:
20.00 FSD accepted as a valid damage claim.
20.00 FSD rejected and recovered from the buyer through a corrective invoice.
The following table shows how the deduction was resolved.
The rejected portion is recovered through negotiation, and the buyer acknowledges the error. Trust is preserved.
Step 4: A Chargeback Is Issued
Later in the quarter, a shipment scheduled for delivery during the Shieldmeet Festival arrives one day late due to a caravan delay caused by weather along the Coast Road.
The Brewers and Distillers Association reviews the delivery logs and determines that the late arrival violated the festival provisioning clause in the regional supply charter. A fixed penalty is issued.
The amount is 75.00 FSD. The chargeback is enforced and non-negotiable.
The chargeback is recorded as a compliance failure and triggers an internal review of routing reliability during high-stakes delivery windows.
Step 5: A Billback Is Calculated
At the end of the quarter, total purchases are tallied. The tavern chain has purchased 320 crates of Harbor Brown Ale across multiple shipments.
The 300-crates volume rebate threshold has been exceeded. According to the contract terms, a 2.00 FSD rebate per crate applies retroactively to all 320 crates purchased during the quarter.
The total billback owed to the buyer is 640.00 FSD.
A credit note is issued to the buyer, and the billback is applied against the next invoice or refunded directly, depending on the buyer’s preference.
Step 6: Final Net Revenue Reconciliation
The following table shows the final net revenue after all adjustments have been applied. It begins with the gross invoiced sales for the quarter and applies each adjustment in sequence, showing the cumulative impact on revenue.
What This Example Reveals
The deduction tested the strength of proof and the quality of trust between the Waterdeep Trading Company and the buyer. It required investigation, evidence, and negotiation.
The chargeback exposed operational risk and routing vulnerability during critical delivery windows. It triggered process improvements.
The billback reflected the planned commercial terms, which were known from the beginning. It was anticipated, accrued, and executed without surprise.
All three reduced revenue, but for very different reasons. Treating them as interchangeable would obscure the lessons each one offers.
Final Thoughts
Post-sale adjustments are not noise in the ledger. They are signals.
Billbacks speak about agreements and the passage of time. They reflect contract design and the deliberate choice to tie incentives to performance or volume.
Chargebacks speak about discipline and compliance. They reveal gaps in process, timing, or quality control that must be closed before they compound into larger failures.
Deductions speak about trust, evidence, and the friction that arises when expectations and reality do not align. They require investigation and judgment, not passive acceptance.
Understanding and separating these three adjustment types protects coin, preserves reputation, and strengthens the foundation of long-term trade relationships across Faerûn.
Support the AD&D365 Project on Patreon. To grow this world, we’ve launched an official Patreon page where supporters can access exclusive content, tools, and training labs, and even influence the project’s future. Your support fuels more than just development; it expands the guildhall, forges new scrolls, and empowers the next generation of configuration wizards. Begin your journey: https://www.patreon.com/adnd365/
A Grateful Salute to ourPatrons. To all those who stand behind the vision, thank you for helping bring this world to life. Our Benefactors, Andre Breillatt and Eryndor Fiscairn‡, your boundless generosity fuels the arcane core of this project. Without your magic, the weave would falter. OurApprentices, the spell engines turn, and the training labs thrive thanks to our current Apprentices: Michael Ramirez and Andreth Bael’Rathyn‡. Special thanks to our past Apprentices, whose contributions helped us get here: Ralf Weber, Wendy Rijners, Shashi Mahesh, Julia Tejera, Ben Ekokobe, Tiago Xavier, Naveen Boyinapelli, Marcos Tadeu Wolf, Kathryn Greene, Jason Brown, Mark Christy, and Ashish Singh. Our Initiates, Jeff Stiles,Harry Burgh, Jesper Livbjerg, Peter Lorre, Gregory Brigden, and Martin Grahm, your commitment marks the start of the deeper path, stepping beyond mere observation into the active shaping of this realm.Our Followers, your steady presence along the journey is a beacon of encouragement: Rusty Cavalier,Eric Shuss, Sunil Panchal, Sarah D. Morgan, Nick Ramchandani, Daniel Kjærsgaard, and Tomasz Pałys. And our Voyeurs, ever watching from the shadows, clearly intrigued… but not enough to part with a single gold piece. Your silent curiosity is noted and mildly judged.
Want to design your own economic models in Faerûn? Get your own AD&D365 Environment and guides at adnd365.com/start, and request access to the public view of the current database at https://public.adnd365.com – Login npc@adnd365.com, Password N0nPl@yC#822!