Archive

Monthly Archives: February 2016

Workspaces are a great place to live within because they give you access to all of the key information that you may need all in one page. One of the new metaphors that are introduced with the Workspaces are the tiles which show up on the left hand side of the workspace and give you the ability to see a count of records that you may be working through and also allow you to quickly jump to the data by clicking on them.

The workspaces come pre-populated with a set of common tiles that you may want to use, but that is just the beginning, because you can add additional tiles yourself to the workspaces and add links to other data that you may be interested in seeing within the Workspace overview page to help you with your day to day work.

In this example we will walk you through the addition of the tiles to the workspaces and show you how they work.

How to do it…

To do this, start off by opening up the list page that you want to create a new workspace tile for. In this example we opened up the All Sales Orders list page.

If you want to filter the data, then just click on the fields filter dropdown list and enter in the filter criteria. In this case we selected the order Status field and then entered in Delivered into the criteria field.

Then click on the Apply button.
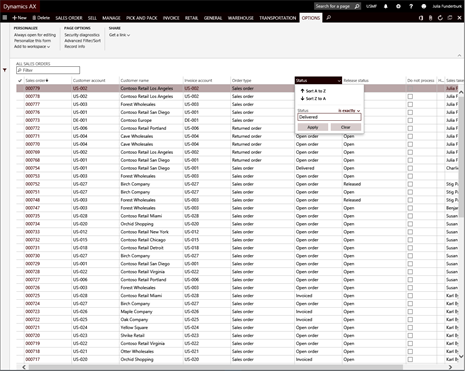
Now you have a filtered list.

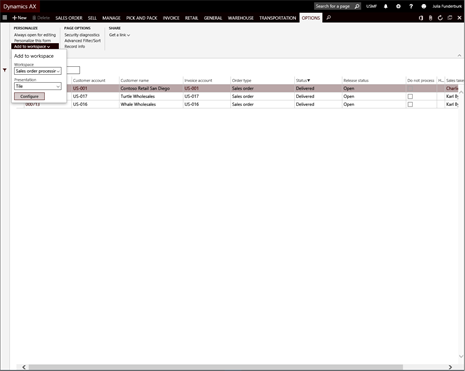
Next, switch to the Options ribbon bar.

This will allow you to then click on the Add to Workspace dropdown menu.

Click on the Workspace dropdown list and select the workspace that you want to add the tile to. In our example we selected the Sales Order Processing and Invoicing workspace.

Then click on the Presentation dropdown list and select the type of view you want to create. We selected Tile in this example, but if you choose List then it will still add the view, but it will be in the List section of the workspace.

After you have done that, click on the Configure button.
This will open up an Add as tile dialog box of the right hand side of the form.

If you want, you can rename the Name on tile to make it more specific to the query. We named ours Delivered Sales Orders.

Then click on the OK button.

When you open up the workspace that you added the tile to then you will see that it is now available for everyone to click on.

Clicking on it will take you straight to the list page and filter out the data for you.

Review

Being able to add tiles to your workspace is a great productivity tool to have in your back pocket. Although you may want to see all of the data sometimes, usually people are working with subsets of the data, and addressing exceptions rather than all of the information. By filtering out the data to just the information that you want to see and adding it as a tile (or as a list) then you get a way to track how much work that you have, and also make sure that you are working on all of the items that you need to work on. There is nothing worse than hunting through pages of data to find the exceptions.

The tiles allow you to get all the information that you need to see all packaged up within a box – literally.

A few weeks ago I released out a new version of my Configuring a Training Environment for Dynamics AX 2012 guide to you which stepped you all through the process of provisioning a new training environment for Dynamics AX within Azure and also shows you how you can create the blank training partition which will be used as the base learning environment for all of the other books in the series.

Over the past week or so I have had the chance to expand out this guide by adding in a few new sections including how to install and configure a local version of the Dynamics AX 2012 Virtual Machine, how to license the virtual machines if they expire, and incorporated the second guide on configuring a base partition and legal entity into the guide as well. Here is the full TOC from the new version of the guide.

CHAPTER 1: USING LIFECYCLE SEVICES AND AZURE TO HOST DYNAMICS AX

  • Signing Up for an Azure Account
  • Registering for your own Lifecycle Services Account
  • Creating Your First Lifecycle Services Project
  • Linking Lifecycle Services And Azure
  • Creating an Azure Hosted Environment through Lifecycle Services
  • Accessing Your Virtual Machine From Azure
  • Viewing The Lifecycle Services Methodologies
  • Turning Your Virtual Machine Off

CHAPTER 2: CONFIGURING A LOCAL VIRTUAL MACHINE (NEW)

  • Downloading the Virtual Machine Image from CustomerSource
  • Decompressing the Virtual Machine
  • Enabling Hyper-V
  • Mounting the Virtual Machine Through Hyper-V

CHAPTER 3: MAINTAINING YOUR VIRTUAL MACHINE LICENSES (NEW)

  • Relicensing the Virtual Machine for 180 Days
  • Relicensing Dynamics AX

CHAPTER 4: CREATING A NEW PARTION

  • Creating A New Partition
  • Creating A New Shortcut To The Partition
  • Initializing The Partition

CHAPTER 5: CONFIGURING THE SYSTEM FOR THE FIRST TIME

  • Changing The Default Company
  • Configure The Default Document Types Storage Locations
  • Importing Default User Profiles
  • Adding Your User To A Role
  • Importing Additional Users
  • Configuring Enterprise Portal Links
  • Configuring Enterprise Search Server

CHAPTER 6: CONFIGURING YOUR ORGANIZATION

  • Initialize the Organizations Number Sequences
  • Importing Address Zip Code, City, State & County Components
  • Configuring The Global Address Book Properties
  • Configuring Default Address Books
  • Configure Working Time Templates
  • Configuring Your Organizational Calendar
  • Creating A Default Email Template
  • Configuring Your Default Workflow Parameters
  • Configure The Alert Notification Parameters
  • Creating A New Worker Record
  • Associating Users With Workers

CHAPTER 7: CONFIGURING YOUR LEGAL ENTITY

  • Adding an Address to the Legal Entity
  • Adding A Logo To Your Legal Entity

This has expanded the guide from 188 or so pages to around 420 pages, and is now a complete reference for people who want to set up their own version of Dynamics AX 2012 for testing and training, and also shows how to configure the base system in order to be ready to move through all of the Bare Bones Configuration Guides that I have developed.

If you haven’t seen any of my guides, then this walkthrough guide is formatted to give you a step by step guide with full screen illustrations of each of the steps to give you a visual guide as to where in the process you are. Each illustration is a great visual reference as to what you should be seeing on the screen and has a description of exactly what you need to do in order to complete the step. This is an ideal way for a novice user to step through the examples within guide.


If you have already picked up a copy of the original guide that I published a couple of weeks ago then don’t frett, you should have already received a link to where you can re-download the updated version of the guide. Being an early ready does have it’s perks.

I hope this is useful to everyone and that you all start learning Dynamics AX 2012 – then when the new release of Dynamics AX comes out you will be up to speed on that version as well because all of the business functionality from Dynamics AX 2012 applies to that version as well.