Archive

Monthly Archives: January 2015

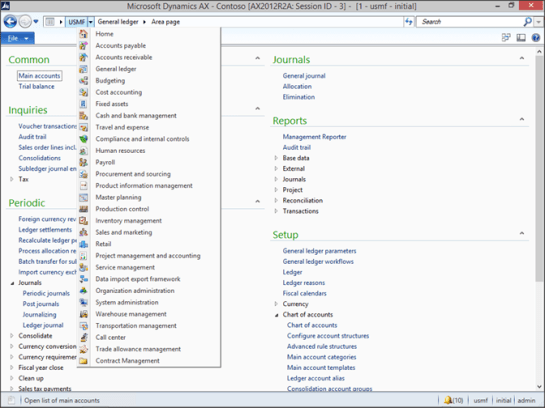
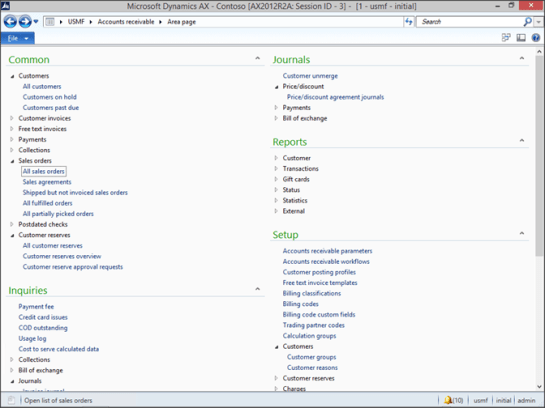
Sometimes the menus within Dynamics AX can be a little overwhelming because there are so many different menu items, and really you just use a handful of the menu items on a daily basis. Also, sometimes to perform a business flow you need to go to a couple of different area pages in order to find all of the things that you need.

You can use the Favorites to create a collection of all the menu items that you use, but if you really want to be clever you can create your own custom menu which will become your go-to location to find everything that you need. This also gives you the option to re-arrange the business processes a little so that they follow a more business process centered flow. You only have to go off the reservation if you need to find a menu item that you don’t usually use.

In this walkthrough we will show you how you can create a new Master menu that has just the menu items that you need.

How To Do It…

  1. For this tweak we need to get into the development environment. The quickest way to do this is just press CTRL+D.
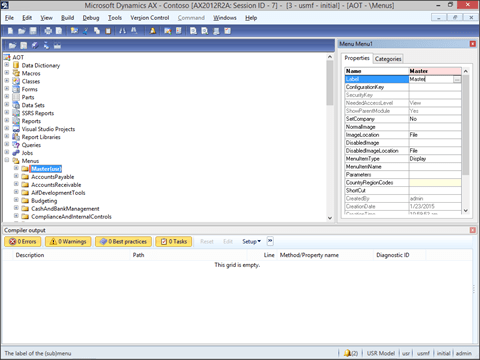
  2. Once you are in AOT, expand the Menu group so that you can see all of the menu area pages and then right-mouse-click on the Menus folder and click on the New Menu item to create a new menu for our master page.
  3. That will create a new menu link for you. Within the properties panel change the Name and Label to Master.
  4. Now we want to create groups for each of our business processes. To do this, just right-mouse-click on the Master menu and click on the New menu item and then select the Submenu option.
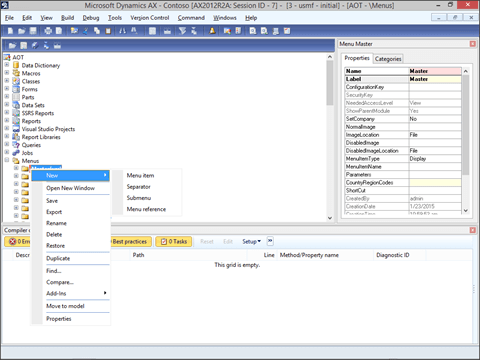
  5. This will create a new folder for you under the master menu and you can change the Name and Label properties to Financials.
  6. Repeat the process for the other business processes that we commonly use i.e. Hire To Retire, Order To Cash, Procure To Pay, and Operations, and then repeat the process for each of the business processes under each of the business processes.
  7. Now right-mouse-click on the Master menu and select the Open New Window menu item and tile the windows so that you can see both the AOT tree and the menu. Then navigate to the menu items that you want to include in the Master menu and drag them over to the business process that they belong in. Keep on doing this for all of the menu items until your menu has all of the main business forms added to it.

    Tip: Make sure that you are pressing the CTRL key when you do the dragging so that you make a copy, and don’t just move them.
  8. Now we need to add an icon to the menu so that it looks like all of the other menus. To do this, click on the Master menu and then change the Image Location property to EmbeddedResource. That will allow you to click on the at the right of the Normal Image property and search through the resource file for a menu icon that looks good. 10054 looks like a keeper.
  9. Now click on the Save button to update the menu.
  10. Next we need to add the menu to the main menu so that we will be able to access it. Start off by expanding out the MainMenu menu item within the Menus group. Then right-mouse-click on the MainMenu folder, select the New menu item and then click on the Menu Reference menu item.
  11. This will open up a new Select Menu list – you may need to tile the windows to see both it and the AOT window. All you need to do is drag the Master menu from the list of menu items into the MainMenu menu.
  12. After you have done that, save the changes and then exit the Dynamics AX Client and restart it to refresh the menus.

How It works

Now when you look at the list of menus you will see the Master menu has been added to the list.

When you click on it you will see your new menu with just the key business processes and menu items.

Tip: To get to the master menu from anywhere, just press F11 to access the breadcrumb bar and then type in Master. You will instantly be transported to the Master menu.

Summary

You can use this procedure in other ways as well. Rather than including all of the business processes in one menu, you could break them out into their own menus so that you can give them to certain user groups to make their lives a little less complicated.

How cool is that!

Additional Resources: If you are looking for a more detailed walkthrough of all the features and functions then you can check out the Dynamics AX Companions site. Just click on the images below to find it.


About The Author:
Murray Fife is a Microsoft Dynamics AX MVP, Author of over 20 books on Microsoft Dynamics AX, and Solution Architect at I.B.I.S. Inc. with over 20 years of experience in the software industry. Like most people in his industry he has worked in many different roles during his career, including as a developer, an implementation consultant, and a trainer which gives him a great understanding of the requirements for both customers and partners. He is a regular contributor to the Dynamics AX community and in addition to hosting presentations for I.B.I.S. presents regularly for the AXUG and MS Dynamics World, has spoken at Microsoft Convergence and AXUG Summit conferences. If that was not enough, he works closely with Microsoft evaluating with their beta products and also is a Council Member on the Microsoft Dynamics Academic Alliance trying to help educate the new generation of consultants on Dynamics AX.

I absolutely love Power BI, and a couple of weeks ago, Microsoft snuck out a preview product which takes all of the good parts of the PowerBI that we like in Excel (which is pretty much everything – PowerQuery, PowerPivot, PowerView etc.) and packaged it up into a nice little standalone product that they call the Power BI Designer. And you can download it for free directly from your PowerBI portal within Office 365.

You can also post everything that you create within the Power BI Designer to the new and improved Power BI sites within Office 365, and from there you can use Power Q&A to search through your data and then create summary dashboards that combine information from multiple sources.

So when the AXUG asked me to host a webinar for them next Monday I couldn’t think of a better topic – especially since the new Power BI Designer allows you to create your own dashboards and analytics practically for free.

If you are free between 2pm & 3pm EST next Monday (Jan 26th) then you may want to register, grab a cup of coffee and drop on by – here is the link: http://www.axug.com/Widgets/Generic?cobaltsrc=https://dciportal.cobaltsaas.com/Meetings/Registration/MeetingDetails.aspx?mid=23dcc690-348b-478c-b120-7a3b089be46e#tab0

Here is a sneak peek into what I will be showing you how to create directly from the Dynamics AX data


PS. If you are not an AXUG member, and still want to see the presentation then use the 30 day trial to register and sneak on in.

PPS. Even if you don’t have Dynamics AX, then drop on by – this product is great and you can use it to report off anything you like.

About The Author: Murray Fife is a Microsoft Dynamics AX MVP, Author of over 20 books on Microsoft Dynamics AX, and Solution Architect at I.B.I.S. Inc. with over 20 years of experience in the software industry. Like most people in his industry he has worked in many different roles during his career, including as a developer, an implementation consultant, and a trainer which gives him a great understanding of the requirements for both customers and partners. He is a regular contributor to the Dynamics AX community and in addition to hosting presentations for I.B.I.S. presents regularly for the AXUG and MS Dynamics World, has spoken at Microsoft Convergence and AXUG Summit conferences. If that was not enough, he works closely with Microsoft evaluating with their beta products and also is a Council Member on the Microsoft Dynamics Academic Alliance trying to help educate the new generation of consultants on Dynamics AX.

One of the most debilitating afflictions within the Microsoft Dynamics AX community is Musophobia which is the abnormal fear of the mouse. It is commonly accompanied by a severe case of Clickarexia which is the unnatural avoidance of mouse button clicks, and the goal to achieve the golden number of 0 clicks each day.

Don’t worry though, there is hope for you all because you can do almost everything that you need to do within Dynamics AX without having to take your fingers off the keyboard. In the following overview we will show you all of the keyboard shortcuts and tricks for navigating through the Dynamics AX client.

Accessing the Breadcrumb Bar through Hotkeys

The breadcrumb bar is a great way to move around within Dynamics AX without having to touch the mouse and if you know the shortcut keys them you can navigate the system like a pro.

The first trick that you will want to know is how to access the Breadcrumb Bar without using the mouse. This is a synch – all you need to do is press F11 and it you will be taken straight up there.

Using the Breadcrumb Bar to Navigate Home

The role center is a great reset point for you to navigate back to, and you can use the breadcrumb bar to take you there. All you need to do is type in home and press enter. You will then be taken to your Role Center.

Changing Companies through the Breadcrumb Bar

Another shortcut that you may want to take advantage of through the breadcrumb bar is changing companies. To do this, start off by pressing F11 to access the breadcrumb bar.

Then just type in the company that you want to switch to and then press ENTER. Immediately you will be swapped to the new company. That saves a whole lot of mouse clicks for sure.

Accessing Area Pages through the Breadcrumb Bar

Something else that you may want to do is move to a particular area page within the menus quickly, and you can do this easily through the breadcrumb bar without touching the mouse. To do this, start off by pressing F11 to access the breadcrumb bar.

Then type in the area page that you want to go to. Immediately you will be taken straight to the area page that you asked for.

Opening Up Forms through the Breadcrumb Bar

If you really don’t like the mouse then you can take the navigation through the breadcrumb bar even further by specifying the form that you want to open. To do this, just press F11 to access the Breadcrumb Bar.

Then replace the Area Page with the tree path to the form that you want to open. That will open the form for you without having to touch the mouse.

Navigating Within Area Pages

You can navigate to forms another way as well that doesn’t require you memorizing all of the form names. And that is through the Area Pages themselves. To do this we will just switch over to an area page.

When we are taken to the Area Page the focus will change from the Breadcrumb Bar over to the main page itself, and the first menu item on the page will be selected. If you press the TAB key then you will be able to move to the next item within the menu page. To open the form, all you need to do is press the ENTER key. That will open up the form that you selected.

Navigating Within Page History

Dynamics AX also tracks the history of where you have been within the system, and this feature allows you to return to any form that you may have been on during your session. You can see the history just by clicking on the history dropdown arrow beside the back and forth buttons.

Although we don’t have to use the mouse to navigate back and forth within the history. All you need to do is press ALT+LEFT ARROW and ALT+RIGHT ARROW to move back and forth within the history. That will return you back to the previous form that you were on.

Cycling Through Area Pages

One last trick that you can use to help you navigate through the application with the keys is to use the CTRL+TAB to move consecutively through area pages.

To move to the next area page just press CTRL+TAB. That will take you to the next Area Page is the list.

To return back to the previous menu item within the list just press CTRL+SHIFT+TAB.


Using Shortcut Keys within Forms

The shortcut keys are not just used to navigate within the menus, you can also cut your ties to the mouse within all of the transactions as well. As an example let’s type in a sales order. First we will select the All Sales Orders form. And then press Enter.

Navigating the Ribbon Bar and Forms through Shortcut Keys

That will take us to the list of all the sales orders. In order create a new sales order though we need to access the Ribbon bar. In order to do this, all you need to do is press the ALT key.

You will notice that a number of different keys will show up in the ribbon bar that tell you what to press to select the ribbon bars, and also the individual groups within the currently selected ribbon bar. We want to create a new Sales Order, and that is in the New group, so we just need to press N.

That will take us into the New ribbon bar group, and since there are a few options that are available there as well we need to select again. The Sales Order option is highlighted with an S so that’s what we should press. Since there are two options available to us that start with S then we will see both menu items, although only one will be highlighted. If we wanted to choose the next option then we could press S again, but in this case it’s the right selection so all we have to do is press ENTER to select the button.

That will open up the Create Sales Order dialog box, and we can use the tab key to move between forma and also the ALT and arrow keys to access dropdown lists. You can then select the records within the dropdown lists with the arrow keys. Once you are on the record that you want just press ENTER. From here you can go directly into the order detail form by pressing ALT+O to select the OK button.

Now you will be in the order detail form, and you will be within the lines ready to enter in a part code. If you know the part code that you want to add to the order then you can just type it in, or you can search by using the dropdown list.

Accessing Different Ribbon Bars

Now that you have a line on your order you can start processing it through the ribbon bar. The problem is that the Confirm function is within the Sell ribbon bar which is not visible so we will need to use the shortcut keys to change the ribbon bar. To start doing this just press the ALT key.

The Sell ribbon bar has the S shortcut key so that is what we should select. You will notice that there are a few shortcuts that use the S key so we need to cycle through them by pressing the S key again.

Still not quite there, so we will need to press S again. Once the Sell ribbon bar is selected then we can press ENTER to change to that ribbon bar.

Now that we can see the Order Confirmation buttons we can use the shortcut keys to kick off the Sales Order Confirmation.

Confirming Dialog Boxes

When the Confirm Sales Order dialog box is displayed, all we need to do is use the shortcut keys to select the OK button. And that will print (or send) our order confirmation out for us. When we are finished looking at the order confirmation, just press ALT+F4 to close the form and we can move onto the next transaction.

Closing Windows with Shortcut Keys

To exit out of the order that you just entered just press ALT+F4 again.

Returning Home

That will return you to your All Sales Orders list page. If you are done entering in orders then you can use the breadcrumb bar to return to your role center home page. Now you’re back where you started from.

Using My Links to Navigate To Forms

One other way that you can open up forms is directly from the Role Center itself. If you have added menu items to your My Links web part then you can use the TAB key to move too them. You will notice that your My Links links are now highlighted. To open up the form just press ENTER. Now you are back in the Orders list page.

You can navigate back to the home page by pressing the ALT-LEFT ARROW KEY or by typing in home within the breadcrumb bar.


Conclusion

Hopefully this walkthrough has shown you that Dynamics AX is easily navigated through the keyboard shortcuts. There may have been a couple of tricks that may make those of you that are not Musophobic reach for the mouse just a little less.

Additional Resources:
If you are looking for a more detailed walkthrough of all the features and functions then you can check out the Dynamics AX Companions site. Just click on the images below to find it.


About The Author:
Murray Fife is a Microsoft Dynamics AX MVP, Author of over 20 books on Microsoft Dynamics AX, and Solution Architect at I.B.I.S. Inc. with over 20 years of experience in the software industry. Like most people in his industry he has worked in many different roles during his career, including as a developer, an implementation consultant, and a trainer which gives him a great understanding of the requirements for both customers and partners. He is a regular contributor to the Dynamics AX community and in addition to hosting presentations for I.B.I.S. presents regularly for the AXUG and MS Dynamics World, has spoken at Microsoft Convergence and AXUG Summit conferences. If that was not enough, he works closely with Microsoft evaluating with their beta products and also is a Council Member on the Microsoft Dynamics Academic Alliance trying to help educate the new generation of consultants on Dynamics AX.


The self-service portals within Dynamics AX are great features to take advantage of in order to help you collaborate more with your Vendors, and also to allow Customers to take care of a lot of the administrative queries that they would usually have your customer service group answer. They are made even more appealing because of two other features. The first is that there are no additional licenses required in order to give the customers and vendors access to the portals because they are free, and also because the self-service portals are included within the base software install kit for Dynamics AX, and all you need to do to get them up and running is to install them.

The Vendor Self Service Portal

The Vendor Self Service Portal is a great way to allow your vendors manage their profile, view all of the Purchase Orders that have been placed with them, and even enter in invoices that will be sent directly to the Payables department within Dynamics AX.

When the vendor logs in they will see a dashboard that will allow them to access all of the vendor based features. The functions that are shown on the portal are also restricted by the user security. When you set up the Vendor within Dynamics AX, you can tweak the roles that are assigned to the user to give them more or less access within the portal to features.

The vendor is not only allowed to view all of their profile details, they are also able to update the details themselves, taking the workload off the Payables group and also improving efficiencies when there are updates that need to be made on the vendor account. It’s so much easier just to get them to do it rather than having to transcribe information from e-mails or documents.

The Vendor Self Service Portal isn’t just for maintaining master data though on the vendor. The vendor can help you while they help themselves by creating transactions within Dynamics AX as well. An example of this is the ability of the vendor to create their own Invoices through the portal which will go straight to Payables for approval and payment. If they attach all of the documentation for the invoice then they completely eliminate the requirement to send an invoice, and also shortens the time to pay.

Another timesaver within the Vendor Self Service Portal is the ability for the vendor to review all of the Purchase Orders that have been sent to them, and also download any associated document that have been added to the Purchase Order as attachments. Rather than having the vendor harass the purchasing department for information they can just let their fingers do the walking.

An additional tool that you can let your vendor’s access through the Vendor Self Service Portal is the ability to track the receipt of products. This allows the vendors to see when the products were received, how much was received, and also create invoices based on the receipts, further reducing the lag time between shipping and invoicing. At any time, the vendor is also able to generate invoices for you within Dynamics AX for you based off the Purchase Order, or reported receipts. Again, these will not be posted until the Payables group have reviewed them, but it will save them time of re-entering in the transactions themselves.

One of the best ways to use the Vendor Self Service Portal for collaboration is to use it to manage Requests for Quotations. This feature allows you to create a quote template within Dynamics AX with all of the products that you need to have a vendor quote out, and then you can send it electronically to the vendor. They are then able to respond online through the portal with their best quote and return it to you. Then you can review all the quotes, choose the ones that you want to accept and they will be converted to Purchase Orders, Purchase Agreements, or even Requisitions without having to re-enter a single line. This is a great way to work with your vendors, and also because it is immediately published to the portal, allows you to increase the turnaround speed on quotations to almost instantly.

Vendor Onboarding through the Enterprise Portal

A slightly different feature that you can take advantage of with the Enterprise Portal is the ability to streamline the Vendor Onboarding process. Rather than having an informal process for accepting vendors to do business with the company, you can take advantage of the prospective vendor onboarding function that allows users to request vendors to be added to certain procurement categories, have them reviewed through workflow, and then collaborate with the prospective vendors to have them update their own information before they become approved vendors. Why not offload some of the onboarding work to the vendors themselves.

The first step in the process is to initiate a new vendor request. This may be done by any employee through the Employee Self Service Portal.

There are a lot of steps that you can automate within the vendor onboarding process, but they are all managed through the Procurement and Sourcing Workflows. So it makes sense to take a quick look at the workflows.

There is one additional feature that you can take advantage of with the Enterprise Portal is that you can invite the prospective vendors to update their details before they become approved vendors. Rather than going through an arduous task of gathering information from the vendor over multiple interviews and e-mails, you can just give them access to all of their information and have them update it online themselves.

The Customer Self Service Portal

Self Service is not just for the Vendors though. There is also a pre-configured self-service portal that has been specially designed for the Customers as well. This allows the customers to update their contact information, add additional contacts, view all of their transactions, and even place orders through the portal. If you want a quick way to allow your customers to access their information on-line then it’s a great option – especially since you have it already within your available products delivered with Dynamics AX.

The first feature of the Customer Self Service Portal that we will look at is the ability for the customer to update all of their contact information on line. So rather than having them call up customer service and asking them to change an address or update a phone number then they can do it themselves and Dynamics AX will always be up to date.

The customers can also help you help them by adding and updating the people that are associated with the customer as well by adding and updating Contacts and the customers can also view all of the related transactions as well like the Invoices.

Another feature that the customer is able to take advantage of is the creation of return orders directly from the Customer Self Service Portal. This warns you that the products are being returned, and also means that you don’t have to create the return order yourself.

One last feature that is available within the Customer Self Service Portal is the ability to publish out eCommerce catalogs that will be made available to the portal for customers to browse through and place orders using a shopping cart. Although it’s not as flashy as some eCommerce solutions, it does give you the ability to have customers place orders through a web page without buying additional software. In addition to being able to order products through the shopping cart, there is also a form style shopping cart for the customer that knows exactly what they are looking for.

Conclusion

Hopefully the examples that we have worked through within this document give you an overview of most of the features that are just sitting there and waiting for you to take advantage of to make it easier for your customers and vendors to work with you. Most importantly we have hoped to illustrate that the Customer and Vendor Self Service Portals are live links back to the Dynamics AX data without having to run any synchronization or batch jobs making it very easy to share information.

We didn’t explore all of the features and functions so keep in mind that there are still a lot of goodies that you can stumble within these features.

Remember, you have this already, you don’t need to buy any additional licenses for the customers and vendors, so what are you waiting for? Start using it already!

Additional Resources:
If you are looking for a more detailed walkthrough of all the features and functions then you can check out the Dynamics AX Companions site. Just click on the images below to find it.


About The Author:
Murray Fife is a Microsoft Dynamics AX MVP, Author of over 20 books on Microsoft Dynamics AX, and Solution Architect at I.B.I.S. Inc. with over 20 years of experience in the software industry. Like most people in his industry he has worked in many different roles during his career, including as a developer, an implementation consultant, and a trainer which gives him a great understanding of the requirements for both customers and partners. He is a regular contributor to the Dynamics AX community and in addition to hosting presentations for I.B.I.S. presents regularly for the AXUG and MS Dynamics World, has spoken at Microsoft Convergence and AXUG Summit conferences. If that was not enough, he works closely with Microsoft evaluating with their beta products and also is a Council Member on the Microsoft Dynamics Academic Alliance trying to help educate the new generation of consultants on Dynamics AX.

Last week I hosted a webinar for I.B.I.S. Inc. focused on the self-service portals within Dynamics AX and showed:

  • how you can use the Vendor Self Service Portals to allow vendors your vendors to track all of their purchase orders and even type in invoices that will be available within Payables for approval without double entry
  • how you can create Request For Quotations and have the vendors respond to them on-line through the Vendor Self Service Portal
  • how you can use the Vendor Requests function to allow prospective vendors to be managed and approved through workflows and also fill in their information before they become vendors
  • how you can allow customers to view all of their Orders and Invoices through the Customer Self Service Portal without having to call up customer service
  • how you can use the shopping cart feature in the Customer Self Service Portals to place orders directly within AX without even talking to you


Along the way I also created a script to accompany the webinar for those of you that were not able to make it, and I just finished putting the finishing touches on it and published it to the Dynamics AX Companions site for you all to download. Just click on the images below to find it.


Tomorrow (Jan 15th) I will be hosting a webinar for I.B.I.S. Inc. focused on the self-service portals within Dynamics AX and have a whole slew of cool things that I will be showing.

I will be showing:

  • how you can use the Vendor Self Service Portals to allow vendors your vendors to track all of their purchase orders and even type in invoices that will be available within Payables for approval without double entry
  • how you can create Request For Quotations and have the vendors respond to them on-line through the Vendor Self Service Portal
  • how you can use the Vendor Requests function to allow prospective vendors to be managed and approved through workflows and also fill in their information before they become vendors
  • how you can allow customers to view all of their Orders and Invoices through the Customer Self Service Portal without having to call up customer service
  • how you can use the shopping cart feature in the Customer Self Service Portals to place orders directly within AX without even talking to you

And all of this is standard within AX and you probably have it all configured. All you need to do is start using it!

If you are free between 11am & 12pm EST then you may want to register, grab a cup of coffee and drop on by – here is the link: http://demand.dynamicscare.com/axwebinars

About The Author:
Murray Fife is a Microsoft Dynamics AX MVP, Author of over 20 books on Microsoft Dynamics AX, and Solution Architect at I.B.I.S. Inc. with over 20 years of experience in the software industry. Like most people in his industry he has worked in many different roles during his career, including as a developer, an implementation consultant, and a trainer which gives him a great understanding of the requirements for both customers and partners. He is a regular contributor to the Dynamics AX community and in addition to hosting presentations for I.B.I.S. presents regularly for the AXUG and MS Dynamics World, has spoken at Microsoft Convergence and AXUG Summit conferences. If that was not enough, he works closely with Microsoft evaluating with their beta products and also is a Council Member on the Microsoft Dynamics Academic Alliance trying to help educate the new generation of consultants on Dynamics AX.

One of the strengths of Dynamics AX is that it has been built from the ground up to track multiple companies within one system. This means that it is easy to share information between companies, and also that the transactions are streamlined as well to make intercompany accounting and management a breeze.

Intercompany sales is a good example of this because if you are buying and selling between two of your companies, then you can simplify your day by linking the two companies through intercompany customers and vendors. Then whenever you create a sales order within one company, There is no need to remember to create purchase order, because it is automatically created within the other company without having to lift a finger. Also, if you make a change at any time, then the other document is updated automatically because they are married together, removing the chance for the documents to get out of sync.

You may think that this would be a complicated task to set up, but it’s really pretty simple, and if you want to give it a try then here is what you need to do.

Within the company that is doing the buying, you will want to set up a Vendor for the company that you are going to be buying the products from.


Then within the company that is going to be selling the product, you will want to set up a Customer account for the buying company.

Then you need to link the two so that Dynamics AX knows that the transactions will be intercompany transactions. To do this, click on the General tab in either the Customer or the Vendor and click on the Intercompany button within the Setup group.

This will allow you to set up a trading relationship between the two companies.

There is also a number of flags and tweaks that you can make here as well that specify how the intercompany transactions are created, and also who is the master of the codes and prices. You might want to browse through these as well.

Now when you create a Purchase Order to source product from the other company, Dynamics AX will automatically create a corresponding Sales Order within the other company.

If you click on the Manage ribbon bar then you will see the Intercompany Tracing options that allow you to open up the corresponding transactions within the other company.

You will notice that the information is exactly the same within the Sales Order within the selling company.

All that you need to do is pick, pack and ship the order as if it were a normal sales order and then when it’s shipped the purchase order within the buying company will default in all the quantities and information to match what was shipped.

If you didn’t think it could get better then you are wrong because you can also use the intercompany functions with direct deliveries. If you create a sales order for a customer and tell the system that you want to perform a direct delivery then you will be able to select the other company as a sourcing vendor.

That then creates a Purchase Order for you that is requesting the direct delivery from the selling company and it also creates a Sales Order on the selling side with delivery instructions for the customer that you placed the order for.

How easy is that?

About The Author:
Murray Fife is a Microsoft Dynamics AX MVP, Author of over 20 books on Microsoft Dynamics AX, and Solution Architect at I.B.I.S. Inc. with over 20 years of experience in the software industry. Like most people in his industry he has worked in many different roles during his career, including as a developer, an implementation consultant, and a trainer which gives him a great understanding of the requirements for both customers and partners. He is a regular contributor to the Dynamics AX community and in addition to hosting presentations for I.B.I.S. presents regularly for the AXUG and MS Dynamics World, has spoken at Microsoft Convergence and AXUG Summit conferences. If that was not enough, he works closely with Microsoft evaluating with their beta products and also is a Council Member on the Microsoft Dynamics Academic Alliance trying to help educate the new generation of consultants on Dynamics AX.

I can’t make it to the Microsoft Dynamics Technical Conference in Seattle, WA this year from February 2nd to the 4th but you can still make it. This is a great conference to catch up with all of your Dynamics AX and CRM colleagues and get inspired to you take your business further.

Microsoft will be showcasing the newly released Microsoft Dynamics AX 2012 R3 CU8 at the conference, so what a great way to learn the new features added with this cumulative update. This year there will be nearly 100 sessions, including the latest developments in Lifecycle Services, Microsoft Dynamics AX 2012 on Azure, warehousing and transportation functionality, and omni-channel capabilities for Retail.

Also you can check out the
Deep Dive Workshops
to maximize your learning.

Here is a link to the registration form if you haven’t already signed up – register today!

Maybe next year there will be a couple of sessions that I host J

You don’t have to be running enormous batches of products through a large production line in order to take leverage the costing within Dynamics AX. One of my new years resolutions was to work out how much my morning smoothie was costing so I thought that I would just model it out within Dynamics AX, and along the way give everyone a simple introduction on how to create a completely new Bill Of Material and roll up the costs.

How To Do It…

  1. The first step in the process is to create your parent product that you will create your Bill Of Material for and then use to calculate the rolled up cost of all of the ingredients that you add in. To do this, open up the Released Products list page and then click on the Product button within the New group of the Product ribbon bar.
  2. When the New Released Product dialog box is displayed, set the Product Number, Product Name and also set both Search Name fields to a shortened description of the product.
  3. Before we continue on click on the Show More Fields link at the bottom of the form and you will notice that there are a few more defaults that we can set up for our product.
  4. Next we want to click on the Item Group dropdown list and select a value. Since this is a new type of product though we may want to create a new record so that we can track the postings for the product separately if we ever want to.
  5. So we will quickly create a new Item Group that we will assign to our product. To do this just right-mouse-click on the Item Group field and select the View Details menu item.
  6. When the Item Groups maintenance form is displayed, click on the New button in the menu bar to create a new record.
  7. Give your Item Group an Item Group code and also a Name.
  8. While we are here, lets set up a couple more Item Groups for some of the other products that we will be creating.
  9. Now that all of the Item Groups have been configured, just click on the Close button to exit from the form.
  10. Now click on the Item Group dropdown list and you will be able to choose the new Item Group that you just set up.
  11. Now click on the Storage Dimension Group field and select the method that you want to use to locate your product.
  12. And then click on the Tracking Dimension Group field and select the method that you want to use to track your product.
  13. Next click on the Inventory Unit field and select the Unit Of Measure that you want to inventory your product in.
  14. If the unit of measure that you are wanting to use for the product does not exist though you may want to create a new one just for the product. To do this, open up the Units maintenance form and click on New button within the menu bar to create a new record.
  15. Type in the Unit Code that you want to use and also the Description of the unit of measure.
  16. By default, the type of Unit Class that is selected is Quantity, but if you are tracking the unit as a different class of unit then you can click on the Unit Class and select a more appropriate value.
  17. If you want to track your production results in other units of measure then you will want to set the conversion values that you want to use for this particular unit of measure. To do this, click on the Unit Conversions button in the menu bar.
  18. When the Unit Conversions maintenance form is displayed, click on the New button in the menu bar to create a new record.
  19. Enter in the Factor and the To Unit for the conversion. The From Unit will automatically default in from the unit of measure.
  20. If you want to check the conversion to make sure that it is correct then just click on the Calculate For Units menu item within the menu bar.
  21. When you are ready you can just click on the Close button to exit from the form.
  22. Now all your Units have been configured and you can just click on the Close button to exit from the form.
  23. Now return back to the New Released Product form and you will be able to click on the Inventory Unit dropdown list and see the new Unit Of Measure that you just configured.
  24. Now set the Inventory Unit, Purchase Unit, Sales Unit and BOM
    Unit to the new unit of measure that you created and when you are done click on the OK button to create the product.
  25. The Released Product Details form should then open up with your new product.
  26. There is one quick tweak that we need to make to the product though and that is to assign a default Site to it. To do this click on the Manage Inventory ribbon bar and then click on the Default Order Settings button within the Order Settings group.
  27. Click on the Default Order Type dropdown list and select the Production option so that if we ever create planning orders then it will plan this product as a production order.
  28. Now set the Purchase Site, Inventory Site, and the Sales Site to the primary Site you want to associate them with.
  29. After you have done that just click on the Close button to exit from the form.
  30. Now that we have our parent product configured it’s time to start creating the Bill Of Materials for it. To do this, click on the Engineer ribbon bar within the Released Product Details form and click on the Lines menu item within the BOM group.
  31. When the BOM Line maintenance form is displayed, click on the Create BOM button within the menu bar to create a new bill of materials.
  32. When the Create BOM dialog box is displayed enter in a new BOM Number, Description, and also the default Site that you want to associate this bill of materials with and then click on the OK button.
  33. After the BOM record has been created, click on the New button within the Lines menu bar to create a new record.
  34. Since we don’t have any of the raw materials configured yet we will set them up by right-mouse-clicking on the Item Number field and selecting the View Details menu item.
  35. When the Released Product Details form is displayed, click on the Product button within the New group of the Product ribbon bar to create a new record.
  36. When the New Release Product dialog box is displayed, set the Product Number, Product Name, and both the Search Name fields.
  37. Then set the Item Model Group, Item Group, Storage Dimension Group, Tracking Dimension Group, Inventory Unit, Purchase Unit, Sales Unit and BOM Unit.
  38. After you have done that just click on the Ok button to create the record.
  39. Scroll down to the Purchase tab within the document view and set the default Purchase Price for the product.
  40. Then scroll further down to the Engineer tab group and set the Calculation Group for the product.
  41. Finally, click on the Cost Group field.
  42. We may want to segregate out our costs a little bit differently by creating some new cost groups though. To do this, right-mouse-click on the Cost Group field and click on the View Details menu item.
  43. When the Cost Groups maintenance form is displayed, click on the New button in the menu bar to create a new record, and then give your record a Cost Group code and a Name.
  44. And then from the Cost Group Type dropdown list select the Direct Materials value.
  45. Now that we have done that, just click on the Close button to exit from the form.
  46. Now select your new Cost Group that you set up for the product.
  47. To finish off the setup of the product we need to just run the cost update so that the BOM will be able to get the correct unit cost. To start doing this, click on the Item Price menu item with in the Setup group of the Manage Costs ribbon bar.
  48. When the Item Price maintenance form is displayed, switch to the Pending Price tab and then click on the Calculation menu item within the menu bar.
  49. When the Calculation For An Item dialog box is displayed, click on the Costing Version dropdown list and select the version that you want the cost to be posted against.
  50. And then select the Site that you want to associate the cost with.
  51. And then click on the OK button to perform the cost calculation.
  52. When you return back to the Item Price maintenance form, you will see that the price has been calculated from the purchase price. All you need to do is click on the Activate button within the menu bar to approve the price.
  53. Now when you look at the Active Prices you will see your cost price.
  54. Now just click on the Close button to exit from the form.
  55. Now we can return to our Bill Of Material and start adding our ingredients. To do this click on the Item Number dropdown list and select the first product that we want to add.
  56. Then select the default Warehouse that we want to source the product from.
  57. Then type in the Quantity and Quantity Unit that we will be adding to the product. Since we have our unit of measure conversions configured the Unit does not have to be the same as the primary unit either.
  58. Repeat the process for all of the other lines in the BOM.
  59. After you have done that you can perform a cost roll up to find out how much your product costs. To do that, just click on the Calculation button within the menu bar.
  60. When the Calculation For An Item dialog box is displayed, just click on the Ok button.
  61. When the Item Price maintenance form is displayed you will see the rolled up price for your product.
  62. If you click on the Complete button in the menu bar then you will see all of the cost breakdowns by item as well.

How cool is that. Setting up Bills of Materials for costing is not that hard, and once you have them set up, you can then start tweaking them to start seeing what the cost impacts would be if there were price changes.

Why don’t you all give it a go?

Need More Information? If you want more detailed information on this walkthrough then you can download the complete walkthrough as a PDF file from the Dynamics AX Companions
website. This includes detailed screen shots showing the step by step instructions and also sample data that you can use to practice yourself or that could be used as training material to teach others how to do it. Just follow the link below.


About The Editor: JT Cutter is the Chief Content Officer at Dynamics AX Companions overseeing all marketing content initiatives for the site. As a bonus with over 15 years as an independent ERP advisory consultant, knows a little about software as well. Track him down on Twitter @jtcutter.