Archive

Monthly Archives: June 2016

To showcase Dynamics AX’s full potential within presentations, you really want to work with multiple personas with different job roles. This highlights the different access that all of the different people have, it cuts down on the number of functions that users are allowed to access, and also it just looks nice to change the view of the Dynamics AX world every now and then.

The problem though is how do you log into multiple personas at once. All of the session information is held in the browser cookies, so you probably start up In Private sessions, or open up other browsers that don’t share the session information. Even then you are still limited to the number of sessions that you can open and also having multiple browsers open like IE, Safari, Chrome etc. although it shows the compatibility of Dynamics AX with the different browsers, looks a little cluttered.

If only there was a better way.

Don’t fret. There is a better way, and it’s pretty simple to do. All you need to do is use the New Session function in Internet Explorer.

How to do it…

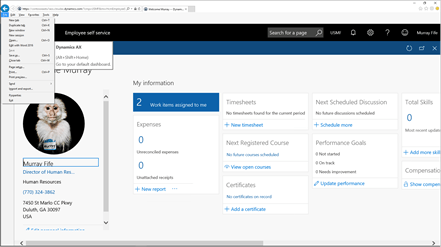
Step 1: Open up your first Persona

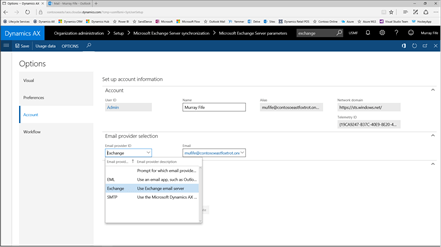
Start off by opening up your first Persona in Internet Explorer. Don’t do this in Edge because the feature is not available in that browser.


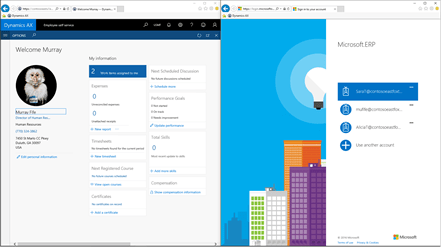
Step 2: Click on the New Session menu item

Now open up the File menu (ALT+F) and select the New Session menu item.


Step 3: Log in as your new Persona

This will open up a new Internet Explorer browser but the interesting thing is that the session will not share any of the information with the other browser window so you will be able to log in as another persona with different credentials.


How it works…

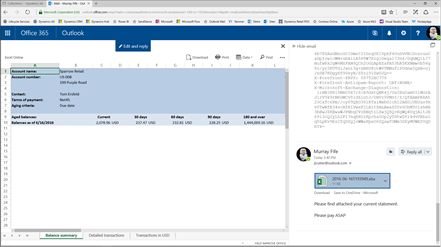
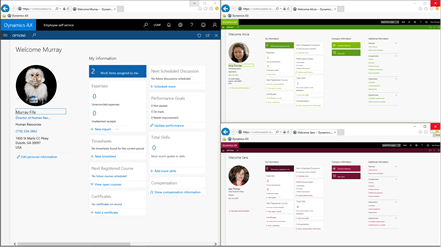
Step 4: Two separate Personas

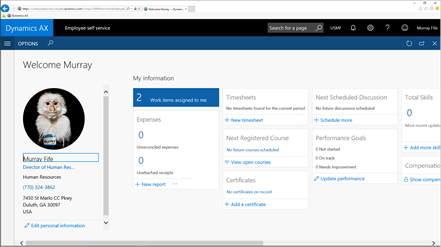
When the second browser logs into Dynamics AX, you will see that the session is running as the new persona and you can now swap between the different users without a problem.


Step 5: You don’t have to stop there

You don’t have to stop there; you can create as many different sessions that are logged into Dynamics AX with their own separate sessions.

As a side note, you can also take advantage of the different color options within the users’ preferences to make it easier to see which user you are logged in as.


Summary

Logging in as different users has a whole slew of benefits. It allows you to work as a user other than the system administrator who has global access, and show what the real users would see and it allows you to show the interaction between the users through workflow and collaboration.

Also, by staging the sessions so that you don’t have to sign out and back in to show the different users makes the process seamless, and also makes the presentation a lot simpler.

About the Author

Murray Fife is an Author of over 25 books on Microsoft Dynamics AX including the Bare Bones Configuration Guide series of over 15 books which step the user through the setup of initial Dynamics AX instance, then through the Financial modules and then through the configuration of the more specialized modules like production, service management, and project accounting. You can find all of his books on Amazon here http://www.amazon.com/author/murrayfife.

Murray is also the curator of the Dynamics AX Companions (www.dynamicsaxcompanions.com) site which he built from the ground up as a resource for all of the Dynamics AX community where you can find walkthroughs and blueprints that he created since first being introduced to the Dynamics AX product.

For more information on Murray, here is his contact information:

Email: mcf@dynamicsaxcompanions.com

Twitter: @murrayfife
Facebook: facebook.com/murraycfife
Google: google.com/+murrayfife
LinkedIn: linkedin.com/in/murrayfife

Blog: http://www.atinkerersnotebook.com

Docs: docs.com/mufife
Amazon: amazon.com/author/murrayfife

With Update 1 of Dynamics AX, a new feature was added that allows you to use Microsoft Exchange Server as the e-mail provider for both workflows and also for sending e-mails directly from Dynamics AX. Previously the email transport options were SMTP and the client applications.

This is an important feature because it means that the outgoing emails are tracked within Exchange and stored as sent mail just in case you need to go back and reference them later on. With SMTP, you have no record of the sent e-mail unless you CC yourself. And if you use the client method to create your emails, then you can’t send the emails unless you have Outlook open, which is a little inconvenient.

Getting ready…

Step 1: Configure the Microsoft Exchange Server Parameters

To get this configured within Dynamics AX, first start by making sure that the Microsoft Exchange Server parameters are configured to point to your Exchange server.


Step 2: Use Autodiscovery to set the Microsoft Exchange Settings

If they are not configured, then just click on the Autodiscover button in the menu bar and then type in your Email and Password and then Dynamics AX will discover where the Exchange server is for itself.


Step 3: Set the default Email Provider to Exchange

Then within the user Options,
browse to the Account page and click on the Email Provider ID and you will be able to select the Exchange option, which will tell the system to send all of your emails through Microsoft Exchange Server.


How it works…

Step 4: Create a Statement to Contact through Customer Collections

To see this in action, open up a customer and navigate to the Collections form with all of the transactions and history for the customer account.

Then click on the Statement to customer button within the action panel to create a new Statement, and then click on the OK button.


Step 5: Personalize the email

This will automatically create the statement for us ax an Excel file (you can see it at the bottom of the Send Email panel that pops up) and also allow you to personalize the email that you are going to send to the customer.

After updating the Subject and also adding a personal message in the email body, we just need to click on the Send button.


Step 6: Email archived within Exchange

Now if we switch over to our Exchange account we will see that the email that we just created is sitting in our Sent email box.


Step 7: The Statement is an Attachment

Also from here we can see that the Statement is attached to the email as well and if we need to peek inside and see what Dynamics AX created for us then we can.


Step 8: There are multiple tabs on the Statement

The statements aren’t just single worksheets as well; they have multiple pages within the workbook which is pretty cool as well.


Summary

If you are wanting to audit emails, or archive correspondence that is sent out to the customer (and vendors etc.) then this is a great way to do it. Also this is a much better option than SMTP or using the client because it is completely hands off and integrated into Dynamics AX.

If you ask me, this is the only way that we should be sending emails.

About the Author

Murray Fife is an Author of over 25 books on Microsoft Dynamics AX including the Bare Bones Configuration Guide series of over 15 books which step the user through the setup of initial Dynamics AX instance, then through the Financial modules and then through the configuration of the more specialized modules like production, service management, and project accounting. You can find all of his books on Amazon here http://www.amazon.com/author/murrayfife.

Murray is also the curator of the Dynamics AX Companions (www.dynamicsaxcompanions.com) site which he built from the ground up as a resource for all of the Dynamics AX community where you can find walkthroughs and blueprints that he created since first being introduced to the Dynamics AX product.

For more information on Murray, here is his contact information:

Email: mcf@dynamicsaxcompanions.com

Twitter: @murrayfife
Facebook: facebook.com/murraycfife
Google: google.com/+murrayfife
LinkedIn: linkedin.com/in/murrayfife

Blog: http://www.atinkerersnotebook.com

Docs: docs.com/mufife
Amazon: amazon.com/author/murrayfife


Dynamics AX allows us to Save document attachments in a number of different locations including within SharePoint. This is a great option because not only do you have a way now to index and manage the documents, but also the documents are also indexed and made available to users through other Office 365 tools like Delve. This provides an enterprise indexing and search option which is extremely helpful, without adding any additional work for the administrators.

Getting ready…

Step 1: Create a Document Type linked to SharePoint

To start off, create a new Document Type within Dynamics AX, and make sure that you set the Location to SharePoint. This will enable the SharePoint Address field and you can click on the pencil icon to the right of the field.


Step 2: Select the SharePoint Document Library

This will allow you to navigate through all of your sites that you have configured within SharePoint and select the default document library that you want to save the document into.

In this example we have created a number of sites, and these are just Office Groups that we created within SharePoint.


How to do it…

Step 3: Open a new Released Product

Now that we have the document types linked to SharePoint we can start saving documents away there. To do this start by opening up a Released Product and then click on the Document Attachment icon (the paper clip) in the top right hand corner of the form.


Step 4: Attach a document within SharePoint

When the Document Attachment window is displayed, attach a file to the record using the SharePoint enabled Document Type that you just created.


How it works…

Step 5: Document saved to SharePoint

Now the document will be saved within SharePoint within the library that you assigned to the Document Type.


Step 6: Document becomes visible within Delve

But there is more. Since the Document has been saved within SharePoint then it will start to be surfaced within Delve as a document that the user created.


Step 7: Open Delve as another user

This becomes even more useful because the document is now searchable through Delve by other users (that have access) to the SharePoint library that you stored the document within.

For example, here we will sign into Delve as Alicia.


Step 8: Document found based on key words

If Alicia searches for any document that has a particular keyword that matches the document, or the indexed contents of the document then she will be able to find the file that we just saved from within Dynamics AX.

More importantly, since we saved a PDF file, Delve will search through the contents of the document as well and allow us to do a full text search within the file.


Summary

By saving Dynamics AX attachments within SharePoint, all of the documents become a resource for the entire organizations. Performing an Enterprise Search using keywords and time frames becomes enabled through not only SharePoint but also through Delve. Along the way these documents can then be Shared with non-Dynamics AX users (that have permission of course) and also we can use Office 365 as a document management system, rather than locking up all of the documents within the database and using up valuable space within SQL.

About the Author

Murray Fife is an Author of over 25 books on Microsoft Dynamics AX including the Bare Bones Configuration Guide series of over 15 books which step the user through the setup of initial Dynamics AX instance, then through the Financial modules and then through the configuration of the more specialized modules like production, service management, and project accounting. You can find all of his books on Amazon here http://www.amazon.com/author/murrayfife.

Murray is also the curator of the Dynamics AX Companions (www.dynamicsaxcompanions.com) site which he built from the ground up as a resource for all of the Dynamics AX community where you can find walkthroughs and blueprints that he created since first being introduced to the Dynamics AX product.

For more information on Murray, here is his contact information:

Email: mcf@dynamicsaxcompanions.com

Twitter: @murrayfife
Facebook: facebook.com/murraycfife
Google: google.com/+murrayfife
LinkedIn: linkedin.com/in/murrayfife

Blog: http://www.atinkerersnotebook.com

Docs: docs.com/mufife
Amazon: amazon.com/author/murrayfife

I’m sure that you all are thinking about your mid-year resolutions, and we can’t think of a better one than to learn how to configure Dynamics AX.


To help you along we have been busy revising and updating our Bare Bones Configuration Guides to make them even more helpful. The first one that we have updated is our Configuring the General Ledger within Dynamics AX 2012 guide, and we are happy to say that it is now available for you all to download.


We listened to all of your feedback from the last version of the guide and with this edition and have:

  • added 137% more content to the guide and in most cases rewrote all of the narratives
  • added more context around the configuration of the General Ledger setup to help you understand the Why of what you are doing
  • included sample data tables to help you as you are setting up data, so that you don’t have to squint at the screen shot as much
  • updated the format of the document to a recipe view, which trimmed up the guide by about 40% even though there is more content.


Here is a quick preview of the new guides – we think we did a pretty good job if we do say so ourselves. (We are using our Author Tools to automate the formatting of the guides and it’s working great)


If you want to take a look at it then you can check out the Print and Digital version on the New
Dynamics AX Companions website www.dynamicsaxcompanions.com (we are finally migrating off the old site that has served us well, but had a few quirks that we couldn’t debug)


If you are a Premium Member on the new Dynamics AX Companions then you can download this new guide, right away, at no additional cost. If you want to be a premium member then all you need to do is sign up here: http://bit.ly/25SOcEj


Along the way we have also started the reorganization process for the website to make it easier for you all to find just the resources that you want. One of these bonuses for you all is that we have also split up the guide into the individual modules that you can download in an à la carte fashion. This allows you to pick and choose what you want to learn and choose your own adventure with Dynamics AX.


To sweeten the deal even more you can download the first module Configuring the General Ledger controls within Dynamics AX 2012 for free to test drive the content. We’re sure that once you start the journey you will be hooked and have to do all eight of the modules.


So if you are looking for something to do in the second half of 2016, why not start off by learning the General Ledger within Dynamics AX. All of your friends will be so impressed with you when you start explaining how to configure the Ledger Controls, Journals, Periodic Journals, Organizational Structures, Financial Dimensions, Allocations, Accrual Schemes and Currency Management.

We’re sure you all know about the Bare Bones Configuration Guides for Dynamics AX that we slaved over for about two years to compile. Just in case though and as a reminder there are currently sixteen guides now published that will allow you to lean Dynamics AX by implementing a simple company from scratch. The series includes the following guides:

  • Configuring A Base Dynamics AX 2012 Test System
  • Configuring an Organization within Dynamics AX 2012
  • Configuring the General Ledger within Dynamics AX 2012
  • Configuring Cash and Bank Management within Dynamics AX 2012
  • Configuring Accounts Receivable within Dynamics AX 2012
  • Configuring Accounts Payable within Dynamics AX 2012
  • Configuring Product Information Management within Dynamics AX 2012
  • Configuring Inventory Management  within Dynamics AX 2012
  • Configuring Procurement and Sourcing within Dynamics AX 2012
  • Configuring Sales Order Management within Dynamics AX 2012
  • Configuring Human Resource Management within Dynamics AX 2012
  • Configuring Project Management and Accounting within Dynamics AX 2012
  • Configuring Production Control within Dynamics AX 2012
  • Configuring Sales and Marketing within Dynamics AX 2012
  • Configuring Service Management within Dynamics AX 2012
  • Configuring Warehouse Management within Dynamics AX 2012

If you are wanting to learn more about the guides then you can go to http://www.dynamicsaxcompanions/barebones and if you haven’t pick up your very own copy then just go to the sister site at http://shop.dynamicsaxcompanions.com and we can hook you up with copies.

Now that the hard work is done, we have been working on additional ways that we can help you even more. To do this we are making all of the Bare Bones Configuration Guides available as training guides and PowerPoint presentation so you can take the next step with the Bare Bones Configuration project and give your own training to your customers and peers.

Also in addition to having the content available as the self-paced walkthrough guides with the big pictures, we are offering some more formats specifically designed specifically for the classroom environment. Here is a quick of what we are now letting you take advantage of:

Training PowerPoints


We have taken all of the content from the Bare Bones Configuration guides and formatted them as PowerPoint presentations.

Each step is shown in the PowerPoint including all of the screen shots and there are options to include the Speaker Notes on the PowerPoint to make a Slideument version or have the notes hidden away as Speaker Only notes.

Additionally the guides have been split even more into individual Labs so you can pick and choose the order and the content for the training yourself.

Additionally, since this is a PowerPoint, then you will receive a license to rebrand the content and white label it if you like your own internal training classes.

Here is a link to the sample PowerPoint presentation: https://doc.co/EPqRsR

Students Guides


To make this look even more organized we have also converted all of the labs into Student Guides.

These guides are a more concise version of the walkthrough guides which also includes sample data and also some exercises.

To make the guide more manageable for the student we have includes all of the images as well, but these are shown as thumbnail images for reference.

We are making these student labs available in both the Digital and Print format.

If you want to white label these labs then we can definitely help you all with that and work with you all on the design that you like.

If you want to see an example of the Student Lab then here is a link: https://doc.co/8i5Ypd

Trainers Script


To finish off the set we have also compiled a Trainers Script which is an even more concise version of the guides. This version though is for the Expert and is designed to be used by the teacher as a guide during the training. No need for pictures in this case.

This will also be available in both the Digital and Print format.

If you would like to see what this document looks like then here is a link: https://doc.co/KDFjaW

Licensing the Source

One final note that we want to highlight is that if you want to repurpose the content and white label it yourself then we are now offering the option to license the source Word File.  This will be the entire content of the guides including all of the images, but the only restriction would be that you don’t republish it in a way that would compete directly with the original content.

This will allow you to convert the training program into other guides, convert into help, use for more extensive training, or just cut up for internal use.

If that sounds like something that would be interesting then just drop us a note.

How can you get these?

Hopefully this has been interesting and shows you how we are taking the Bare Bones Configuration Guides to the next level to help you all out as well. If you want to take advantage of any of these additional offerings then just drop us a note and we will definitely be able to help you all.