Archive

Monthly Archives: April 2017

Bots are cool. They are going to save all of us by automating all of the tasks and researching that we have to do by hand, and lead us into Utopia. Which is totally true.

Although, you may think that creating a Bot is complicated, and that you need to be a seasoned coder om order to create them.

And if you want to unleash the Bot onto the rest of the world through mediums like Skype, then you have to be an even more advanced coder because you need to understand the API’s and communication interfaces. And who on earth understands that?

Nothing can be further from the truth. You can create your own minion Bot within minutes, and then publish it as a Skype Bot in even less time.

In this walkthrough we will show you how to do this, and also solve one of the world’s greatest problems along the way.

Topics Covered

  • Creating a QnA Services with the QnAMaker
  • Creating an Azure Bot Service
  • Deploying the Bot Service to Skype
  • Conclusion

Creating a QnA Services with the QnAMaker

The first thing that you need to give your Bot is a brain, or at least a foundation that it is able to use to interact with people. You can code this by hand if you like, but another option is to cheat and get someone else to do all of the work for you.

That is where the QnAMaker comes in. This is a free service that will allow you to create Question and Answer groups that we can then publish as a conversation service.

It gets even better because you can have the QnAMaker mine a website FAQ and load in all of the information for you.

How to do it…

To do this, open up a browser and go to qnamaker.ai.

This will open up the QnA Maker service and all we need to do to start creating our service is to click on the Create new service link in the header.


This will open up a short form where we can define and publish our service.


Start off by giving your QnA Service a Service name.

Here we set the Service name to McEnroe.


There are a number of ways that you can create the Q&A pairs. You can add them manually, or if you already have a website source for the Questions and Answers, then you can paste that URL into the FAQ URL field.


Now just scroll down to the bottom of the form and click on the Create button.


This will start off the process of building the Question and Answer details for you from the FAQ site.


Shortly after that, you will be taken to the Knowledge Base form and see all of the Questions and Answers have been loaded for you.


If you like you can change any of the Questions or Answers to be more appropriate for the audience and even add additional information if you like.

When you are happy with the content, just click on the Publish button.


This will take you to the Publishing screen and all you need to do here is click on the Publish button.


That will process all of the Questions and Answers and create a QnA Service.


Creating an Azure Bot Service

Now that we have our QnA Service, we can build a Bot Service that will consume it. This is almost as easy as the creation of the knowledge base, and doesn’t require a single line of coding, because we can deploy out a Bot Service within Azure from a template.

How to do it…

To do this open up you Azure Portal and click on the New button on the left.


This will open up the Azure Marketplace with all of the services that we can take advantage of.


Rather than searching through all of the categories, just search for Bot Service.


This will open up a list of matching services, and the first one will be the Bot Service template.

All you need to do here is select it.


When the Bot Service panel opens up, just click on the Create button to start building your bot.


This will open up the Bot Service configuration panel.


Type in an App name for the Bot Service. This needs to be a unique name, because this is creating a new site on the azurewebsites.net domain.

Luckily for us the McEnroe
App name was still available.


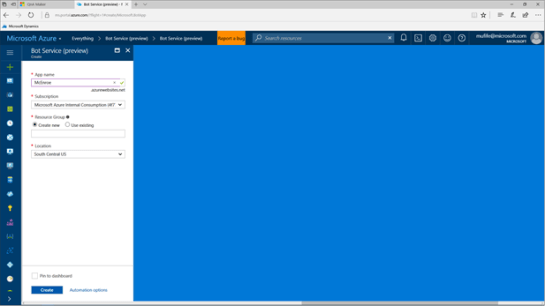
Then enter in a new Resource Group name that you want to put this service into.

You can also change the Location and even check the Pin to dashboard options is you like.

When you are ready, click on the Create button to unleash your Bot on the world.


Azure will then start creating and deploying your Bot.


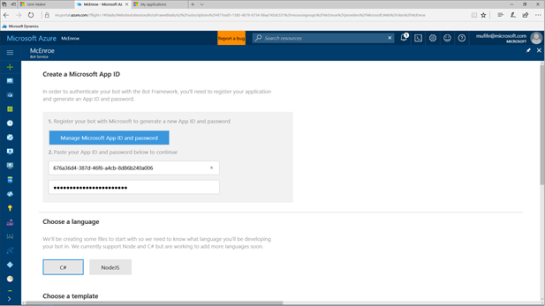
There is one last step that we need to perform to finish off the Bot though. We need to create an Application ID and secure password for the Bot.

So when the Create a Microsoft App ID form is displayed, click on the Create Microsoft App ID and password button.


This will ask you to log in with your Microsoft Account credentials.


This will open up the service that will allow us to generate an App ID for our application, and also create a password.

All we need to do here is click on the Generate an app password to continue.


This will open up a new dialog box with the Password that has been created for the app and all you need to do is copy it down.

Now we can return back to Microsoft Azure and paste in the App ID and the Password into the Create a Microsoft App ID form.


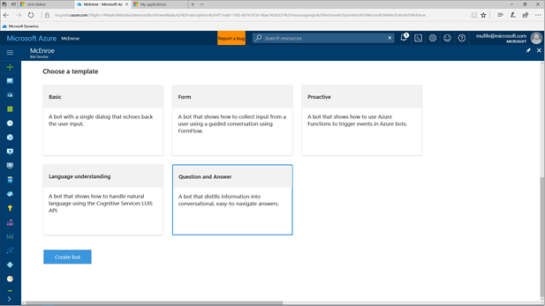
If we scroll down just a bit we will see a number of templates are available for us to choose from for the creation of the new Bot Service. One of them is a Question and Answer template.


All we need to do is select the Question and Answer template and then click on the Create bot button.


Now we will be asked to connect to a QnA service.


Just click on the Knowledge Base dropdown list and you will see that the QnA Service that we just created is listed there and we can select it to make it the source for the Bot.

After we have done that, just click on the OK button.


This will start the creation and deployment of the Bot for us.


Pretty soon after that we will be taken to the finished Bot.


Deploying the Bot Service to Skype

Now that we have created our Bot Service, we want to make this available through Skype so that we can mobilize the Bot, and take it on the road with us.

To do this, all we need to do is return back to the Bot Service and then click on the Channels tab. When we do this we will see that there are a number of different channels that we can publish the bot to, and some that have already been created – i.e. the Skype client.

To add the new Bot to Skype, just click on the Add to Skype button.


This will open up a Skype window that will ask you if you want to add the new Bot as a contact.

Just click on the Add to Contacts button.


This will take you over to Skype, with a conversation already started with our new Bot.


Let’s take it for a test drive – all we need to do is ask it a question.


When we submit the question to our Bot, it will look through the knowledge base and then give us the best response using Cortana Intelligence.


Also, this works on the smaller clients as well, including the phone apps.


Conclusion

Within a couple of minutes we have been able to create a knowledge base for our bot, create a Bot Service that uses it to reply to questions, and then added it to Skype so that we can take advantage of it anywhere.

All without a single line of code being written.

How cool is that!

Advertisement

Writing walkthrough guides and technical documentation is more about the flow that you are describing rather than the actual writing itself because you are wanting to explain the process, not to write the next best seller on the NY Times book list.

But there is still a little creativity that you need to make the walkthrough interesting to the reader.

Although I have noticed that there are a number of different variations of the way that people want to have walkthrough guides structured depending on the audience.

In this walkthrough I will show a new Compose feature within the Author Tools template that may help a little with this problem.

I usually use a pretty simple structure while writing my walkthroughs. For example, here is an example blurb that I write for one of my guides that explains how to assign a Customer record a Type:

The first thing that we will want to do is set the type of customer record that we want to create.

Customers are configured either as a Person or as an Organization with their own specific naming format.

To do this, click on the Type dropdown list and select the Organization Type from the list

In this example we will set the Type to Organization.

Now we have set the Customer Type.

For example, here is the storyboard slide that I used for that example


And this works pretty well in most cases.

But there are some cases where you may not want to show all of the information that I have in the text of the slide.

For example, if I wanted to create a version of the walkthrough that shows just the step description and the sample data that I need to enter then I would have to create a new version of the storyboard and then cut up each of the text blocks and change the detail.

If you dissect it then you will see that it has these components:

Introduction: The first thing that we will want to do is set the type of customer record that we want to create.

Detail: Customers are configured either as a Person or as an Organization with their own specific naming format.

Action: To do this, click on the Type dropdown list and select the Organization Type from the list

Example: In this example we will set the Type to Organization.

End: Now we have set the Customer Type.

And within that structure there are also subcomponents that are useful, like:

Action Shorthand: Select the Customer Type

Example Data: Type: Organization

Not all storyboard slides are this detailed, or have all of these components in them, but it is a good example of a structured step with a lot of detail.

What I need to do though is extract all of these components out and then pick and choose when to use them.

To solve this problem I created an Advanced Storyboard template that I can use to extract out the different parts of the text block broken out into the different components.


This allows me to move the Text content into its corresponding text block and also create some additional variations of the instructions for the Shorthand and Data blocks.


Now that I have broken out all of the text into its component blocks, now want to use these to create my new variations of the final slide text that I will be using to create my documents from.

To do this I have added a new function to the Author Tools called Compose.

This allows me to select from a number of different composition templates that then specify how I want to build up each of the text elements in the storyboard – Subtitle, Caption, Text and Notes.


If I select the Guide template then this will copy the Shorthand to the Subtitle, the Data to the Caption, build up the Text from multiple different blocks and then also add a few more of the blocks to the Notes section.


If I change the Composition Template to the Lab template and then recompose the slide then you will see that only the Shorthand and the Data is added to the Text, but a lot of the description is added to the Notes section.

This is the perfect format for Presentations because the notes will show up in the Speaker Notes section.


If I change the Composition Template to the Exercise template and then recompose the slide then you will see that only the Shorthand is added to the Text, and the Data is added to the Notes.

This is the perfect format for hands on exercises because it is short and concise.


To see this in action, I have expanded out the Storyboard from that one slide to the full walkthrough with all of the different steps broken out to use the composition blocks rather than having all of the data in the text and then built the content of the text so that it has the Guide format.


If I switch to the Write tab and then select the Recipe template, then I can create my output document using this version of the content.


This will create my Recipe style document with all of the text giving me an instructional document that everyone is able to follow.


Now I will return back to the Storyboard and recompose the storyboard text using the Lab format.


When I recreate the Recipe document based on this version of the content then all of the steps are listed out for me showing the Shorthand and Data components, but no detail.

This is a great summary document for the expert users.


Finally, if I will return back to the Storyboard and recompose the storyboard text using the Exercise format then it is even more concise.


Bit one thing that I can also do here is update the template details and change the components that are being used to build the slide. Here I added the Shorthand to the Subtitle, and the detailed text to the Notes.


Now when I create the Recipe document it has each of the Steps listed out with the data from the step as detail. This is an even better version of the Exercise in this case.


Review

The decomposition of the Storyboard steps may seem like a little bit more work as you are writing your walkthrough guides, but it is worth it.

It makes you think a little more about the structure of the content that you are creating, and also then allows you to create variations of the walkthroughs for different purposes.

If you want to create a Presentation then you may just want to have the key information showing on the slides and not have the detailed text.

If you are creating a detailed Walkthrough guide then you may want to have more explanations for the screen shots than you would normally have to help the reader guide themselves.

If you are creating Hands on Labs then you may want to skip the detail, but have the steps and shortcuts in the document for easy reference.

If you are creating Student Exercises then you may want to have the step but no data so that you can provide that as a separate document.

And now we can do that through the Compose function.

How cool is that?

PowerApps is definitely one of the coolest tools that we have in our back pockets for extending out Dynamics 365, because it allows non developers to quickly and easily create new apps for Dynamics 365 without doing a lot of coding. It’s almost so easy you will feel like you are cheating.

In this walkthrough we will show you how easy this is by creating a sample application that will allow you to browse customers, orders and order lines directly from a phone, and we can probably do this in about 5 minutes.

Topics Covered

  • Creating your first PowerApp
  • Connecting the PowerApp to your Dynamics 365 data
  • Creating a Customer browser form
  • Adding a Sub Form
  • Filtering the sub form Detail
  • Creating a drill through action from the parent to the child form
  • Adding additional drill through forms

Creating your first PowerApp

The first thing that we need to do is create a new PowerApp using the PowerApp designer.

How to do it…

Start off by opening up the PowerApp desktop app and then click on the New menu item on the left.


This will open up the Create an app form where you can create apps directly from some of the common services. But in this example we will want to create a Blank app. We have two different options here, we can create a Phone layout or a Tablet layout.

We will click in on the Phone layout option.


This will open up the PowerApp designer page.

On the left you will see the one page that is automatically created.

In the center is the canvas for the design.

On the right is our configuration panel.

And along the top is the Action/Ribbon bar.


Connecting the PowerApp to your Dynamics 365 data

Now that we have an app to work with we will want to connect it to our data within Dynamics 365.

How to do it…

To do this, switch to the Content action menu and then click on the Data sources button.


On the right hand panel a Data sources option will show up. To connect to the data, click on the Add data source button.


This will then show us a list of different data sources that we can connect to. In this example we will want to click on the Dynamics 365 for Operations connection icon.


This will open up a list of connections to our Dynamics 365 for Operations environments that we can use for the application. All we need to do here is click on the connection.


Now PowerApps will interrogate the Dynamics 365 connection for all of the entities that are published for us to use.


For this example, we will type in customers into the filter box.


This will allow us to see the Customers entity and we can check the box to include it in the connection.


Before we finish though, let’s add in a few more table connections. Filter out the list by typing in salesorder into the filter box.


This will allow you to select the SalesOrderHeaders and SalesOrderLines entities that you can select and then click on the Connect button.


After you have done that you will see that the three data entities are now connected to the PowerApp.


Creating a Customer browser form

Now that we have connected the PowerApp to our data within Dynamics 365 for Operations, let’s start creating a form, and a great place to start is to create a way to browse through the customer data.

How to do it…

To do this we will want to add a control to the form that we can use to view all of the data that we have in the Customers data source. To do this, switch to the Insert action bar and we will see that there are a number of different visual control that we can use.


The form that we want to use here is the Gallery control which gives us a way you browse through multiple records at once. If you click on the Gallery button then you will see that here are a number of different formats for the gallery as well. We will want to select the Vertical Text gallery option.


This will add a new control to the page that we created.


It is connected to dummy data right now, but if we click on the Connection icon on the right hand side and it will show us all of the connections that we added to the app earlier on. Start off by selecting the Customers connection.


This will change the default fields that are connected to the form.


If you click on any of the fields on the right hand panel, you will be able to browse through all of the fields that are available within the connection. In this step we clicked on the Heading1 field and can select the Name field from the Customer connection.


If we click on the Subtitle field we can link that with the CustomerAccount field.


Now select the Body1 field. If you look up in the formula bar, you will notice that there is a formula that links to the fields.


If we want, we can create a function that includes multiple fields. In the formula bar, type in this function to show the Street and City.

ThisItem.AddressStreet & “, ” & ThisItem.AddressCity

If we want to see the form in action, all you need to do is click on the Play button in the form header.


Adding a Sub Form

Now that we have a Customer browser, we will probably want to add a little bit or other functionality. Since we connected the Sales Order Header entity to the data connection, then let’s add a sub form that will show all of the sales order headers.

How to do it…

To do this, we will want to create a new screen by clicking on the New Screen button within the Home action bar.


This will create a new blank screen for us. On the right hand side we will see a few sample layouts that we can use to save us some time in adding data galleries.


We can select a simple gallery browser layout and that will automatically add in a few sample controls.


If we click on any of the fields within the form then we will be able to see the fields and also the data connection.


Here we will want to click on the template data connection and change it to the SalesOrderLines data connection.


Now we will be able to click on the Heading2 field dropdown list and then select the SalesOrderNumber field.

Now we see all of the sales orders are listed in the form.


Filtering the sub form Detail

Seeing all of the sales orders is great, but, we only want to see the orders for the customer that we selected in the previous screen. So we will want to filter out the results just to the ones that are associated with the customer.

How to do it…

To do this click on the Function dropdown list on the left, and select the Items function. Within the function detail we can see that this is linked to the SalesOrderHeaders connection.


To do this, change the filter function to this:

Filter(SalesOrderHeaders, OrderingCustomerAccountNumber = Gallery1.Selected.CustomerAccount)

This command filters the SalesOrderHeaders table, just to show the sales orders where the OrderingCustomerAccountNumber matches the CustomerAccount that is selected form the first screen.


Creating a drill through action from the parent to the child form

Now that we have the sub form, we need to do one last thing before we can see all of this working. And that is to create a link from the parent form so that when we click on the record, it takes us to the child form.

How to do it…

To do this, select the field that we want to trigger the drill through on and then select the OnSelect option from the function bar.


Now we just need to change the function to use the Navigate command. So update the function to:

Navigate(Screen2,ScreenTransition.Cover)

This just says to navigate to the second screen that we created.


The next thing you know you will be taken into the sub form, and only see the sales orders associated with the customer account.


Adding additional drill through forms

Since we also included the Sales Order Lines connection into the application, let’s finish off the application by adding a third form that we can drill through into from the Sales Order Headers form to see all of the products on the order.

How to do it…

To do this, just click on the New Screen button to create a new screen and then select the form layout that you want to use for the form. In this example we got a little fancy and used the tiled view.


Then click on the connection link and point it to the SalesOrderLines connection.


Then set the Body2 field to link to the ItemNumber field.


And then change the Footer1 field to show the SalesPrice field.


Then update the Items function to filter out the data that shows to just the lines that are associated with the Sales Order Header form. You can do this by using this function:

Filter(SalesOrderLines,SalesOrderNumber = BrowseGallery1.Selected.SalesOrderNumber)


Then return to the second screen and change the OnSelect function to navigate to the third form by using the following function:

Navigate(Screen3,ScreenTransition.Cover)


BAM! Now we are seeing the lines as tiles.


Summary

How easy is that. We just created a simple app that browses customers and allows us to see all of the sales orders and lines for the customer as well. Coding this the normal way would take forever, and for this example we created it in just a couple of minutes. All we need to do now is pretty it up a little and add some branding, but that is the fun part.

About the Author

Murray is a Technical Solution Professional at Microsoft and Author of over 25 books on Microsoft Dynamics including the Bare Bones Configuration Guide Series which contains over 15 books that show novice users host to set up Microsoft Dynamics using visual walkthroughs. These guides start off with the Financial modules of Microsoft Dynamics and then progress through the Operational, Distribution, and then the more specialized modules like production, service management, and project accounting. You can find all of his books here on Amazon http://www.amazon.com/author/murrayfife.

Throughout his 30+ years of experience in the software industry he has worked in many different roles, including as a developer, an implementation consultant, a trainer and a demo guy within the partner channel which gives me a great understanding of the requirements from both customers and partners perspective.

Here is all of his contact information:

Email: murray@murrayfife.com
Twitter: @murrayfife
Facebook: facebook.com/murraycfife
Google: google.com/+murrayfife
LinkedIn: linkedin.com/in/murrayfife

Blog: atinkerersnotebook.com
Docs: docs.com/atinkerersnotebook
Amazon: amazon.com/author/murrayfife


Branding Dynamics 365 is something to give the system a little more of a personalized experience for the organization that we are working with, but we can take this one step further if we want by branding the login landing page that we always need to use to get access to the system.

For example, although colorful, the default login page for Dynamics 365 looks a little generic.

In this walkthrough we will show you how you can do this. All you need is make a couple of tweaks to the Azure Active Directory settings.


How to do it…

To do this, open up your Microsoft Azure portal for your tenant by browsing to https://azure.microsoft.com.

When you get there, click on the My Account link in the header of the page.


This will take you to the Manage your Azure account page, and from here we will want to click on the Azure portal link.


After you authenticate into Azure you will be taken into the Microsoft Azure Dashboard. Look on the left hand menu and select the Azure Active Directory item.


This will take you to an area where you can manage all of the different options for Azure Active Directory. The option that we are interested in looking at here is the Company branding options, so click on the Company branding link in the left hand menu.


When the Company branding page is displayed, just click on the Edit company branding link.

Note: The first time that you access this feature you may need to do a little bit of initial configuration and step through a wizard.


This will open up all of the Company branding options for us.

To start off, we can update the login page background image. To do that, just click on the folder icon to the right of the Sign-in page image field.


This will open up a file explorer and we can then select the background image that we want to use and then click on the Open button.


When we return to the Edit company branding form, the only step that is left for us to do is to click on the Save button in the header.


Then we will get a notification that the branding has been applied.


How it works…

To see this in action, we just need to log into Dynamics 365.

Initially, since we have not selected a domain, our login page will show the default background image.


But as soon as we either select, or type in a username that is connected to our domain, the background image that we uploaded will show up.

How cool is that?

But let’s not stop there. There is additional branding that we can perform that allows us to add a smaller branded logo in the login area where it is currently just saying Dynamics 365 Portal.


How to do it…

To do this, return back to the Azure Active Directory Company branding form. There are three more branding components that we can update including a banner image, and also a square logo image.

Start off by clicking on the Banner image file folder icon.


This will open up a File explorer and we will be able to select a small banner image and then click on the Open button.

Note: Pay attention to the size of this image – the recommended size is 60x280px, and also for some images you may need to take down the image depth so that it is led than 10KB.


After you have done that you should be able to see the new Banner image is showing on the form, and you can save the changes if you like.

Now click on the Square logo image file folder icon.


This will allow you to select a square logo image for the company branding.

Note: This is the light background version, so if you don’t want it to stand out too much, then you may want to use a white background for this image. Again, pay attention to the size of this image – the recommended size is 240x240px, and also for some images you may need to take down the image depth so that it is led than 10KB.

After selecting the image, click on the Open button.


After you have done that you should be able to see the new Square logo image is showing on the form.

Now click on the Square logo image, dark theme file folder icon.


This will allow you to select a square logo image for the company branding.

Note: This is the dark background version, you may want to use a dark, or black background for this image. And remember, pay attention to the size of this image – the recommended size is 240x240px, and also for some images you may need to take down the image depth so that it is led than 10KB.

After selecting the image, click on the Open button.


Now, all that is left is to click on the Save icon and save the changes.


How it works…

Now when you log into your organization, the smaller logo will show up as well.

This is useful for logins on smaller form factor devices like smart phones, because the background image will not be shown, but the logo image will.


Review

Branding the Azure Active Directory login page is a great way to add that extra little bit of personalization to your environment and also gives people something to look at each time you log into your environment.

And it only takes a couple of minutes to do which is a bonus.

About the Author

Murray is a Technical Solution Professional at Microsoft and Author of over 25 books on Microsoft Dynamics including the Bare Bones Configuration Guide Series which contains over 15 books that show novice users host to set up Microsoft Dynamics using visual walkthroughs. These guides start off with the Financial modules of Microsoft Dynamics and then progress through the Operational, Distribution, and then the more specialized modules like production, service management, and project accounting. You can find all of his books here on Amazon http://www.amazon.com/author/murrayfife.

Throughout his 30+ years of experience in the software industry he has worked in many different roles, including as a developer, an implementation consultant, a trainer and a demo guy within the partner channel which gives me a great understanding of the requirements from both customers and partners perspective.

Here is all of his contact information:

Email: murray@murrayfife.com
Twitter: @murrayfife
Facebook: facebook.com/murraycfife
Google: google.com/+murrayfife
LinkedIn: linkedin.com/in/murrayfife

Blog: atinkerersnotebook.com
Docs: docs.com/atinkerersnotebook
Amazon: amazon.com/author/murrayfife