In every guild hall across the Sword Coast, from the marble counting houses of Waterdeep to the timber-framed trade posts of Baldur’s Gate, there exists an unspoken question. What separates a thriving merchant house from one that folds after a single bad season?
Adventurers have long been judged by strength, dexterity, constitution, intelligence, wisdom, and charisma. These scores tell the story of what a person can lift, dodge, endure, learn, perceive, and persuade. But guilds and trading companies are not people. They are living systems built on coin, contracts, caravans, and control.
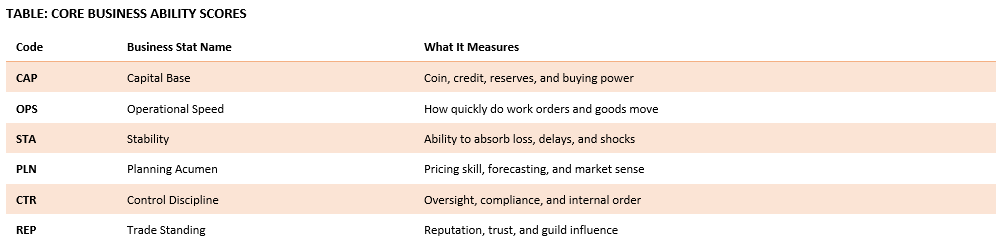
The Waterdeep Trading Company does not measure itself by the arm strength of its porters or the charm of its negotiators. It measures itself by six core business ability scores. Capital Base, Operational Speed, Stability, Planning Acumen, Control Discipline, and Trade Standing. Together, these scores provide a complete picture of how a business performs under pressure, navigates opportunity, and sustains itself across seasons and storms.
This system is used by guild clerks, senior factors, and financial scribes to evaluate performance, compare branches, and make decisions about expansion, investment, and partnerships. The scores are not abstract. They shape daily outcomes, from whether a contract is honored to whether a caravan reaches its destination intact.
This article explains how the Waterdeep Trading Company uses business ability scores to measure organizational health, predict risks, and maintain one of the most respected operations in the Realms.
What Business Ability Scores Are
Business ability scores are numerical ratings that describe the functional capacity of a guild, trading house, or merchant operation. Just as adventurers are rated on a scale of 3 to 18 for physical and mental attributes, businesses are rated on the same scale for operational and financial attributes.
Each score measures a specific dimension of performance. Low scores indicate weakness or vulnerability. High scores indicate strength and resilience. A score of 10 or 11 represents average competence for an established guild. Scores below 8 suggest critical deficiencies. Scores above 15 suggest exceptional capability.
These scores are not static. They shift in response to events, decisions, investments, and market conditions. A guild that loses its warehouse to fire may see its Stability score drop by 3 points. A guild that secures exclusive contracts with the Lords’ Alliance may see its Trade Standing rise by 2 points.
The six core scores are used individually and in combination to calculate derived metrics that describe real operational outcomes.
The Six Core Business Stats
This table defines the primary attributes used to assess a business’s strength and health in Faerûn.
Capital Base, CAP
Capital Base measures financial muscle. It represents the total amount of liquid coin, available credit, vaulted reserves, and purchasing power that a business can deploy on short notice.
A guild with a high Capital Base can afford bulk purchases at discount rates, fund emergency repairs without hesitation, and sustain operations through lean months. A guild with a low Capital Base struggles to keep shelves stocked, cannot negotiate favorable terms, and must turn away profitable opportunities due to a lack of funds.
Capital Base is used when a business needs to outbid rivals, secure rare materials, pay unexpected tariffs, or survive a season where revenue drops below expenses. It determines whether a company controls its suppliers or is controlled by them.
A score of 8 or below means the guild operates hand to mouth, always one delay away from insolvency. A score of 15 or above means the guild can absorb shocks, invest in growth, and dictate terms to weaker partners.
Operational Speed, OPS
Operational Speed measures how fast a business acts. It represents the ability to fulfill orders promptly, reroute caravans in response to danger, process customer requests without delay, and handle surges in demand.
A guild with high Operational Speed completes contracts ahead of schedule, adapts to shifting markets, and captures time-sensitive opportunities. A guild with low Operational Speed creates backlogs, misses deadlines, and loses customers to faster competitors.
Operational Speed is used when goods must be delivered by a specific festival date, when a workshop must pivot to produce a different item on short notice, or when emergency repairs are needed to keep a production line running.
A score of 8 or below means the guild is perpetually behind, with frustrated customers and missed opportunities. A score of 15 or more means the guild sets the pace of the market and can react to changes faster than rivals can plan for them.
Stability, STA
Stability measures endurance under pressure. It represents the ability to absorb losses, withstand delays, survive fines or penalties, and continue operating when circumstances turn hostile.
A guild with high Stability can endure a failed caravan, a spoiled shipment, a warehouse fire, or a contract dispute without collapsing. A guild with low Stability teeters on the edge of ruin, where a single bad event can close its doors permanently.
Stability is used when goods spoil in transit, when bandits destroy a shipment, when tariffs double unexpectedly, when a key partner goes bankrupt, or when a plague disrupts supply chains for months.
A score of 8 or below means the guild has no cushion for error and cannot survive adversity. A score of 15 or above means the guild can weather storms that would destroy lesser operations and emerge intact.
Planning Acumen, PLN
Planning Acumen measures foresight and judgment. It represents the ability to forecast demand, anticipate price shifts, choose reliable suppliers, set profitable margins, and avoid costly mistakes.
A guild with high Planning Acumen purchases materials before prices spike, avoids inventory that will not sell, prices goods to maximize profit without losing customers, and identifies emerging markets before competitors do. A guild with low Planning Acumen overbuys goods that sit unsold, underprices valuable items, and makes purchasing decisions based on guesswork.
Planning Acumen is used to determine how much stock to order for the winter season, decide whether to expand into a new region, set prices for a new product line, or evaluate the reliability of a potential supplier.
A score of 8 or below means the guild makes poor decisions that erode margins and waste resources. A score of 15 or above means the guild anticipates market movements and positions itself ahead of the curve.
Control Discipline, CTR
Control Discipline measures internal order and rule-keeping. It represents the ability to enforce procedures, detect fraud, maintain accurate records, ensure contract compliance, and prevent waste or theft.
A guild with high Control Discipline has clean books, reliable audits, trusted employees, and consistent processes. A guild with low Control Discipline suffers from embezzlement, sloppy record keeping, contract violations, and operational leaks that drain profit.
Control Discipline is used when conducting financial audits, investigating discrepancies in inventory counts, enforcing contract terms with suppliers, or ensuring that employees follow established procedures.
A score of 8 or below means the guild is vulnerable to fraud, mistakes, and regulatory penalties. A score of 15 or above means the guild operates with precision and can be trusted by partners, investors, and guilds.
Trade Standing, REP
Trade Standing measures how the market views the business. It represents reputation, trustworthiness, influence with guilds and nobles, access to favorable credit terms, and the ability to negotiate from a position of strength.
A guild with high Trade Standing enjoys preferred supplier relationships, can secure credit on favorable terms, gains access to exclusive contracts, and receives lenient treatment when disputes arise. A guild with low Trade Standing must pay cash up front, is denied opportunities, and struggles to find partners willing to work with them.
Trade Standing is used when negotiating payment terms, seeking membership in a prestigious guild, applying for licenses or permits, or requesting favors from influential contacts.
A score of 8 or below means the guild is viewed as unreliable and unworthy of trust. A score of 15 or above means the guild opens doors that others cannot access and commands respect across the Realms.
Derived Business Metrics
Core ability scores are useful on their own, but they become even more powerful when combined to calculate derived metrics. These metrics describe specific operational outcomes that matter to daily performance.
This table shows how core stats combine into practical outcomes.
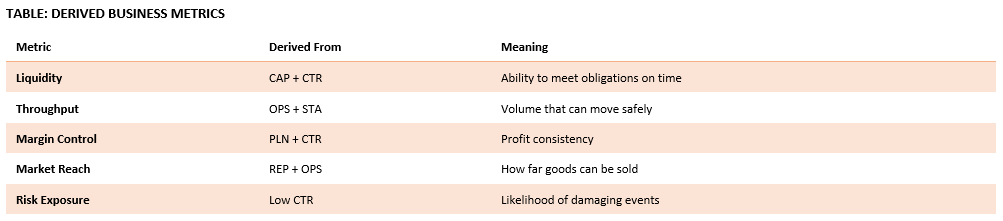
Liquidity
Liquidity is calculated by adding Capital Base and Control Discipline. It measures whether a business can meet its financial obligations when they come due. A guild with high Liquidity has enough coin on hand and disciplined processes to ensure payments are made on time. A guild with low Liquidity may have coin but lose track of when payments are due, or may have excellent record keeping but insufficient funds to cover debts.
Throughput
Throughput is calculated by adding Operational Speed and Stability. It measures the volume of goods that can be moved safely without exceeding the system’s capacity. A guild with high Throughput can handle large orders, seasonal surges, and complex logistics without collapsing under the load. A guild with low Throughput becomes overwhelmed when demand spikes and suffers delays or failures.
Margin Control
Margin Control is calculated by adding Planning Acumen and Control Discipline. It measures how consistently a business generates profit. A guild with high Margin Control prices goods intelligently and enforces cost controls that prevent waste. A guild with low Margin Control makes erratic profits, with some quarters highly profitable and others deeply unprofitable.
Market Reach
Market Reach is calculated by adding Trade Standing and Operational Speed. It measures how far a business can effectively sell its goods. A guild with high Market Reach can deliver products quickly to distant cities and has the reputation to close deals in unfamiliar markets. A guild with low Market Reach is confined to local sales and struggles to expand beyond familiar territory.
Risk Exposure
Risk Exposure is indicated by low Control Discipline. It measures the likelihood of damage from internal failures. A guild with high Risk Exposure is vulnerable to fraud, contract violations, regulatory fines, and operational mistakes that create financial harm.
Reading a Business Profile
To illustrate how these scores work together, consider a mid-sized merchant house operating out of Baldur’s Gate. The house specializes in importing textiles from Calimport and selling them throughout the Sword Coast.
This table shows the ability scores for a fictional merchant house.
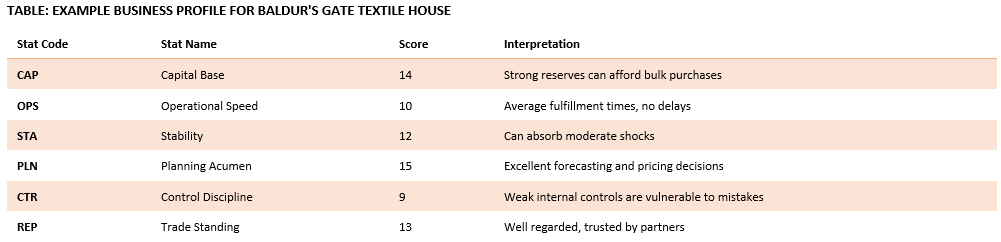
Derived Metrics:
Liquidity: 14 + 9 = 23. Adequate ability to meet obligations, though control weaknesses introduce some risk.
Throughput: 10 + 12 = 22. Moderate capacity can handle standard volumes.
Margin Control: 15 + 9 = 24. Good planning is offset by weak controls; profits are strong but inconsistent.
Market Reach: 13 + 10 = 23. Solid reach can sell across the Sword Coast.
Risk Exposure: Control Discipline of 9 indicates an elevated risk of fraud or operational errors.
Interpretation
This merchant house has strong margins and good market standing, but weak controls. Growth has outpaced discipline. The business is profitable and well-positioned for expansion, but a single fraud incident, contract violation, or sloppy record-keeping error could cause significant damage.
The recommended action would be to invest in improving Control Discipline before pursuing further growth. This might include hiring an experienced auditor, implementing stricter inventory checks, or establishing formal approval processes for major expenditures.
Using Business Ability Scores in Daily Decisions
Guild clerks and senior factors use these scores to guide decisions across a range of scenarios.
When evaluating a potential partnership, they compare Trade Standing and Control Discipline scores. A partner with high Trade Standing but low Control Discipline may bring valuable connections but also introduce operational risk.
When planning for seasonal demand surges, they examine Operational Speed and Stability. If both scores are low, the guild may need to decline large orders or risk collapse under the load.
When deciding whether to extend credit to a customer, they review the customer’s Capital Base and Trade Standing. A customer with a strong reputation but weak capital may need shorter payment terms.
When assessing the viability of a new trade route, they calculate Market Reach and compare it with the route’s distance and complexity. If Market Reach is insufficient, the route may fail due to delivery delays or the inability to negotiate favorable terms in unfamiliar cities.
These scores are not abstract academic measures. They are practical tools used daily to evaluate risk, allocate resources, and make choices that determine whether a business thrives or fails.
Realms Aware Considerations
Business ability scores are influenced by location, market conditions, and external events. A guild operating in Waterdeep may have higher Trade Standing due to proximity to influential nobles and guild councils. A guild operating in a frontier settlement may have lower Operational Speed due to limited infrastructure and unreliable supply chains.
Scores can shift rapidly during crises. A plague that disrupts trade routes may reduce Operational Speed and Stability across an entire region. A successful diplomatic mission that secures favorable trade agreements may increase Trade Standing for all guilds affiliated with the sponsoring faction.
Guilds with diversified operations across multiple cities may have different scores in each location. The Waterdeep Trading Company may have a Capital Base of 16 in its home city but only 11 in its Baldur’s Gate branch, reflecting differences in local reserves and access to credit.
Senior factors track score changes over time to identify trends. A steady decline in Control Discipline may indicate that internal processes are breaking down and require immediate attention. A steady increase in Planning Acumen may indicate that recent hires or training programs are paying off.
Final Thoughts
Business ability scores let a guild feel alive, measured, and fallible, just like any adventuring party. They provide a common language for evaluating performance, comparing operations, and making decisions grounded in evidence rather than intuition.
The Waterdeep Trading Company uses these scores to maintain discipline, anticipate risks, and ensure that every branch operates with the strength needed to survive in the competitive markets of Faerûn. Whether managing a warehouse, negotiating a contract, or planning for the next season, these six scores guide every choice and shape every outcome.
Support the AD&D365 Project on Patreon. To grow this world, we’ve launched an official Patreon page where supporters can access exclusive content, tools, and training labs, and even influence the project’s future. Your support fuels more than just development; it expands the guildhall, forges new scrolls, and empowers the next generation of configuration wizards. Begin your journey: https://www.patreon.com/adnd365/
A Grateful Salute to our Patrons. To all those who stand behind the vision, thank you for helping bring this world to life. Our Benefactors, Andre Breillatt and Eryndor Fiscairn‡, your boundless generosity fuels the arcane core of this project. Without your magic, the weave would falter.
Our Apprentices, the spell engines turn, and the training labs thrive thanks to our current Apprentices: Michael Ramirez and Andreth Bael’Rathyn‡. Special thanks to our past Apprentices, whose contributions helped us get here: Ralf Weber, Wendy Rijners, Shashi Mahesh, Julia Tejera, Ben Ekokobe, Tiago Xavier, Naveen Boyinapelli, Marcos Tadeu Wolf, Kathryn Greene, Jason Brown, Mark Christy, and Ashish Singh.
Our Initiates, Jeff Stiles, Harry Burgh, Jesper Livbjerg, Peter Lorre, Gregory Brigden, and Martin Grahm, your commitment marks the start of the deeper path, stepping beyond mere observation into the active shaping of this realm.Our Followers, your steady presence along the journey is a beacon of encouragement: Rusty Cavalier, Eric Shuss, Sunil Panchal, Sarah D. Morgan, Nick Ramchandani, Daniel Kjærsgaard, and Tomasz Pałys.
And our Voyeurs, ever watching from the shadows, clearly intrigued… but not enough to part with a single gold piece. Your silent curiosity is noted and mildly judged.
Want to design your own economic models in Faerûn? Get your own AD&D365 Environment and guides at adnd365.com/start, and request access to the public view of the current database at https://public.adnd365.com – Login npc@adnd365.com, Password N0nPl@yC#822!