I can’t make it to the Microsoft Dynamics Technical Conference in Seattle, WA this year from February 2nd to the 4th but you can still make it. This is a great conference to catch up with all of your Dynamics AX and CRM colleagues and get inspired to you take your business further.

Microsoft will be showcasing the newly released Microsoft Dynamics AX 2012 R3 CU8 at the conference, so what a great way to learn the new features added with this cumulative update. This year there will be nearly 100 sessions, including the latest developments in Lifecycle Services, Microsoft Dynamics AX 2012 on Azure, warehousing and transportation functionality, and omni-channel capabilities for Retail.

Also you can check out the
Deep Dive Workshops
to maximize your learning.

Here is a link to the registration form if you haven’t already signed up – register today!

Maybe next year there will be a couple of sessions that I host J

You don’t have to be running enormous batches of products through a large production line in order to take leverage the costing within Dynamics AX. One of my new years resolutions was to work out how much my morning smoothie was costing so I thought that I would just model it out within Dynamics AX, and along the way give everyone a simple introduction on how to create a completely new Bill Of Material and roll up the costs.

How To Do It…

  1. The first step in the process is to create your parent product that you will create your Bill Of Material for and then use to calculate the rolled up cost of all of the ingredients that you add in. To do this, open up the Released Products list page and then click on the Product button within the New group of the Product ribbon bar.
  2. When the New Released Product dialog box is displayed, set the Product Number, Product Name and also set both Search Name fields to a shortened description of the product.
  3. Before we continue on click on the Show More Fields link at the bottom of the form and you will notice that there are a few more defaults that we can set up for our product.
  4. Next we want to click on the Item Group dropdown list and select a value. Since this is a new type of product though we may want to create a new record so that we can track the postings for the product separately if we ever want to.
  5. So we will quickly create a new Item Group that we will assign to our product. To do this just right-mouse-click on the Item Group field and select the View Details menu item.
  6. When the Item Groups maintenance form is displayed, click on the New button in the menu bar to create a new record.
  7. Give your Item Group an Item Group code and also a Name.
  8. While we are here, lets set up a couple more Item Groups for some of the other products that we will be creating.
  9. Now that all of the Item Groups have been configured, just click on the Close button to exit from the form.
  10. Now click on the Item Group dropdown list and you will be able to choose the new Item Group that you just set up.
  11. Now click on the Storage Dimension Group field and select the method that you want to use to locate your product.
  12. And then click on the Tracking Dimension Group field and select the method that you want to use to track your product.
  13. Next click on the Inventory Unit field and select the Unit Of Measure that you want to inventory your product in.
  14. If the unit of measure that you are wanting to use for the product does not exist though you may want to create a new one just for the product. To do this, open up the Units maintenance form and click on New button within the menu bar to create a new record.
  15. Type in the Unit Code that you want to use and also the Description of the unit of measure.
  16. By default, the type of Unit Class that is selected is Quantity, but if you are tracking the unit as a different class of unit then you can click on the Unit Class and select a more appropriate value.
  17. If you want to track your production results in other units of measure then you will want to set the conversion values that you want to use for this particular unit of measure. To do this, click on the Unit Conversions button in the menu bar.
  18. When the Unit Conversions maintenance form is displayed, click on the New button in the menu bar to create a new record.
  19. Enter in the Factor and the To Unit for the conversion. The From Unit will automatically default in from the unit of measure.
  20. If you want to check the conversion to make sure that it is correct then just click on the Calculate For Units menu item within the menu bar.
  21. When you are ready you can just click on the Close button to exit from the form.
  22. Now all your Units have been configured and you can just click on the Close button to exit from the form.
  23. Now return back to the New Released Product form and you will be able to click on the Inventory Unit dropdown list and see the new Unit Of Measure that you just configured.
  24. Now set the Inventory Unit, Purchase Unit, Sales Unit and BOM
    Unit to the new unit of measure that you created and when you are done click on the OK button to create the product.
  25. The Released Product Details form should then open up with your new product.
  26. There is one quick tweak that we need to make to the product though and that is to assign a default Site to it. To do this click on the Manage Inventory ribbon bar and then click on the Default Order Settings button within the Order Settings group.
  27. Click on the Default Order Type dropdown list and select the Production option so that if we ever create planning orders then it will plan this product as a production order.
  28. Now set the Purchase Site, Inventory Site, and the Sales Site to the primary Site you want to associate them with.
  29. After you have done that just click on the Close button to exit from the form.
  30. Now that we have our parent product configured it’s time to start creating the Bill Of Materials for it. To do this, click on the Engineer ribbon bar within the Released Product Details form and click on the Lines menu item within the BOM group.
  31. When the BOM Line maintenance form is displayed, click on the Create BOM button within the menu bar to create a new bill of materials.
  32. When the Create BOM dialog box is displayed enter in a new BOM Number, Description, and also the default Site that you want to associate this bill of materials with and then click on the OK button.
  33. After the BOM record has been created, click on the New button within the Lines menu bar to create a new record.
  34. Since we don’t have any of the raw materials configured yet we will set them up by right-mouse-clicking on the Item Number field and selecting the View Details menu item.
  35. When the Released Product Details form is displayed, click on the Product button within the New group of the Product ribbon bar to create a new record.
  36. When the New Release Product dialog box is displayed, set the Product Number, Product Name, and both the Search Name fields.
  37. Then set the Item Model Group, Item Group, Storage Dimension Group, Tracking Dimension Group, Inventory Unit, Purchase Unit, Sales Unit and BOM Unit.
  38. After you have done that just click on the Ok button to create the record.
  39. Scroll down to the Purchase tab within the document view and set the default Purchase Price for the product.
  40. Then scroll further down to the Engineer tab group and set the Calculation Group for the product.
  41. Finally, click on the Cost Group field.
  42. We may want to segregate out our costs a little bit differently by creating some new cost groups though. To do this, right-mouse-click on the Cost Group field and click on the View Details menu item.
  43. When the Cost Groups maintenance form is displayed, click on the New button in the menu bar to create a new record, and then give your record a Cost Group code and a Name.
  44. And then from the Cost Group Type dropdown list select the Direct Materials value.
  45. Now that we have done that, just click on the Close button to exit from the form.
  46. Now select your new Cost Group that you set up for the product.
  47. To finish off the setup of the product we need to just run the cost update so that the BOM will be able to get the correct unit cost. To start doing this, click on the Item Price menu item with in the Setup group of the Manage Costs ribbon bar.
  48. When the Item Price maintenance form is displayed, switch to the Pending Price tab and then click on the Calculation menu item within the menu bar.
  49. When the Calculation For An Item dialog box is displayed, click on the Costing Version dropdown list and select the version that you want the cost to be posted against.
  50. And then select the Site that you want to associate the cost with.
  51. And then click on the OK button to perform the cost calculation.
  52. When you return back to the Item Price maintenance form, you will see that the price has been calculated from the purchase price. All you need to do is click on the Activate button within the menu bar to approve the price.
  53. Now when you look at the Active Prices you will see your cost price.
  54. Now just click on the Close button to exit from the form.
  55. Now we can return to our Bill Of Material and start adding our ingredients. To do this click on the Item Number dropdown list and select the first product that we want to add.
  56. Then select the default Warehouse that we want to source the product from.
  57. Then type in the Quantity and Quantity Unit that we will be adding to the product. Since we have our unit of measure conversions configured the Unit does not have to be the same as the primary unit either.
  58. Repeat the process for all of the other lines in the BOM.
  59. After you have done that you can perform a cost roll up to find out how much your product costs. To do that, just click on the Calculation button within the menu bar.
  60. When the Calculation For An Item dialog box is displayed, just click on the Ok button.
  61. When the Item Price maintenance form is displayed you will see the rolled up price for your product.
  62. If you click on the Complete button in the menu bar then you will see all of the cost breakdowns by item as well.

How cool is that. Setting up Bills of Materials for costing is not that hard, and once you have them set up, you can then start tweaking them to start seeing what the cost impacts would be if there were price changes.

Why don’t you all give it a go?

Need More Information? If you want more detailed information on this walkthrough then you can download the complete walkthrough as a PDF file from the Dynamics AX Companions
website. This includes detailed screen shots showing the step by step instructions and also sample data that you can use to practice yourself or that could be used as training material to teach others how to do it. Just follow the link below.


About The Editor: JT Cutter is the Chief Content Officer at Dynamics AX Companions overseeing all marketing content initiatives for the site. As a bonus with over 15 years as an independent ERP advisory consultant, knows a little about software as well. Track him down on Twitter @jtcutter.

With 2015 just a little bit away, and looking back at 2014, even I’m surprised by what we’ve been able to do this year through the Dynamics AX Companions project, and I thought that I had better pat myself on the back and remind everyone what great things are available for you all now, and also give you all a sneak peek into the changes that are coming in 2015 that you may want to take advantage of.. So let’s start off by looking at the numbers

16 That is the number of books and guides that we were able to publish this year on Dynamics AX for you all to learn from.

11 We were able to complete 11 of the planned 18 books in the Dynamics AX Companions Bare Bones Configuration Guide series which are hands on guides that take you step by step through all of the setup of Dynamics AX, starting off with the creation of a blank company, all the way through the configuration of all the modules, giving you a great jumpstart on learning how everything works. Out of the 11 guides, the first 6 were completed which take you through the setup of all of the financials modules. Throughout the year though we did digress a little by releasing out 5 other guides ahead of schedule at the request of you all including a guide on Project Management and also a guide on the new Warehouse Management capabilities within R3.

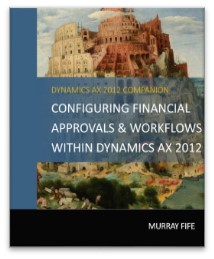
9 Along the way we have also been able to publish (and in some cases reformat and republish) 9 Configuration Blueprints and Introduction Guides for you all. Some of these like the Financial Approvals & Workflow blueprint were initially created for a webinars that we were asked to do (in this case it was for MS Dynamics World – thank you Jason Grumpert for being our muse) and then we’ve reused the heck out of it for the AX User Group webinars and live presentations. So if you have missed any of those, you can live through them vicariously through the book J


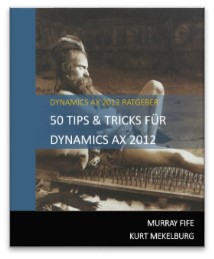
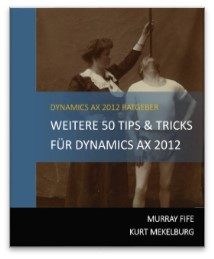
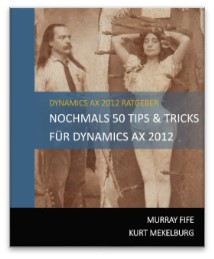
150+ We published out 150+ tips which we are trying to get loaded onto the Dynamics AX Compansions site within the Tips & Tricks Archive section, but in the mean time you can see all of them within the 3 volumes of Tips & Tricks that we have been compiled – some of you all were lucky enough to let me unload 100 copies of the first volume at Convergence.


3 Thanks to my best friend in Germany – Kurt Mekelburg – all 3 of the Tips & Tricks guides have been translated into German, and we are in the process of translating them also into Russian, Danish, Turkish, and Portuguese. We are still looking for more translators – we would especially like to have a Spanish because it will make Dynamics AX sound alluring 😉


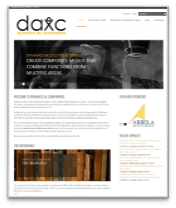
1274 A major milestone was the creation and deployment of the Dynamics AX Companions website which we managed to roll out on a shoestring budget within a couple of days, but as you can see we are still loading in content and also converting content into different formats for you all so that you can have instant access to guides on Dynamics AX. Even though the site has only been up for the past six months we have got a good subscription base with 1274 people becoming registered users, and some of you all even subscribing for the Premium and also eBook services. Thanks especially to you all because you have been keeping the lights on for the hosting of the website.

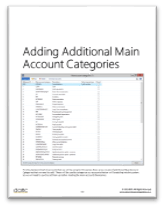
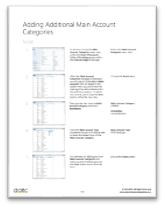
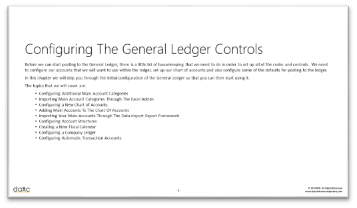
2015 Looking forward to 2015 we are going to be reworking all of the content that we have been creating to make it even more useful to you all and also releasing out additional versions of the guides that you all can take advantage of to share the knowledge about Dynamics AX within your own company. The guides have always been designed to be training guides, but they need a little more polishing to finish them off. You will start seeing a new version of the guides that is focused on the student – where there will be more information about the steps that they need to work through, sample data for them top reference, summary steps for the power user, as well as detailed steps for the more visual learner, and even scripts that could be used for overview demonstrations. Here are some examples of what we are working on…


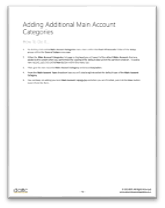
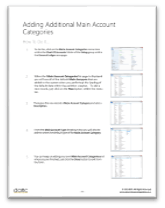
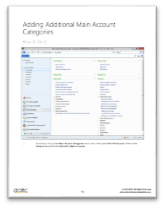
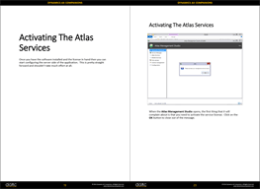
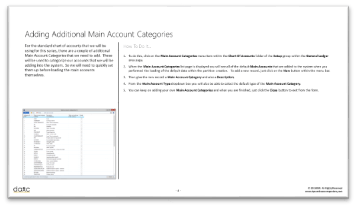
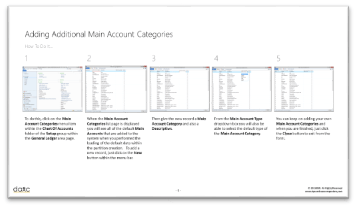
To make this a true training resource we are also reformatting the books as PowerPoint presentations that you can use as a trainer to guide the classes, and when used in conjunction with the Student Guides you have a classroom in a box. Here is what we are working on for the training guide presentations:

Watch out for more content to be coming out of the Dynamics AX Companions project, we are definitely looking forward to delivering more to you all and getting your feedback.

Happy New Year.

Atlas is a great product which allows you to grab data from Dynamics AX while your are within the Excel, Word, PowerPoint and even Outlook, so that users quickly create reports without having to rush to the IT department.  It has the added benefit that all of the typical relationships between the tables have been built into Atlas so that you don’t even have to think about how to link data, making it very easy to report off what used to be very complicated table structures.  Additionally with the 6.0 release of Atlas there is a great dashboard designer that you can use with the product to create desktop, mobile, and smartphone enabled dashboards and scorecards.

I especially love this product because you can try out before your buy, and it is super easy to install yourself and you can start playing with it within a 10 minutes or so of downloading the trial software.

So we created the following guide will take you through the download, installation and configuration process for the trial software and then show you some of the ways that you can start using it to report against your Dynamics AX installation.   It covers:

  • Requesting A Trial License
  • Downloading & Installing Atlas
  • Activating The Atlas Services
  • Configuring The Atlas Services
  • Licensing The Atlas Server
  • Creating User Groups
  • Assigning Licenses To Users
  • Assigning User Groups To The Server
  • Organizing The Atlas Tiles
  • Logging Into Atlas
  • Creating Atlas Queries Within Excel
  • Creating Atlas Queries Within PowerPoint
  • Creating Atlas Queries Within Word
  • Creating Atlas Queries Within Outlook
  • Creating Dashboards Within The Desktop Client

If you are interested in checking this out the guide then just become a registered member on the site (no paying subscription is required) and you will be able to download the guide by clicking on the link below:


Even as a novice user with this program I was able to do quite a bit, although I know that there are a lot more features that you can take advantage of within the product such as:

  • Functions
  • Filters,
  • Linking of data
  • Merging of tables
  • Combining multiple data sources such as CRM

Hopefully this has given you all a little bit of an idea of what Atlas is and how it you can get your feet we with the product.

This weeks task for the Dynamics AX Companions Project was to complete the Bare Bones Configuration Guide for Accounts Payable, and we are happy to say that it is now available through Amazon, and also for download along with all of the other guides.

This also marks a milestone for the Bare Bones Configuration Guides series because we have completed the first six books that allow you to configure the core Financials within Dynamics AX from scratch.

If you are an eBook subscriber then you can access it right away, but if you have commitment issues with subscribing to all of the books that we have made available – remember that you can just subscribe to this one volume as well. Here is a quick summary of the latest guide and links to see more detail if you are interested in checking it out.

Configuring Accounts Payable Within Dynamics AX 2012

http://www.dynamicsaxcompanions.com/Bare-Bones-Configuration-Guides/Configuring-Accounts-Payable


EBOOK SUBSCRIBER CONTENT

The Accounts Payable area is one of the three foundation financial modules within Dynamics AX that you will want to set up. It not only allows you to manage all of your vendor information, post your invoices, and make in your payments, but also allows you to manage approval workflows, and much more.

It’s not hard to configure either and this book is designed to give you step by step instructions to show you how to configure the payables area, and also how some of the basic transactions work to get you up and running and working with your vendors.

Topics Covered:

  • Configuring Accounts Payable Controls
  • Configuring Vendor Accounts
  • Configuring Invoicing
  • Creating Vendor Payments
  • Configuring Payables Invoice Journal Approvals


EBOOK SUBSCRIBER CONTENT

We have had some more requests to have some of the Configuration Blueprints to be updated and made available through the Dynamics AX Companions site as downloadable PDF’s, and we have been able to do that for both of the Power* reporting walkthroughs.

Also as a new offering if you want to step through all of these examples yourself and learn how it works for yourself then don’t fret.  We have packaged up all of the examples into a guide especially for you.  If you are a Premium or eBook subscriber then just click on the images below to link to the landing pages where you can download your very own copy of the In A Nutshell guide that will take you step by step through each of the examples.  It is also a great student manual as well if you want to use this for your own training.

Here are links to the guides and a quick summary.

Using PowerPivot to Analyze Dynamics AX Data
http://www.dynamicsaxcompanions.com/Configuration-Blueprints/Usinf-PowerPivot-To-Analyze-Dynamics-AX-Data


CLICK FOR EBOOK SUBSCRIBER CONTENT

Perhaps you have heard about the new tool in Excel 2010, PowerPivot, but wonder how it can enhance your use of Excel.

In this configuration guide we will show how PowerPivot can assist you with advanced data analysis and reporting, making those extracts from Dynamics AX to Excel even more valuable.

Topics Covered

  • Using Pivot Tables to Analyze Dynamics AX Data
  • Using PowerPivot to create Dashboards
  • Adding Timeline Slicers to PowerPivot Dashboards
  • Creating Additional Calculated Columns
  • Applying Filters to your Data Model
  • Creating Joins between Multiple Datasets
  • Using Functions to create Calculated Columns
  • Creating URL and Picture Columns
  • Creating a PowerPivot Gallery within SharePoint
  • Saving PowerPivot Data Models to the PowerPivot Gallery
  • Creating PowerView Dashboards from the PowerPivot Gallery Data Sources
  • Changing the View Mode for the PowerPivot Gallery
  • Setting PowerPivot Data Model Refresh Rates
  • Exporting PowerView Dashboards to PowerPoint

 
CLICK FOR PREMIUM & EBOOK SUBSCRIBER CONTENT

Using PowerBI to Analyze Dynamics AX Data
http://www.dynamicsaxcompanions.com/Configuration-Blueprints/Using-PowerBITo-Analyze-Dynamics-AX-Data


CLICK FOR EBOOK SUBSCRIBER CONTENT

Everyone has used Pivot Tables within Excel at one point in time to create simple reports against Dynamics AX, and some of you may have also used Power Pivot to create more elaborate dashboards and charts. Recently Microsoft extended out the query and reporting capabilities within Excel with the Power BI suite. In addition to extending the Power Pivot capabilities, they also added three more tools called Power Query, Power View & Power Map, and that means that you have a whole new set of reporting options.

In this blueprint we will show you how you can use all of the Power BI tools to analyze your Dynamics AX data.

Topics Include:

  • Mapping your data within Excel through PowerView
  • Using PowerQuery to Clean up Your Data
  • Using PowerMap to Build Even Better Map Visualizations
  • Using different Visualizations within PowerMap
  • Using PowerQuery to Merge Datasets
  • Flattening Maps
  • Adding Labels to the Maps
  • Using PowerQuery to Integrate External Data

 
CLICK FOR PREMIUM & EBOOK SUBSCRIBER CONTENT


Next year I have been offered the opportunity to host some of the AXUG Academy courses based off the Bare Bones Configuration Guides that I have been feverishly working on over the past year. Of course I jumped at the opportunity because using them as training resources has always been their end goal.

All of the dates and registration information is now available on the AXUG Academy site (http://www.axug.com/academy) but I thought that I would drop you all a note with the links to the full series to save you the time.

To help with this I am developing additional resources that you can use specifically designed for training and as a bonus I am making them available for download from the Dynamics AX Companions site for all of the Premium or eBook Subscribers just in case you want to use the Bare Bones Configuration Guides as the starting point for your training as well.

Right now though anyone who is registered on the Dynamics AX Companions site can download the training guides for the first module that we will be giving the training on – All that I ask in return I would love to get some feedback and any suggestions for improvement. If you want to download the files then just follow this link and click on the thumbnails for the training material:

http://www.dynamicsaxcompanions.com/Bare-Bones-Configuration-Guides/Configuring-An-Organization-Within-Dynamics-AX-2012

The first resource is Training Guide which you can use as your training presentation, and it takes you through each of the exercises described in the full companion book, except they have been distilled down to a single slide each so that the trainer doesn’t have to build all of the training slides themselves.

The second resource is the Student Guide which is a more lightweight version of the original companion book where all of the exercises are distilled down to a couple of pages. This is a great handout that you can give to your students to help them work through the exercises.

When you pair these up with the full book with all of the examples captured with all of the detailed screen shots then you should have everything that you need for your own training J


The Warehouse Management module within Dynamics AX is a great feature to configure if you want to do more with your inventory then just track it and count it. When you enable the Warehouse Management features you can start taking advantage of the in-built handheld interface, you can start tracking your workers a little more closely and assign work to them, and it also allows you to create rules on how all of the work within the warehouse is performed so that you can start optimizing and refining your warehouse operations.

Along with all of these more advanced warehouse management features, there is also a little bit more planning and setup that you need to do in order to get everything working, but that doesn’t mean that you have to over-complicate your system. If you know the basics of the Warehouse Management module, then you can start off by just configuring what you need initially, and then grow out from there as you start refining your processes.

To help you all learn the basics of this module, I have published book #18 in the Bare Bones Configuration Guide series that lays the foundation for Configuring Warehouse Management within Dynamics AX 2012, and it is now available for download. The book covers all of these areas related to Warehouse Management:

  • Configuring Warehouse Management Controls
  • Configuring Warehouses
  • Configuring Products
  • Configuring Work
  • Configuring The Warehouse Management Handheld
  • Configuring Workers
  • Receiving Though Warehouse Management
  • Picking & Shipping Through Warehouse Management

If you need a copy right now then you can download the eBook directly from the Dynamics AX Companions website. Just use the link below to go directly to the books home page, and then add the Configuring Warehouse Management within Dynamics AX subscription for your account. Then you will be able to download the PDF version of the book.

http://dynamicsaxcompanions.com/Bare-Bones-Configuration-Guides/Configuring-Warehouse-Management

For those of you with an eBook subscription, you can download the book right now without spending another dime.

If you want to check out the book on Amazon, then here you can find the paperback version by following this link: http://www.amazon.com/dp/1503280918/

The Kindle version is being compiled right now as well and should be available within a week or so.

The Project Accounting module within Dynamics AX is a great module for anyone that is trying to track time and costs against projects within the organization.  It is especially useful because it is fully integrated with all of the other foundation areas of the product like Payables, Receivables, Inventory, the General Ledger and much more so that as you track costs within them they are automatically applied to the project and as you create transactions within Project Accounting, then they are automatically updated within the foundation modules.

When you add in all of the additional functions that are available within the module like collaboration workspaces, worker assignment and scheduling, integration with MS Project and also time and expense entry through portals, then this is definitely a module that you need to get to know.

To help you all, I have published book #12 in the Bare Bones Configuration Guide series that lays the foundation for Configuring Project Management And Accounting Within Dynamics AX 2012, and it is now available for download.  The book covers all of these areas related to Project Management:

  • Configuring Project Management And Accounting Controls
  • Configuring Projects
  • Configuring Collaboration Workspaces
  • Using MS Project To Manage Project Details
  • Configuring Project Budgets
  • Configuring Timesheet Reporting For Projects
  • Configuring Expense Reporting For Projects


If you need a copy right now then you can download the eBook directly from the Dynamics AX Companions website.  Just use the link below to go directly to the books
home page, and then add the Configuring Project Management And Accounting Within Dynamics AX subscription for your account.  Then you will be able to download the PDF version of the book.

http://www.dynamicsaxcompanions.com/Bare-Bones-Configuration-Guides/Configuring-Project-Management


For those of you with an eBook subscription, you can download the book right now without spending another dime.


If you want to check out the book on Amazon, then here you can find the paperback version by following this link: http://www.amazon.com/dp/1502985268/

The Kindle version is being compiled right now as well and should be available within a week or so.